
How to Crochet Christmas Bell Ornament With Holy Sprig
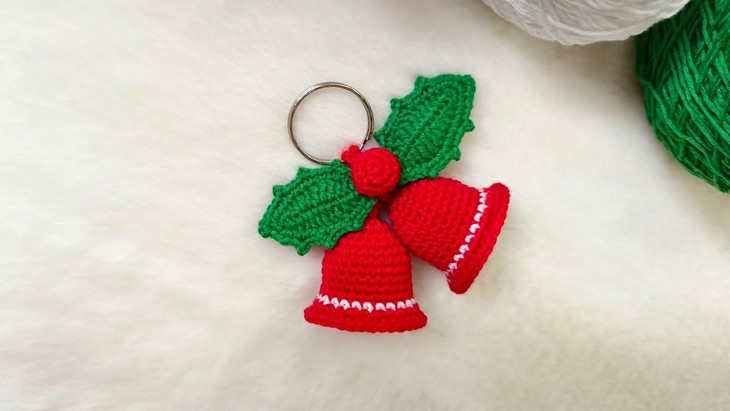
I am here with a new Christmas bell idea, this time with one of two popular Christmas leaves. Today’s tutorial will teach you how to crochet a pair of decorative Christmas bells with a Holy Sprig or poinsettia leaf ornament designed by Baochi so beautifully. The core design of this Christmas bell set is the same as the one I previously shared, which is: two large crochet bells with a common string and a decoration in the middle of the join.
A special feature is using a thin wire to make the leaf easily poseable for a more realistic look. You will just love the red and green color combo, unlike the usual yellow ones. So, crochet one for decorating your Christmas tree!
Crochet Holy Sprig Christmas Bell Ornament

The tutor has cleverly used skills like picot stitch to make the leaf of this Christmas bell life-like. There is also an option to attach a keyring with these Christmas bells, as the size falls between medium and small. There is more to like in this design, like the round 3D center part and the white stripes.
So, if you have made up your mind to crochet this new Christmas bell variation for beginners, continue reading this post till the end. There you will find the complete tutorial.

Know the designer: The designer of this Christmas tree bell ornament for Christmas is @baochihandmade – she has designed just so many home decor crochet items with step-by-step guides for beginners. She has also published multiple Christmas projects like the Christmas Poinsettia plant,
which seems to be the successor of the Holy Sprig Bell ornament, Christmas tree ornaments, and more. Similarly, you will find many flower projects and amigurumi ideas.
Note: In respect of the creator’s pattern rights, there will be no provision of the written pattern. You can watch the tutorial with on-screen instructions.
Materials for Christmas Bell Ornament
Gather the following suggested tools and materials for crocheting this Christmas bell with Holy Sprig keychain, mentioned in the tutorial:
- Yarn – in three colors: green, red, and white. You can use DK or lace yarn. Milk Cotton will work well.
- Crochet hook – 1.1mm is used, which translates to No.10.
- Wire – helps make the holly leaves poseable
- Stuffing – used to fill and shape the bell and the holly berry

Other Notions:
- Keychain hardware – a ring or clip to turn the finished piece into a keychain
- Yarn needle – for weaving in ends and assembling the parts
- Scissors
- Pliers – for bending or cutting the wire
- Glue – used to attach the holly components to the bell
Abbreviations in Christmas Ornament
Here are the quick one-line guides for crocheting each stitch and technique in the Christmas Christmas bell ornament and the abbreviations:
Single Crochet (SC): Insert hook into stitch, yarn over, pull up a loop (two loops on hook), yarn over, pull through both loops.
Increase (INC): Work two single crochet stitches into the same stitch.
Decrease (DEC): Insert hook into the next stitch, yarn over, pull up a loop; insert hook into the next stitch, yarn over, pull up a loop (three loops on hook), yarn over, pull through all three loops.
Slip Stitch (SL ST): Insert hook into stitch, yarn over, pull through both the stitch and the loop on the hook.

Other Techniques:
Half Double Crochet (HDC): Yarn over, insert hook into stitch, yarn over, pull up a loop (three loops on hook), yarn over, pull through all three loops.
Double Crochet (DC): Yarn over, insert hook into stitch, yarn over, pull up a loop (three loops on hook), yarn over, pull through the first two loops, yarn over, pull through the remaining two loops.
Treble Crochet (TR): Yarn over twice, insert hook into stitch, yarn over and pull up a loop, then yarn over and pull through two loops three times.
Christmas Bell Ornament Tutorial