
How to Crochet Christmas Tree Keychain & Amigurumi
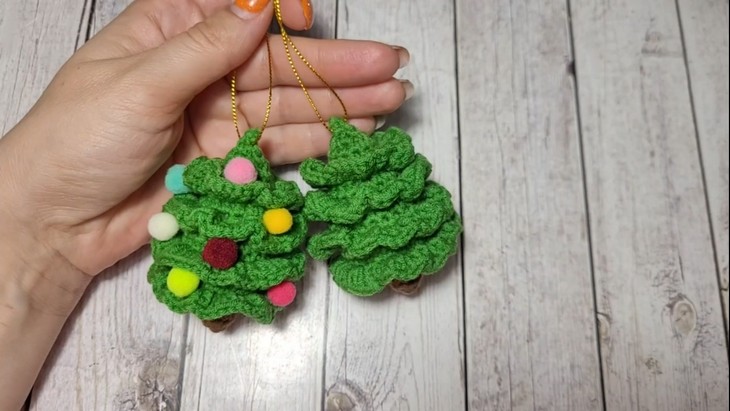
Today’s tutorial will explain to you how to crochet a Christmas tree keychain with cute, tiered edging around an amigurumi cone and colorful pom-poms. Designed by Love Knitting, this Christmas tree is about seven centimeters tall and can be finished within 30 minutes.
Its special feature is the four-layered “skirts” that are worked using surface-stitching. Finished with a golden hanging string, this Christmas tree will be an ornament worth crocheting. So, crochet it for sure!
Crochet Christmas Tree Keychain for Decor

Crocheting this Christmas tree needs absolutely zero sewing and is easy, even for beginners. You will especially love to learn the frilly edging around, and also gradually decrease the number of rows, or keep the design.
So, if you have made up your mind to crochet this new Christmas tree variation, continue reading this post till the end. There you will find the complete tutorial. It will certainly be the best gift ever!
About the Designer: The designer of this tiered Christmas tree is @love-knitting –with our 1k tutorials, she is an all-arounder in crocheting whose super bulky yarn and Christmas series is my favorite.
She has also designed so many ornaments for Christmas, which include other Christmas tree designs, also, that are all quick and easy to crochet, even for beginners.
Note: In respect of the creator’s rights, there will be no provision of the written pattern. You will watch the tutorial at the end of this post.
Finished Size: The small, approximately 7 cm (2.75 inches) Christmas tree ornament

Materials for Christmas Tree Keychain
Gather the following suggested supplies for crocheting this Christmas tree ornament in the same size:
- Green Yarn: Alize Cotton Gold (or similar Sport/Fine weight yarn, approx. 100g / 330 m).
- Brown Yarn: YarnArt Jeans (or similar yarn for the trunk/base).
- Crochet Hook: 2 mm

Other Notions:
- Polyester Fiberfill: Stuffing for the tree.
- Yarn Needle: For weaving in ends and closing the top.
- Scissors.
- Stitch Marker (highly recommended for working in round).
- Optional Decorations: Small pom-poms, beads, or sequins for the final touch.
About Christmas Tree Tutorial
Quick Summary & Skill Level: Beginner – Intermediate. You will first crochet the trunk in brown yarn with Single Crochet (SC). Then switch to green yarn for the main cone body of the tree. The body is worked in rounds using SC, with increases to widen the shape. To crochet the foundation for the ruffles, rounds are crocheted in the Back Loop Only (BLO).
As you reach the top, decreases are used to taper the cone. The piece is then stuffed, and the opening is sewn shut. The final step is to add the four ruffled tiers by working clusters of Double Crochet into the front loops left on the main body.
Tutorial-Timing: 11 Minutes Only

Abbreviations for Christmas Tree
The following are the quick guides for the crochet stitches and abbreviations that the tutor will use for crocheting this Christmas tree amigurumi:
Single Crochet (SC): Insert hook into the stitch, yarn over, pull up a loop, yarn over again, and pull through both loops on the hook.
Double Crochet (DC): Yarn over, insert hook into the stitch, yarn over, pull up a loop, yarn over, pull through two loops, yarn over again, and pull through the remaining two loops.
Increase (Inc): Work two single crochet stitches into the same stitch to widen the piece.
Decrease (Dec): Insert hook into the next stitch, yarn over, pull up a loop, insert into the following stitch, yarn over, pull up another loop, yarn over, and pull through all loops on the hook.
Advanced Techniques:
Back Loop Only (BLO): Insert the hook under the back loop only to create a textured ridge.
Front Loop Only (FLO): Insert the hook under the front loop only to prepare for attaching ruffle tiers.