
Free Crochet Christmas Dolls From SpongeBob Square Pants Pattern
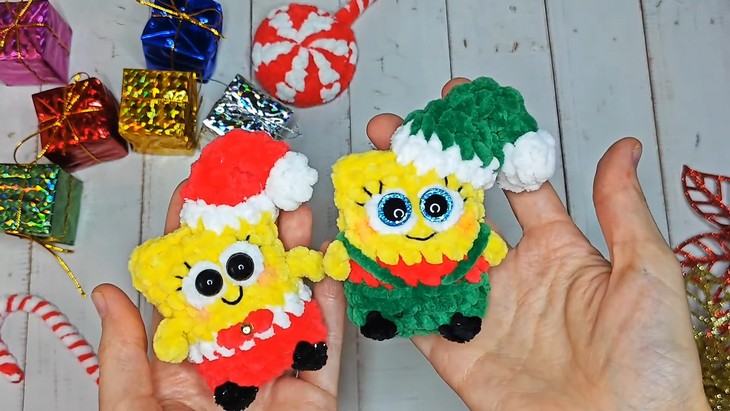
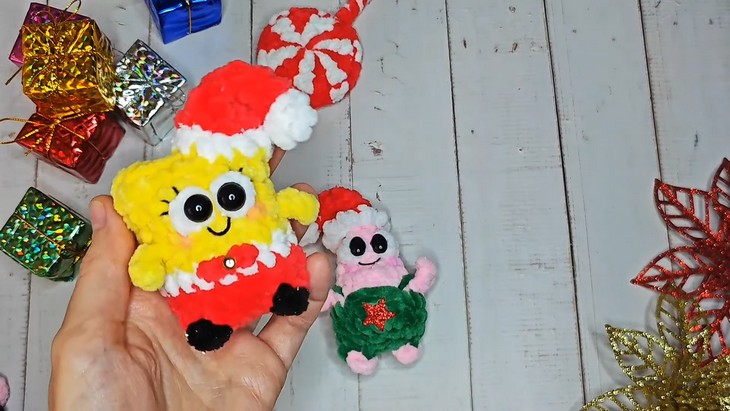
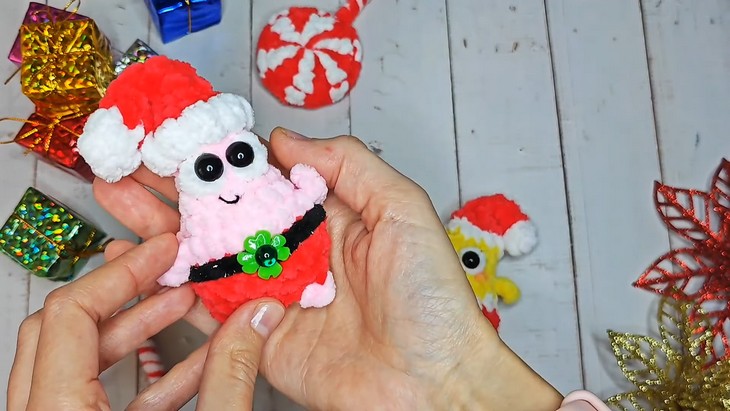
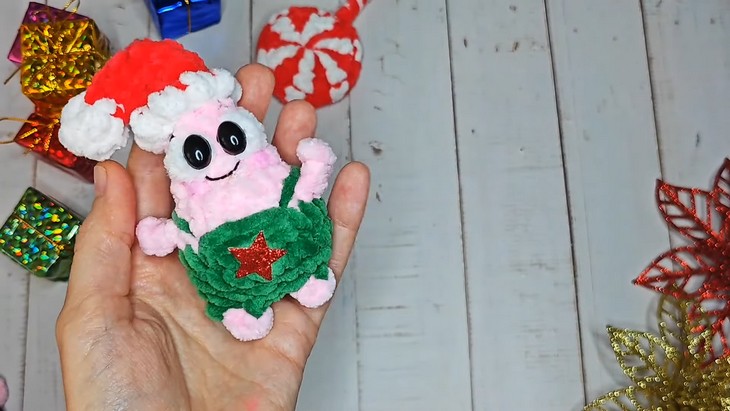
SpongeBob characters in Christmas costume plushies, just a wow gift idea! So, learn how to crochet these Christmas dolls from SpongeBob Square Pants with a written pattern that is completely no-sew, colorful, and so funny and cute with googly eyes. Following this pattern, you can crochet a Patrick Star in a slouchy Santa hat and an elf SpongeBob as a bonus. Both are simply irresistible.
With the use of super bulky yarn, these crochet Christmas dolls are so quick, squishy, and soft. For the eyes, you will find two options: either crochet with black or glittery googly eyes. So, if you have made up your mind to crochet these dolls, continue reading!
Crochet Christmas Dolls From SpongeBob
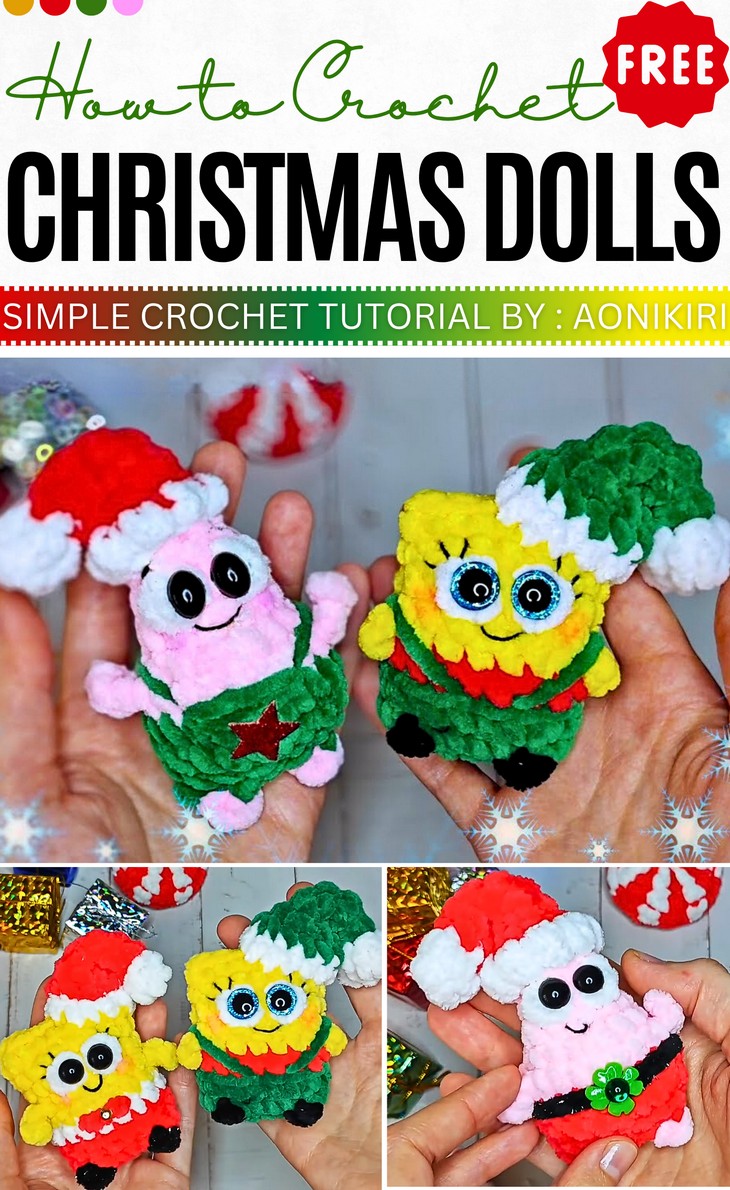
You can further customize these SpongeBob characters with snowflakes, stars and more. Both of these can be finished within an hour or so.
About the Designer: The designer of these Christmas dolls for kids is @aonikiri – she has expertise in “no-sew” crochet keychains and small plushies that are always so cute.
Like these Christmas dolls from SpongeBob, she has so many plushies that need absolutely no sewing, even though it seems like the case.

In her SpongeBob series, she also has Squidward and Plankton, similarly, many characters. For Christmas, she will in the future add many plushies, so follow her for sure!
Note: For this crochet Christmas plushie idea in particular, I will provide you with the complete pattern using English terms.
Material List for Christmas Dolls
To follow through with the pattern, gather the following suggested supplies for crocheting these Christmas dolls from Square Pants:
Yarn Colors:
White – hat trim and pom-pom
Pink/Rose – Patrick’s body
Green/Mint – costume or pants
Yellow – SpongeBob’s body
Safety Eyes: 10 mm (Patrick), 12 mm blue glitter (SpongeBob)
Stuffing: Fiberfill for shaping
Glue: To secure eyes
Needle: For embroidery and minor attachments
Stitch Marker: To mark the start of each round
SpongeBob Christmas Dolls: Abbreviations
Here is the complete list of all the abbreviations I will be using throughout this Christmas dolls pattern and quick guides for special stitches:
- MR: Magic Ring
- ch: Chain
- sl st: Slip Stitch
- sc: Single Crochet
- hdc: Half Double Crochet
- inc: Increase (2 sc in one st)
- dec: Decrease (sc2tog)
Special Stitches:
sc3tog (Single Crochet 3 Together): Insert hook into next 3 stitches one by one, pull up a loop each time, yarn over, and pull through all 4 loops on the hook.
BLO (Back Loop Only): Work your stitch into the back loop of the stitch only.
FLO (Front Loop Only): Work your stitch into the front loop of the stitch only.
Bobble (3 Double Crochet Cluster): Yarn over, insert hook, pull up a loop, yarn over, pull through 2 loops (3 times in same stitch), yarn over, pull through all loops on hook.
Crochet Pattern
This pattern is for a Christmas Patrick Star amigurumi and SpongeBob Christmas dolls, starting with the hat and head and working down to the body and legs. While for the SpongeBob, the opposite:
Note: The SpongeBob pattern in the tutorial is a variation of the main body for Patrik Star, where the costume is worked from R9 as the Patrik Pattern.
Patrik Star:
Hat & Head (Starting with White Yarn)
R1: With White yarn, in a MR, ch 1, work 6 hdc. Join with a sl st. (6 hdc)
R2: ch 1. Work (hdc, hdc dec) repeating 2 times. Change to Green yarn in the last stitch. (4 hdc)
R3: With Green yarn, work 4 sc. (4 sc)
R4: 3 sc, inc. (5 sc)
R5: 5 sc. (5 sc)
R6: 4 sc, inc. (6 sc)
R7: 6 sc. (6 sc)
R8: 2 inc, 4 sc. (8 sc)
R9: 2 sc, inc, 5 sc. Change to Pink yarn in the last stitch, but do not cut the White yarn—leave it attached on the outside for the trim. (9 sc)
R10: With Pink yarn, working in the BLO only: 9 sc. (9 sc)
Hat Trim (White Yarn)
- Join White yarn into the first unworked FLO from R9.
- ch 1, and work 9 sc into the unworked front loops around.
- sl st to join, or work an extra sc into the first st.
- Fasten off and weave in the White yarn.
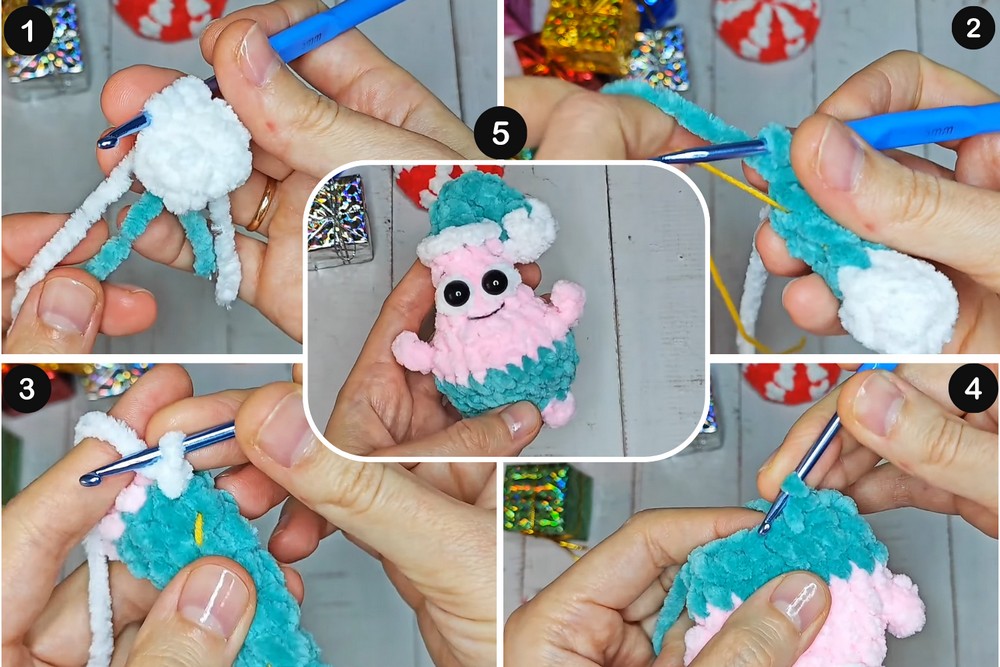
Body (Pink Yarn)
Continue with Pink yarn, working through both loops again.
R11: 9 sc. (9 sc)
R12: inc, 2 sc. Work Bobble (3 dc cluster) in the next st (change to White yarn, work Bobble, change back to Pink). sc. Work Bobble in the next st (change to White yarn, work Bobble, change back to Pink). 2 sc, inc. (11 sts)
R13: 3 sc, inc, then repeat (sc, inc) 2 times, and finish with 3 sc. (14 sc)
R14: inc, 3 sc.
* Arm 1: ch 3. Starting in the 2nd chain from the hook, work sc, hdc. sl st back into the body stitch where you started the chain.
* Work 3 sc, inc, 3 sc.
* Arm 2: ch 3. Starting in the 2nd chain from the hook, work sc, hdc. sl st back into the body stitch.
* Finish with 2 sc, inc. (17 sc)
R15: 5 sc. Work 2 sc over the base of Arm 1. 8 sc. Work 2 sc over the base of Arm 2. 4 sc to end. Work an additional 5 sc for a stitch shift. In the last sc, change to Green yarn for the pants, but do not cut the Pink yarn. (17 sc)
Pants & Legs
Continue with Green yarn. Do not cut the Pink yarn as it is needed for the legs.
R16: 5 sc, inc, 15 sc. (22 sc)
R17: sc, dec, 2 sc, sc3tog, 2 sc, dec, 4 sc, dec, 4 sc. (17 sc)
R18: 3 sc, dec, 2 sc, dec, 4 sc, dec, 2 sc. (14 sc)
Finishing the Body
- Stuff the body firmly.
- Fold the body flat so the last row’s stitches align.
- Using the Pink yarn (the one left hanging), sl st the opening closed across both layers.
Legs
- Leg 1: In the center of the seam just created, work: ch 2. In the 2nd chain from hook, work hdc (do not finish, 2 loops on hook). Finish the stitch with Green yarn.
- Work 3 sl st with Green yarn along the closed seam, tucking the Pink yarn inside.
- Work 1 sl st with Pink yarn, tucking the Green yarn inside.
- Leg 2: Work: ch 2. In the 2nd chain from hook, work hdc (do not finish). Finish the stitch with Green yarn.
- Work 1 sl st with Green yarn to secure.
- Cut and fasten off both the Green and Pink yarns.
Final Assembly and Details
- Eyes: Attach 10mm safety eyes or glue googly eyes slightly below the white Bobble stitches.
- Mouth: Use black or dark pink yarn to embroider a simple mouth.
- Hat: Use the yarn tail to sew the hat to the side of the head, or leave it positioned loosely.
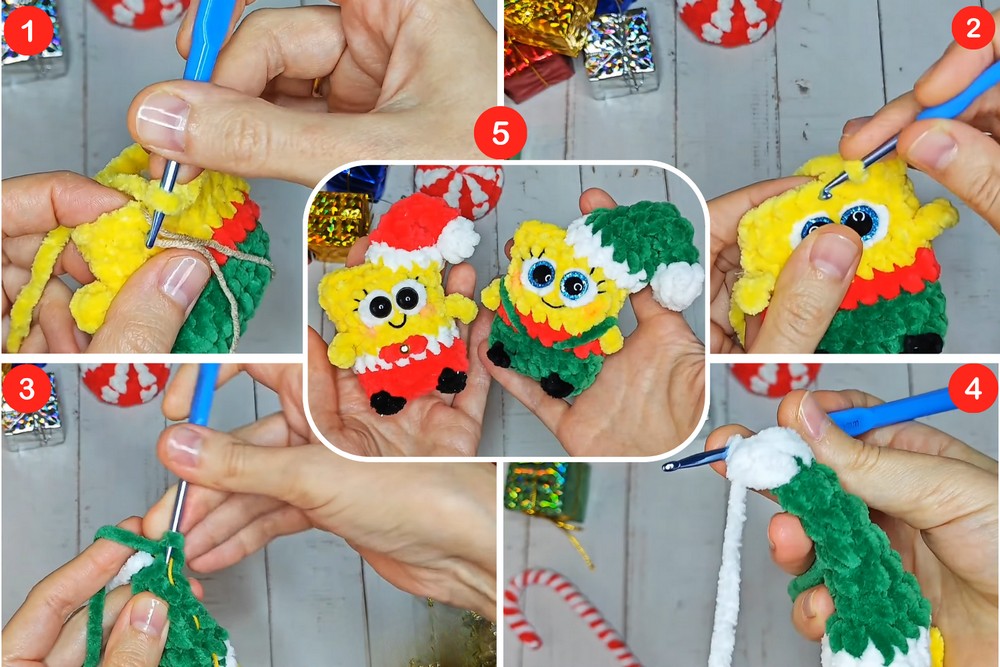
SpongeBob Crochet Pattern (Rounds 1-8)
This is the start of the no-sew SpongeBob pattern. It begins with the pants and legs, then moves to the shirt and body.
Pants and Legs (Starting with Brown Yarn)
R1 (Complex Leg/Base Row):
- Start with Brown yarn, chain 5.
- In the 2nd ch from hook: sc, and in the same ch work hdc (do not complete hdc).
- Change to Black yarn. Work Leg 1: ch 2, in the 2nd ch from hook work sc (do not complete sc). Change to Brown yarn.
- In the same ch as the previous stitches (the 2nd ch from hook), work sc (Brown).
- Next 2 chs: sc, sc.
- Last ch: sc (do not complete sc).
- Change to Black yarn. Work Leg 2: ch 2, in the 2nd ch from hook work sc (do not complete sc). Change to Brown yarn.
- In the same ch as the previous stitches: hdc, sc, hdc, sc. (This places 5 sts in the last ch).
- Next 2 sts on the other side of the starting chain: sc, sc.
- Next st (the first st): sc, hdc. (The row ends here, Black yarn can be cut).
R2 (Pants):
- Work (sc, inc) over the first two stitches.
- 4 sc.
- inc. (Skip the ch and sc of the leg).
- sc, inc.
- 4 sc.
- inc. (18 sc)
R3 (Pants):
- 18 sc (no change). (18 sc)
- Do not complete the last stitch, change to White yarn.
R4 (Shirt):
- Working in BLO only: 18 sc. (18 sc)
- Do not complete the last stitch, change to Yellow yarn. (White yarn can be cut).
Body and Arms (Yellow Yarn)
R5 (Body/Arms):
- 2 sc.
- Arm 1: ch 3, starting in 2nd ch from hook: sl st, sl st. Then sl st into the side of the stitch on the body where the chain began.
- 7 sc.
- Arm 2: ch 3, starting in 2nd ch from hook: sl st, sl st. Then sl st into the side of the stitch on the body where the chain began.
- 9 sc to end. (18 sc)
R6 (Body):
- 18 sc (no change). (18 sc)
R7 (Body/Eyes):
- 4 sc.
- Eye 1: Change to White yarn. Work a Bobble in the next st. Change to Yellow yarn.
- sc (Yellow).
- Eye 2: Change to White yarn. Work a Bobble in the next st. Change to Yellow yarn.
- 11 sc to end. (18 sts)
R8 (Body):
- 18 sc (no change). (18 sc)
R9 (Costume Start): With Yellow yarn, work in BLO only: 6 sc. Then, work through both loops: 9 sc. Then, work in BLO only: 3 sc. (18 sc total)
R10 (Closing): Stuff the body firmly. Work 2 sl st to shift the stitching to the corner. Fold the body flat so the sides align. sl st across the 9 stitches to close the top opening (as shown in the video).
Cut and fasten off Yellow yarn. Weave in the tail.
Hat (Worked onto the Front Loops)
The hat is worked into the FLO loops left unworked in R9, and then in rounds. Use White for the trim, and Green/Red for the main hat (Green is used for the Elf version in the video).
R1 (Trim): Join White yarn to the first unworked FLO from R9.
- ch 1. Work 5 hdc into the next 5 FLOs.
- Turn the piece and work a hdc into the side of the last stitch of the main body (near the seam).
- Work a hdc into the closed seam.
- Work a hdc into the other side of the seam.
- Work a hdc into the side of the next stitch of the main body.
- Work 3 hdc into the next 3 FLOs.
- Work a sc into the last FLO, then work a sl st underneath the White ch 1 of the previous stitch.
- Change to Green yarn in the last sl st. (Approx. 13 sts)
R2 (Hat Body): With Green yarn, work a sl st to secure.
- 4 sc, 2 dec, 5 sc. (11 sc)
R3: 2 sc, dec, sc, dec, 2 sc, dec. (8 sc)
R4: dec, 6 sc. (7 sc)
R5: 7 sc around. (7 sc)
R6: dec, 5 sc. (6 sc)
R7: dec, 4 sc. Change to White yarn in the last stitch. (5 sc)
R8 (Pom-Pom): With White yarn, leave Green tail for sewing.
- Work ch 2. In the same st, work 2 dc (do not finish, 3 loops on hook).
- In the next st, work 2 dc (do not finish, 5 loops on hook).
- In the next st, work 2 dc (do not finish, 7 loops on hook).
- Yarn over and pull through all 7 loops to create a bobble.
- ch 1 to secure.
- Repeat the Bobble cluster in the remaining 2 stitches.
- Fasten off the White yarn. Pull the tail through to secure the pom-pom.
Final Assembly
- Stuff the hat lightly (optional).
- Use the Green yarn tail to sew the hat to the side of the head or into the desired position.
- Embroider a smile, belt straps, or other details as desired.