
How to Crochet Christmas Tree Ornament with Stars
Recently, I have shared Christmas tree tutorials designed for decorating desktops, even holding balms, and bringing smiles to kids (the amigurumi). The only type left was the ornamental Christmas tree. So, in this post, I have brought the best tutorial for crocheting a quick and easy tiered Christmas tree ornament that is finished with hanging stars, ribbon, and even red crochet beads all around.
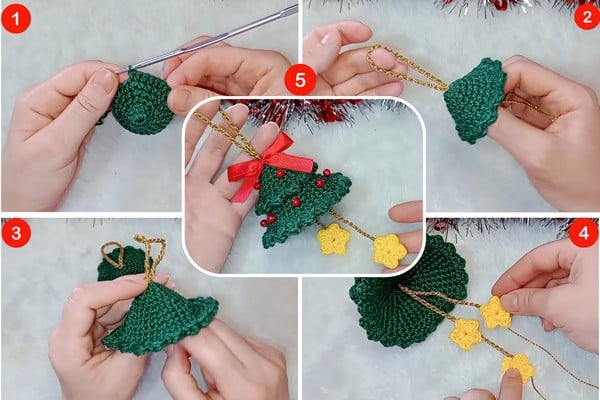
Quick, easy, and lovely textured, this Christmas tree will be a gift that will be simply adored. You will especially love the picot textured edging and the golden hanging string for using it as a bag charm and a Christmas tree.
The tutor provides a useful suggestion in the tutorial. So, if you are ready to crochet this Christmas amigurumi, continue reading this post till the end. There you will find the complete tutorial. It will certainly be the best gift ever!

Who is the designer? The incredible designer behind this hanging Christmas tree is @ARTDATHA. She has some of the cutest amigurumi designs in quite a promising amount, like the Minecraft Bee, Minion, and Bugs Bunny, to name a few.
From popular cartoon amigurumi (such as Snoopy and Tweety Bird) to small animals like lions and rabbits. You will love her Christmas series with a Christmas tree, Santa, an elf, and more.
Note: In respect of the creator’s rights, there will be no provision of the written pattern. You can watch the tutorial with on-screen written instructions at the end of this post.

Material Suggestions
To follow through with the tutorial, gather the following suggested tools and materials for crocheting this mini Christmas tree:
- Yarn: In Green, Red, Yellow, and Gold colors.
- Crochet Hook/Agulha: 2.5 mm is used for the main yarn, and 2 mm is used for the thinner gold yarn.
Other materials:
- (Beads/Small Ornaments).
- (Ready-made bow/Ribbon).
- Cola (Glue).
- (Scissors).
- (Stitch Marker).

Crochet Christmas Tree Tutorial
Quick Summary & Skill Level: To crochet this multi-layered hanging Christmas tree, you will need a mix of basic and intermediate techniques. You will be using the same tiered Christmas tree pattern with Single Crochet in the rounds. The spherical shaping needs Increases and Decreases.
The unique, textured edge for both pieces is created using a shell-like pattern of Half Double Crochet and Double Crochet stitches, alternating with Slip Stitches.
Additional elements include Chain Stitches to create the gold hanging loops and a flat, star-shaped embellishment made by combining single crochet, double crochet, and chain stitches within the Magic Ring.

Tutorial Timing: About 10 minutes only (perfect for crocheting a tiny star and beautiful wavy edging)
Tips before getting started: Personalization for this ornament focuses on color choice and decorative embellishments. The hanging loops, created with gold chains, can be made in different lengths (30 chains for the short one, 55 chains for the long one).
Most notably, the final decoration is highly customizable: the project is finished by gluing on a ready-made ribbon/bow and gluing small beads or ornamental stones around the edge.
Stitches Needed
The following are the crochet techniques that the tutor will use for crocheting all parts of this Christmas amigurumi:
- Slip Stitch (SL ST): Insert the hook into the stitch, yarn over, and pull through both loops on the hook.
- Half Double Crochet (HDC): Yarn over, insert the hook into the stitch, yarn over, pull through, yarn over again, and pull through all three loops.
- Double Crochet (DC): Yarn over, insert the hook into the stitch, yarn over, pull through, yarn over again, pull through two loops, yarn over once more, and pull through the remaining two loops.
- Chain Stitch (CH): Yarn over and pull through the loop on the hook.
Thanks for expressing it to me. You can crochet the Santa face as in this drawstring bag pattern: https://mycraftybasket.com/how-to-crochet-3d-santa-drawstring-pouch-for-christmas/