
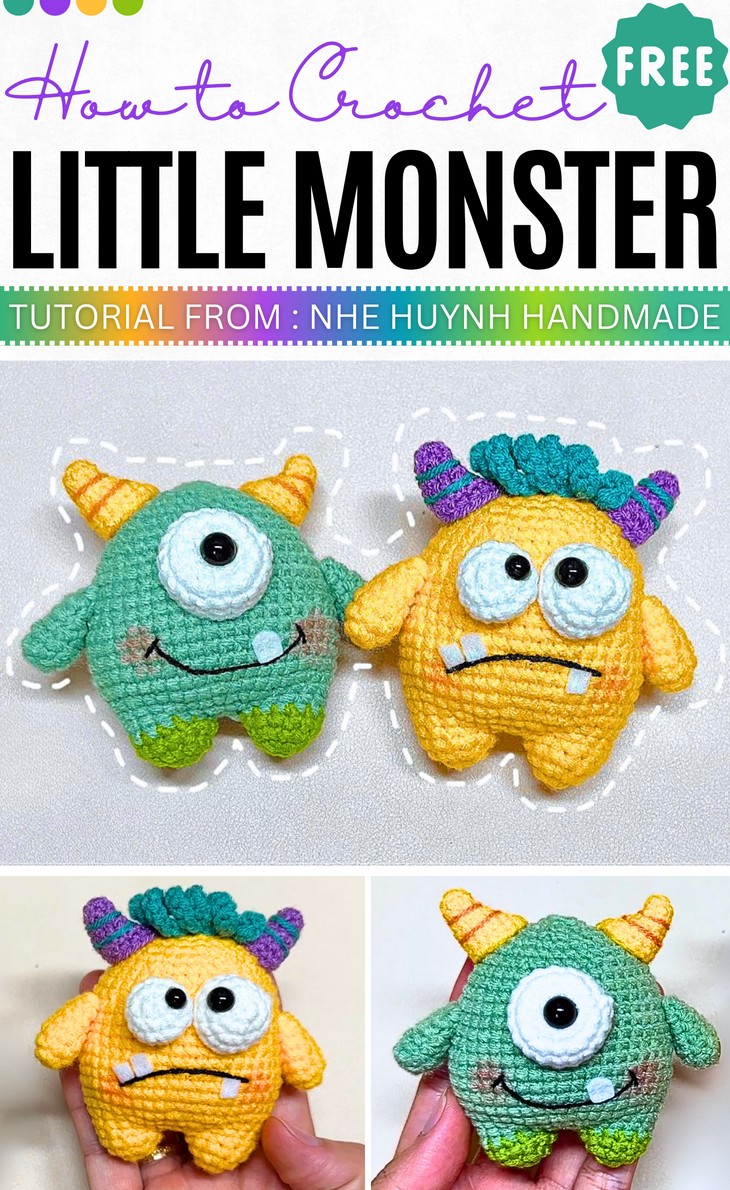
How to Crochet Colorful Baby Monster Amigurumi (2-in-1 Tutorial)
For a crochet monster, there is no restriction for unseen color combos and funny details, just one’s imagination is woven. So, with a two-in-one tutorial, learn how to crochet these two colorful baby monster amigurumi to bring humor and laughter to your Halloween parties. The pattern for the main body for both of these kawaii monsters will be the same. They differ in eye and felt tooth number, the placement of teeth, the black part of the eyes for a funny look, and the curly hair. The pattern is also low-sew, so you can crochet one quickly. It will become your favorite thanks to its wholesome colors.
So, if you are ready for crocheting both the Halloween monsters, continue reading this post till the end. There you will find the complete tutorial!
About the Designer: The designer behind this monster doll project is @nhehuynh.handmade – From keychains of animals like sheep, panda, and fox to characters like Labubu and Totoro, she crochets all things amigurumi. Her amigurumi are mostly small, but so accurate and detailed. She also has tutorials for mini bags with content primarily in Vietnamese but with key terms translated into English. Some of my favorite of her unique designs are combos like puppy bee and fuzz yarn amigurumi. So, check her library for sure!
Note: In respect of the creator’s pattern rights, there will be no provision of the written pattern. You can watch the tutorial with on-screen instructions at the end of this post.

Crochet Two Little Monsters Tutorial
Skill Level: Beginners – Intermediate. You will start with crocheting two half-spheres separately and then connect them using the slip stitch, using color changes. You will continue working around in a specific pattern from increasing up to closing three decreases, getting the monster doll body. Then crochet the arm and sew it. Then, working in the round, crochet a cone-like witch hat that uses an increasing pattern and again sew. Eyes are also spherical and half-spherical, and need the glue for the black part. As for stitches and techniques, magic ring, single crochet, increase, decrease, slip stitch, and chain.
Tutorial Timing: Approximately 65 Minutes. (perfect for learning the popular no-sew start for crochet legs that is widely used in the crochet dolls. You will also learn how to produce the twist in the flat fabric for curly hair that is used for many amigurumi and to crochet the wind spinner. It will also improve the sewing and color changes. So, worth watching!)
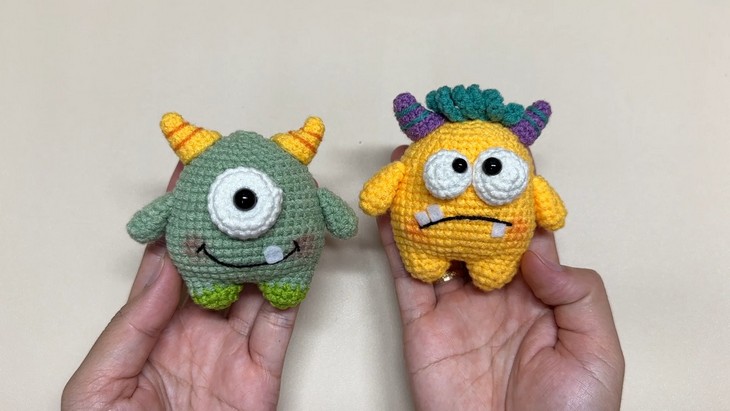
Personalization Tips: You can choose from two eyes or a single eye in the center. The two eyes can be of different sizes. The colors are yellow, green, purple, or your own combo. Choose the felt tooth positions and change the number.
Pattern Type: A detailed on-screen written pattern is available if you find written instructions easy to follow along with.
Materials Needed
You will have to gather the following suggested tools and materials for crocheting this Halloween monster amigurumi for Halloween, mentioned in the tutorial:
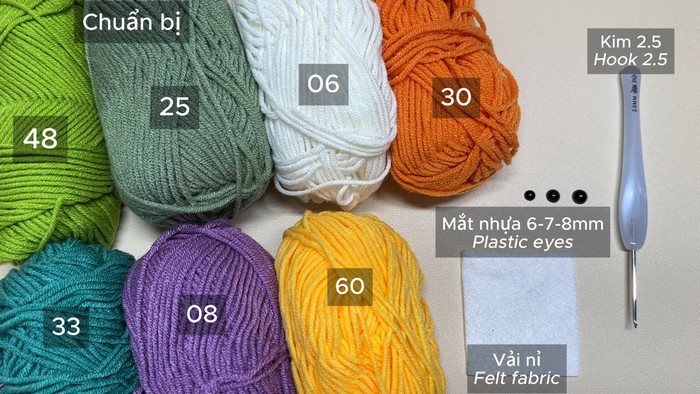
- You will need 5.5-Ply Milk Cotton Yarn in the following color codes: 48, 25, 06, 30, 60, 33, 08
- Crochet Hook: Size 2.5mm (Kim móc 2.5mm / Kìm 2.5)
- Scissors
- Tapestry Needle
- Safety Parts & Stuffing
Size between 6.0mm and 8.0mm (6-7-8mm) - Fiberfill Stuffing
- Felt Fabric – for details like paw pads, beaks, etc.
- Hot Glue Gun & Glue Sticks
- Craft Glue (e.g., Clue brand)
(The pattern will specify which colors to use for which parts)
Crochet Techniques
Here’s a one-line guide for crocheting each stitch and technique in the Halloween pattern:
- Single Crochet (sc): Insert the hook into the stitch, yarn over, pull through, yarn over again, and pull through both loops on the hook.
- Increase (inc): Work two single crochet stitches into the same stitch to increase the stitch count.
- Decrease (dec): Insert the hook into the next stitch, yarn over, pull through, insert into the next stitch, yarn over again, pull through, yarn over once more, and pull through all loops on the hook.
- Slip Stitch (sl st): Insert the hook into the stitch, yarn over, and pull through both the stitch and the loop on your hook.
- Chain (ch): Yarn over, and pull through the loop on your hook to form a chain for foundation stitches or spacing.