
How to Crochet GHOST Wearing Skull Hat for Halloween
There are very few interactive amigurumi for Halloween, and here is a quick but cutest of them! Learn how to crochet these two-in-one reversible mini ghosts wearing a skull mask that hides funny kawaii faces perfect for kids. You can choose from two color combos and embroidery faces! To show the face, all you will need to turn the skull mask behind the head and the reverse of it. You can crochet this reversible ghost in just 20 minutes thanks to the no-sew pattern. The skull embroidery is also so detailed, with the large eyes just by the sewing.
So, if you have made up your mind to crochet this fastest ghost pattern, continue reading this post till the end. There you will find the complete tutorial.

About the Designer: The designer behind this small but detailed skull hat ghost project is @KiwyCrochet – she always creates cute, miniature amigurumi, often inspired by popular characters and animals. Notable tutorials include how to crochet a Chihuahua dog, a cowboy koala, a mini Doraemon keychain, and a Christmas capybara. Her capybara keychain series is also admirable. She has a small but unique playlist of Christmas, fall, and Halloween projects that are sure to check!
Note: In respect of the creator’s pattern rights, there will be no provision of the written pattern. You can watch the tutorial with on-screen and CC instructions at the end of this post.

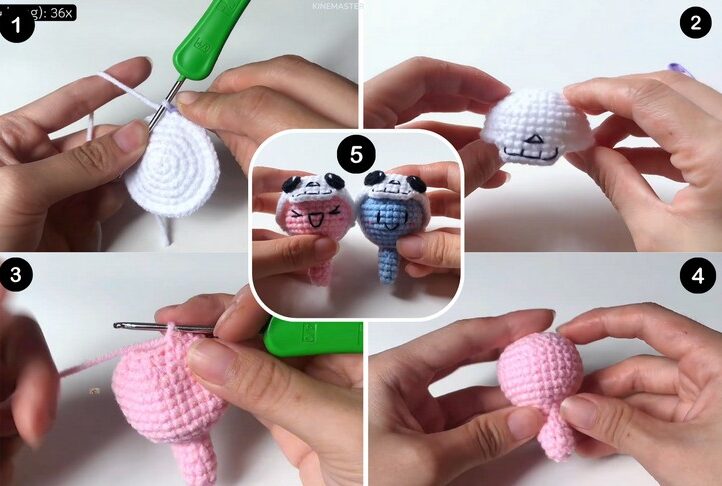
Crochet GHOST Wearing Skull Hat Tutorial
Skill Level: Intermediate. The crochet skull hat and ghost face embroidery using thin thread is the foremost technique to truly remake this design. Core stitches include single crochet (SC), increase (2 SC in one stitch), and decrease (SC2TOG). The project starts with a magic ring for both the ghost and hat, worked in continuous rounds for the ghost and joined rounds for the hat. Techniques like stuffing, slip stitches for joining, and working with a sewing needle are a must.
Tutorial Timing: Approximately 36 minutes only. (Perfect your embroidery and no-sew techniques through this crochet tutorial. You will also learn how different kawaii or chibi faces are made, plus how to produce curls in amigurumi.)

Personalization Tips: Swap yarn colors with Halloween standards, shades of orange and purple. Customize the ghost’s face with either a smiling or an excited face, or use glow-in-the-dark thread. You can adjust the ghost’s size by using thicker or thinner yarn. Plush ghost will work best as a support toy due to the holdable shape it has!
Pattern Type: A detailed on-screen written pattern is available if you find written instructions easy to follow along with.
Materials Needed
You will have to gather the following suggested tools and materials for crocheting this mini ghost for Halloween mentioned in the description:
- 2.5mm crochet hook
- 4ply yarn (pink, white, black)
- Stitch markers
- Polyester stuffing
- Sewing needle and scissors

How is it done?
To crochet the ghost, start with a magic ring and work continuous rounds using single crochet, increases, and decreases to shape the body. Add stuffing as you decrease toward the end, and fasten off. For the hat, use a magic ring and join rounds, alternating single crochets and increases to build the structure. Finish off with skull embroidery, crocheted eyes, and a tie strap.
Finally, embroider the ghost’s face using thread, attach the hat, and hide yarn ends. This quick yet detailed project is perfect for adding a spookiness!
Techniques Used
Here’s a one-line guide for crocheting each stitch and technique in the Halloween ghost pattern:
- Magic Ring: Create an adjustable loop, crochet stitches into it, and pull the tail to close the circle.
- Single Crochet (SC): Insert hook into the stitch, yarn over, pull through, yarn over again, and pull through both loops.
- Increase: Work two single crochet stitches into the same stitch to expand the piece.
- Decrease (SC2TOG): Insert hook into the next stitch, yarn over, pull through, repeat in the next stitch, then yarn over and pull through all loops.
- Color Change: Complete the final yarn-over of the last stitch in the current color with the new yarn color.
- Chain: Yarn over, pull through the loop on the hook.