
How to Crochet Kawaii Animal Plushies for Kids
Lately, I have been sharing some oh-so-cute animal plushies that kids simply won’t resist receiving. In this post, too, you will learn how to crochet 14 kawaii animal plushies that are low-sew, quick, and so cute. Today, I will share only baby animal plushies, whether the bunny or a crochet snake, and even a spider one.
These kawaii animal plushies are very near to my heart and can be rightly said to be some of the masterpieces of love-knitting. So, if you are feeling curious about these animal plushies, let’s get started!
Cutest Animal Plushies for Kids
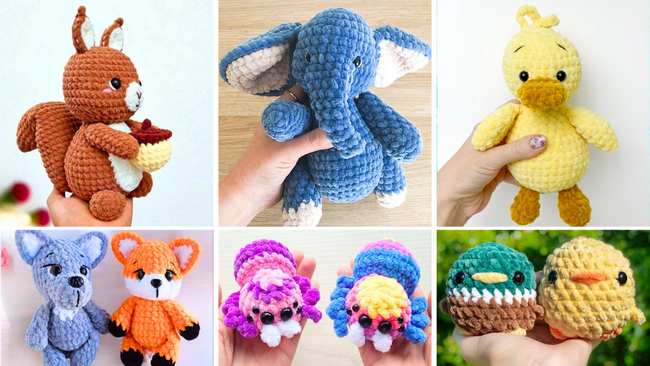
You all must know I will be sharing tutorials on animal amigurumi mostly. So, make sure to follow me on social media platforms. Now, enjoy learning with these new plushie tutorials:
Note: In respect of the creator’s pattern rights, there will be no provision of the written patterns.
01 of 14 Crochet Baby Bunny Animal Plushie

This is the cutest of the baby bunny plushies I have ever shared, finishes without any sewing, and can sit or be hugged by a little one. I especially love the embroidery around the eyes, including the eyelashes, plus the white part of the eyeball.
Before gifting to a little girl, just attach a small pink bow, and the kid won’t resist hugging this plushie all day long. The finished plushie will be about 16 cm tall.
Materials Needed
The materials used in the tutorial for this crochet plush bunny are:
Plush Yarn (100g/120m) in the following colors:
Main Color (for the body, head, arms, and ears).
Pink/Additional Color (for the feet/paws).
White plush yarn (for the whites of the eyes, used in the final decoration).
Crochet Hook: 4 mm.
Safety Eyes: 14 mm (inserted between the 18th and 19th rows).
Stuffing: Holofiber or similar filling material.
02 of 14 Crochet Baby Fox Animal Plushie
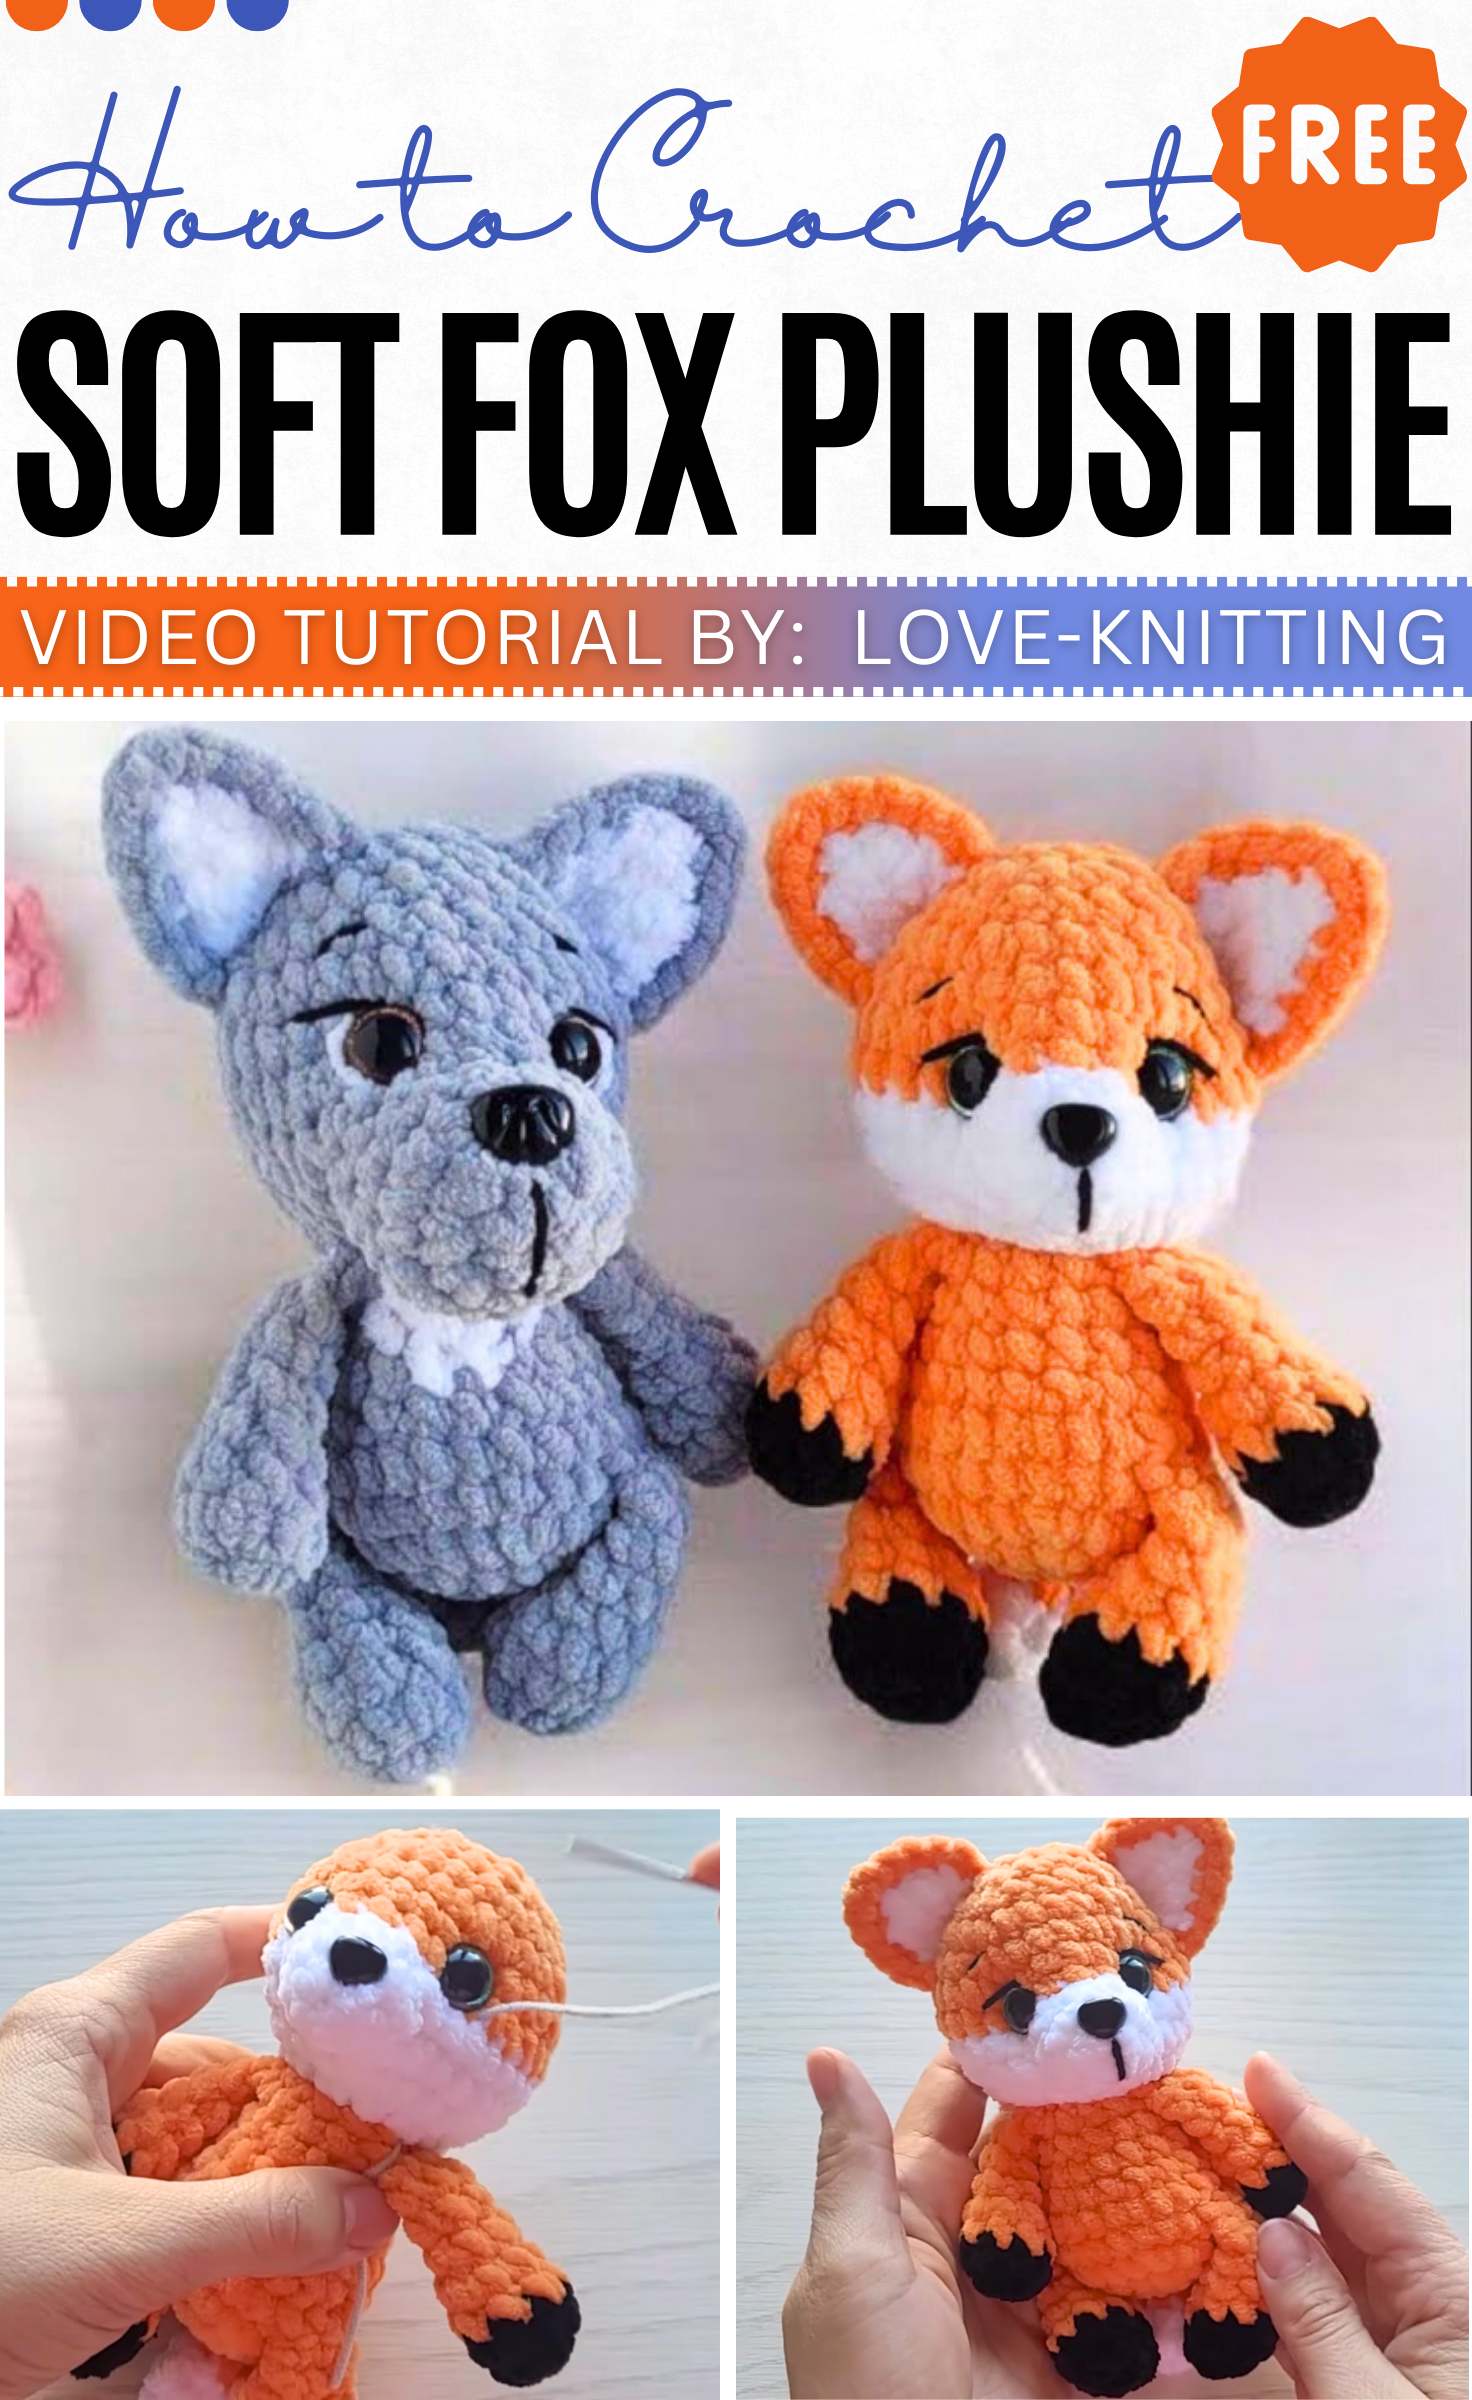
Here is how to crochet a cute red fox plushie with little sewing and using super bulky yarn. The finished animal doll uses the standard animal body base with a face similar to the previous crochet wolf plushie, but without a muzzle.
This way, you can also easily follow many of Love-Knitting’s plushie tutorials. The finished doll seems to be quite in a medium size, which makes it work up fast.
Materials Needed
The tutorial for the crocheted Fox doll uses the following materials:
Plush Yarn (100g/120m) in the following colors:
Orange (Main/Primary color).
White (for the muzzle, tail tip, and head base).
Black or Dark Color (for the feet/paws).
Crochet Hook: 4 mm.
Safety Eyes: 14 mm (inserted between the 16th and 17th rows).
03 of 14 Crochet Baby Stitch Plushie
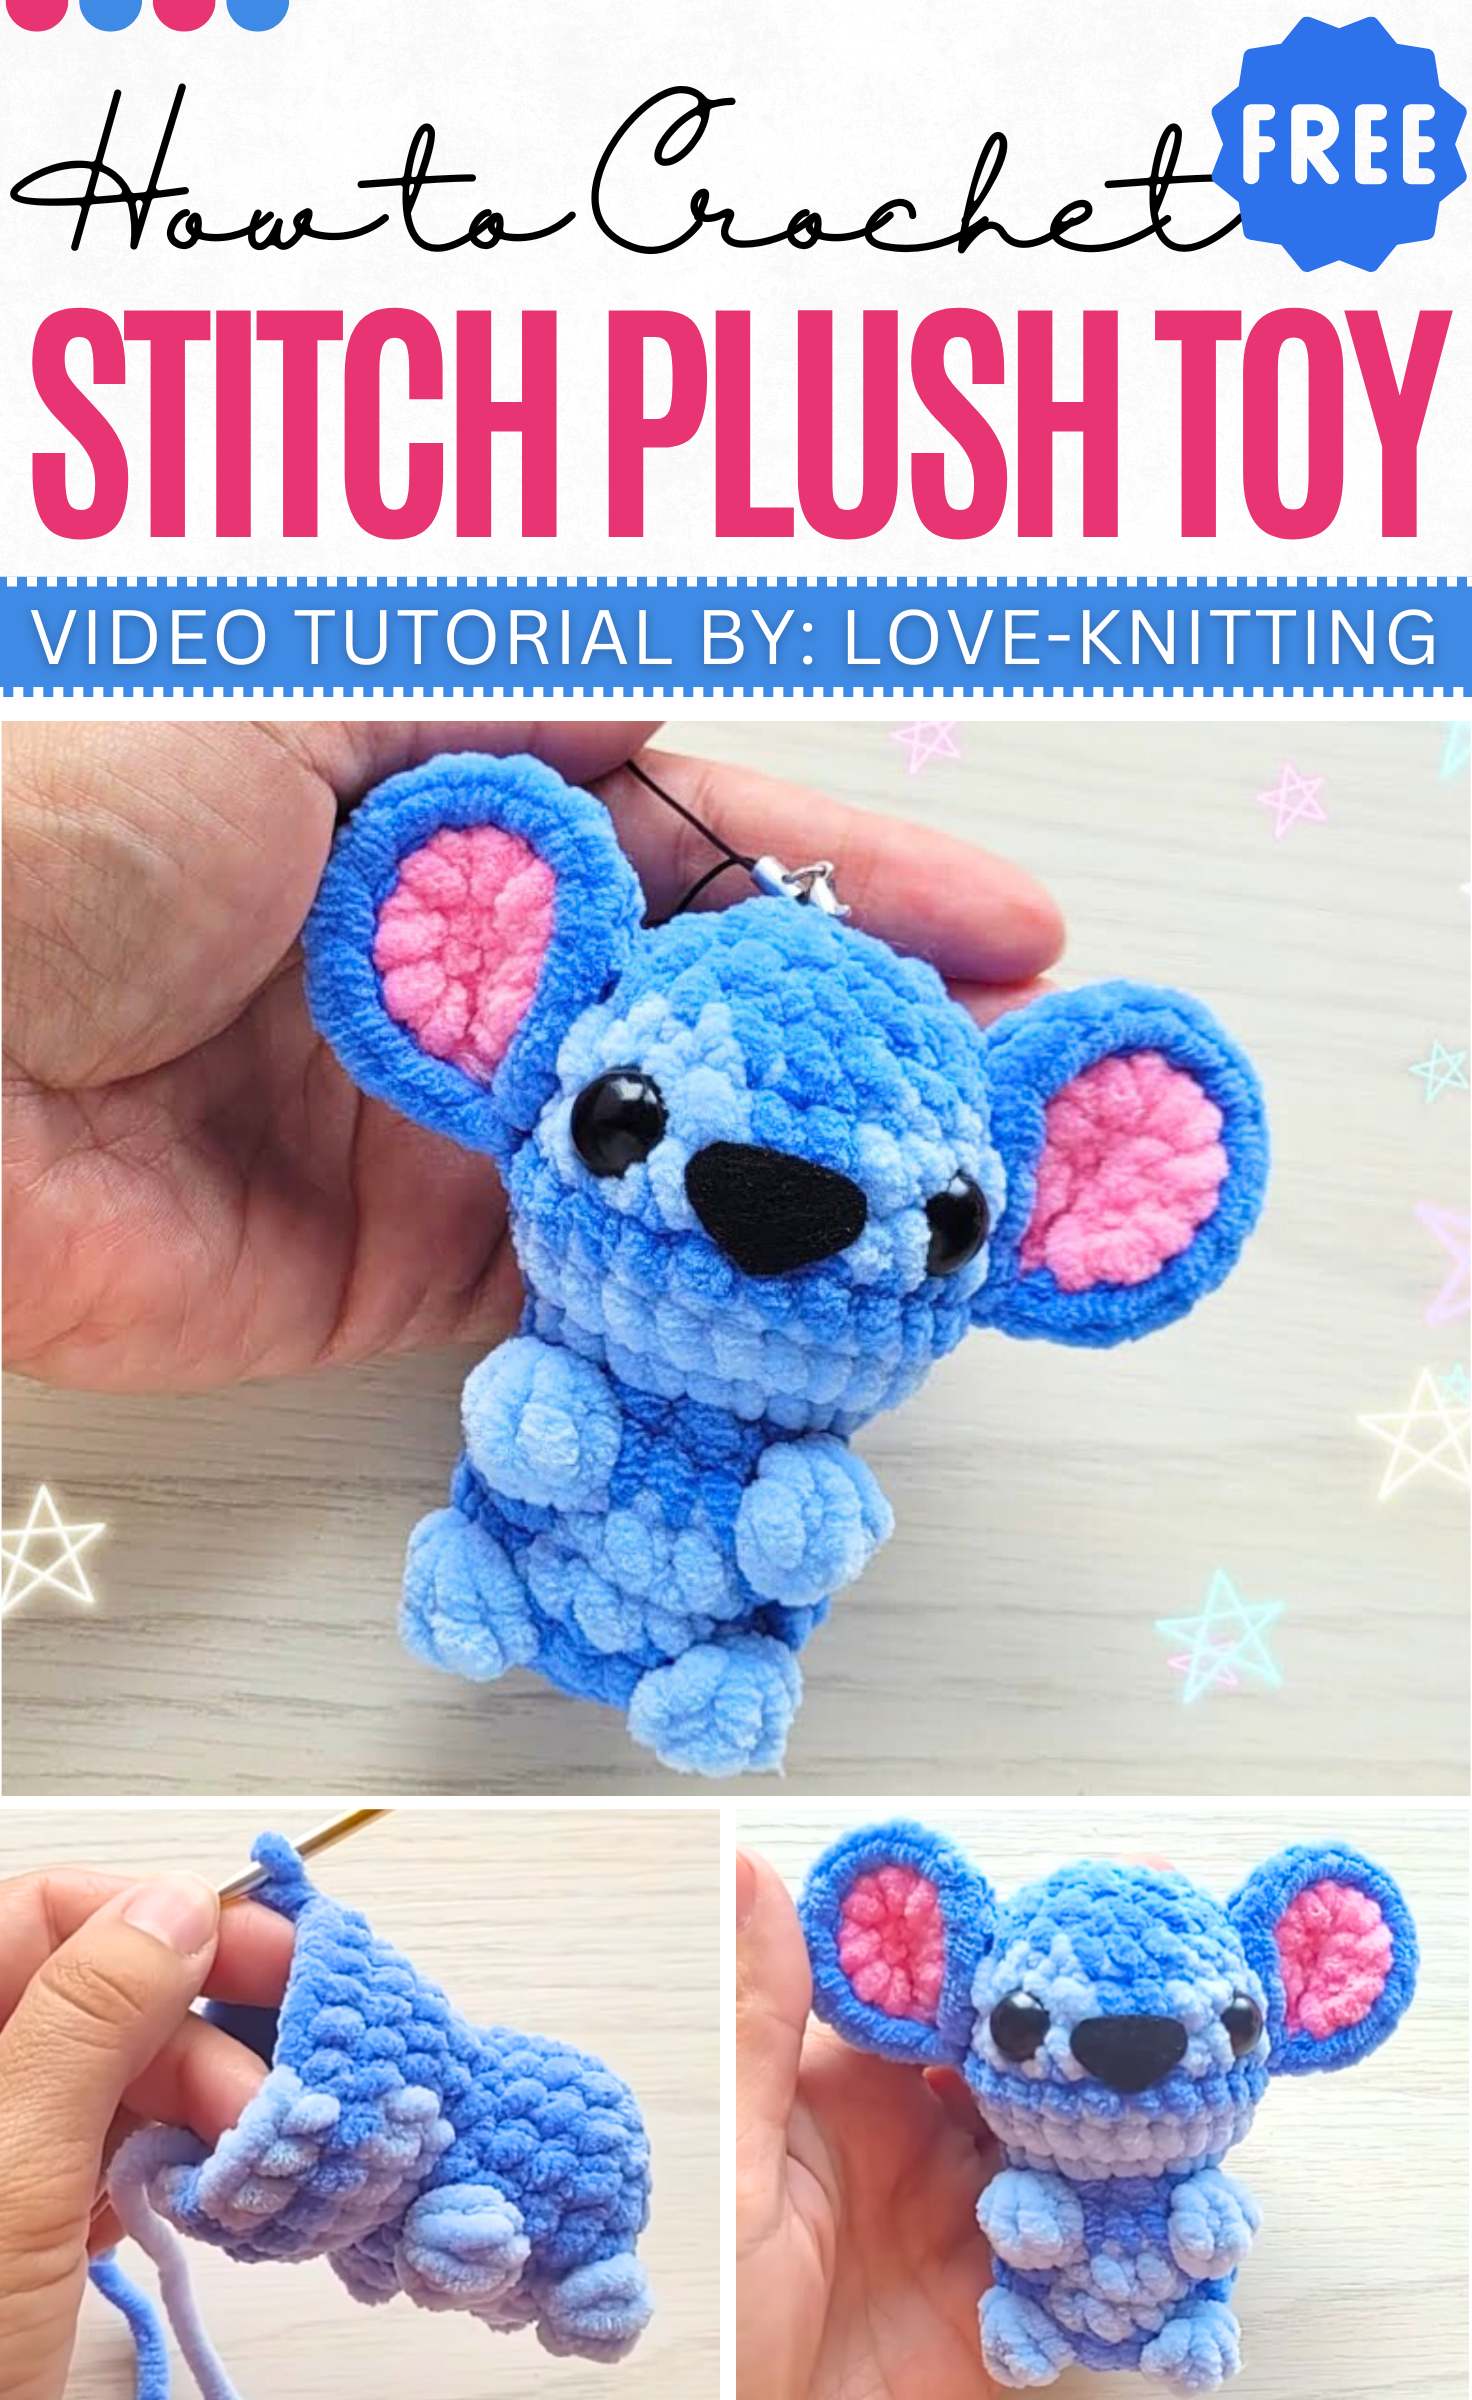
Follow this tutorial to crochet a plushie and a no-sew version of popular Stitch, a Koala character from the movie Lilo & Stitch. This stitch plushie uses the widely used bobble stitch and basic no-sew body as a base.
The head is, however, quite detailed and cute. I especially loved the ears of the Koala as they are large and have a proper shape. The finished Koala will measure about 6cm, which makes it a keychain and bag charm toy.
Materials Needed
The tutorial for the crocheted Stitch keyring/keychain uses the following materials:
Plush Yarn: (100g/120m) in the following colors:
Dark Blue/Dark Cyan (main body color).
Light Blue/Cyan (for the tummy, feet, and eye patches).
Pink/Rose (for the inner ears).
Crochet Hook: 4 mm.
Safety Eyes: 12 mm (inserted between the 13th and 14th rows).
04 of 14 Crochet Kawaii Spider Plushie
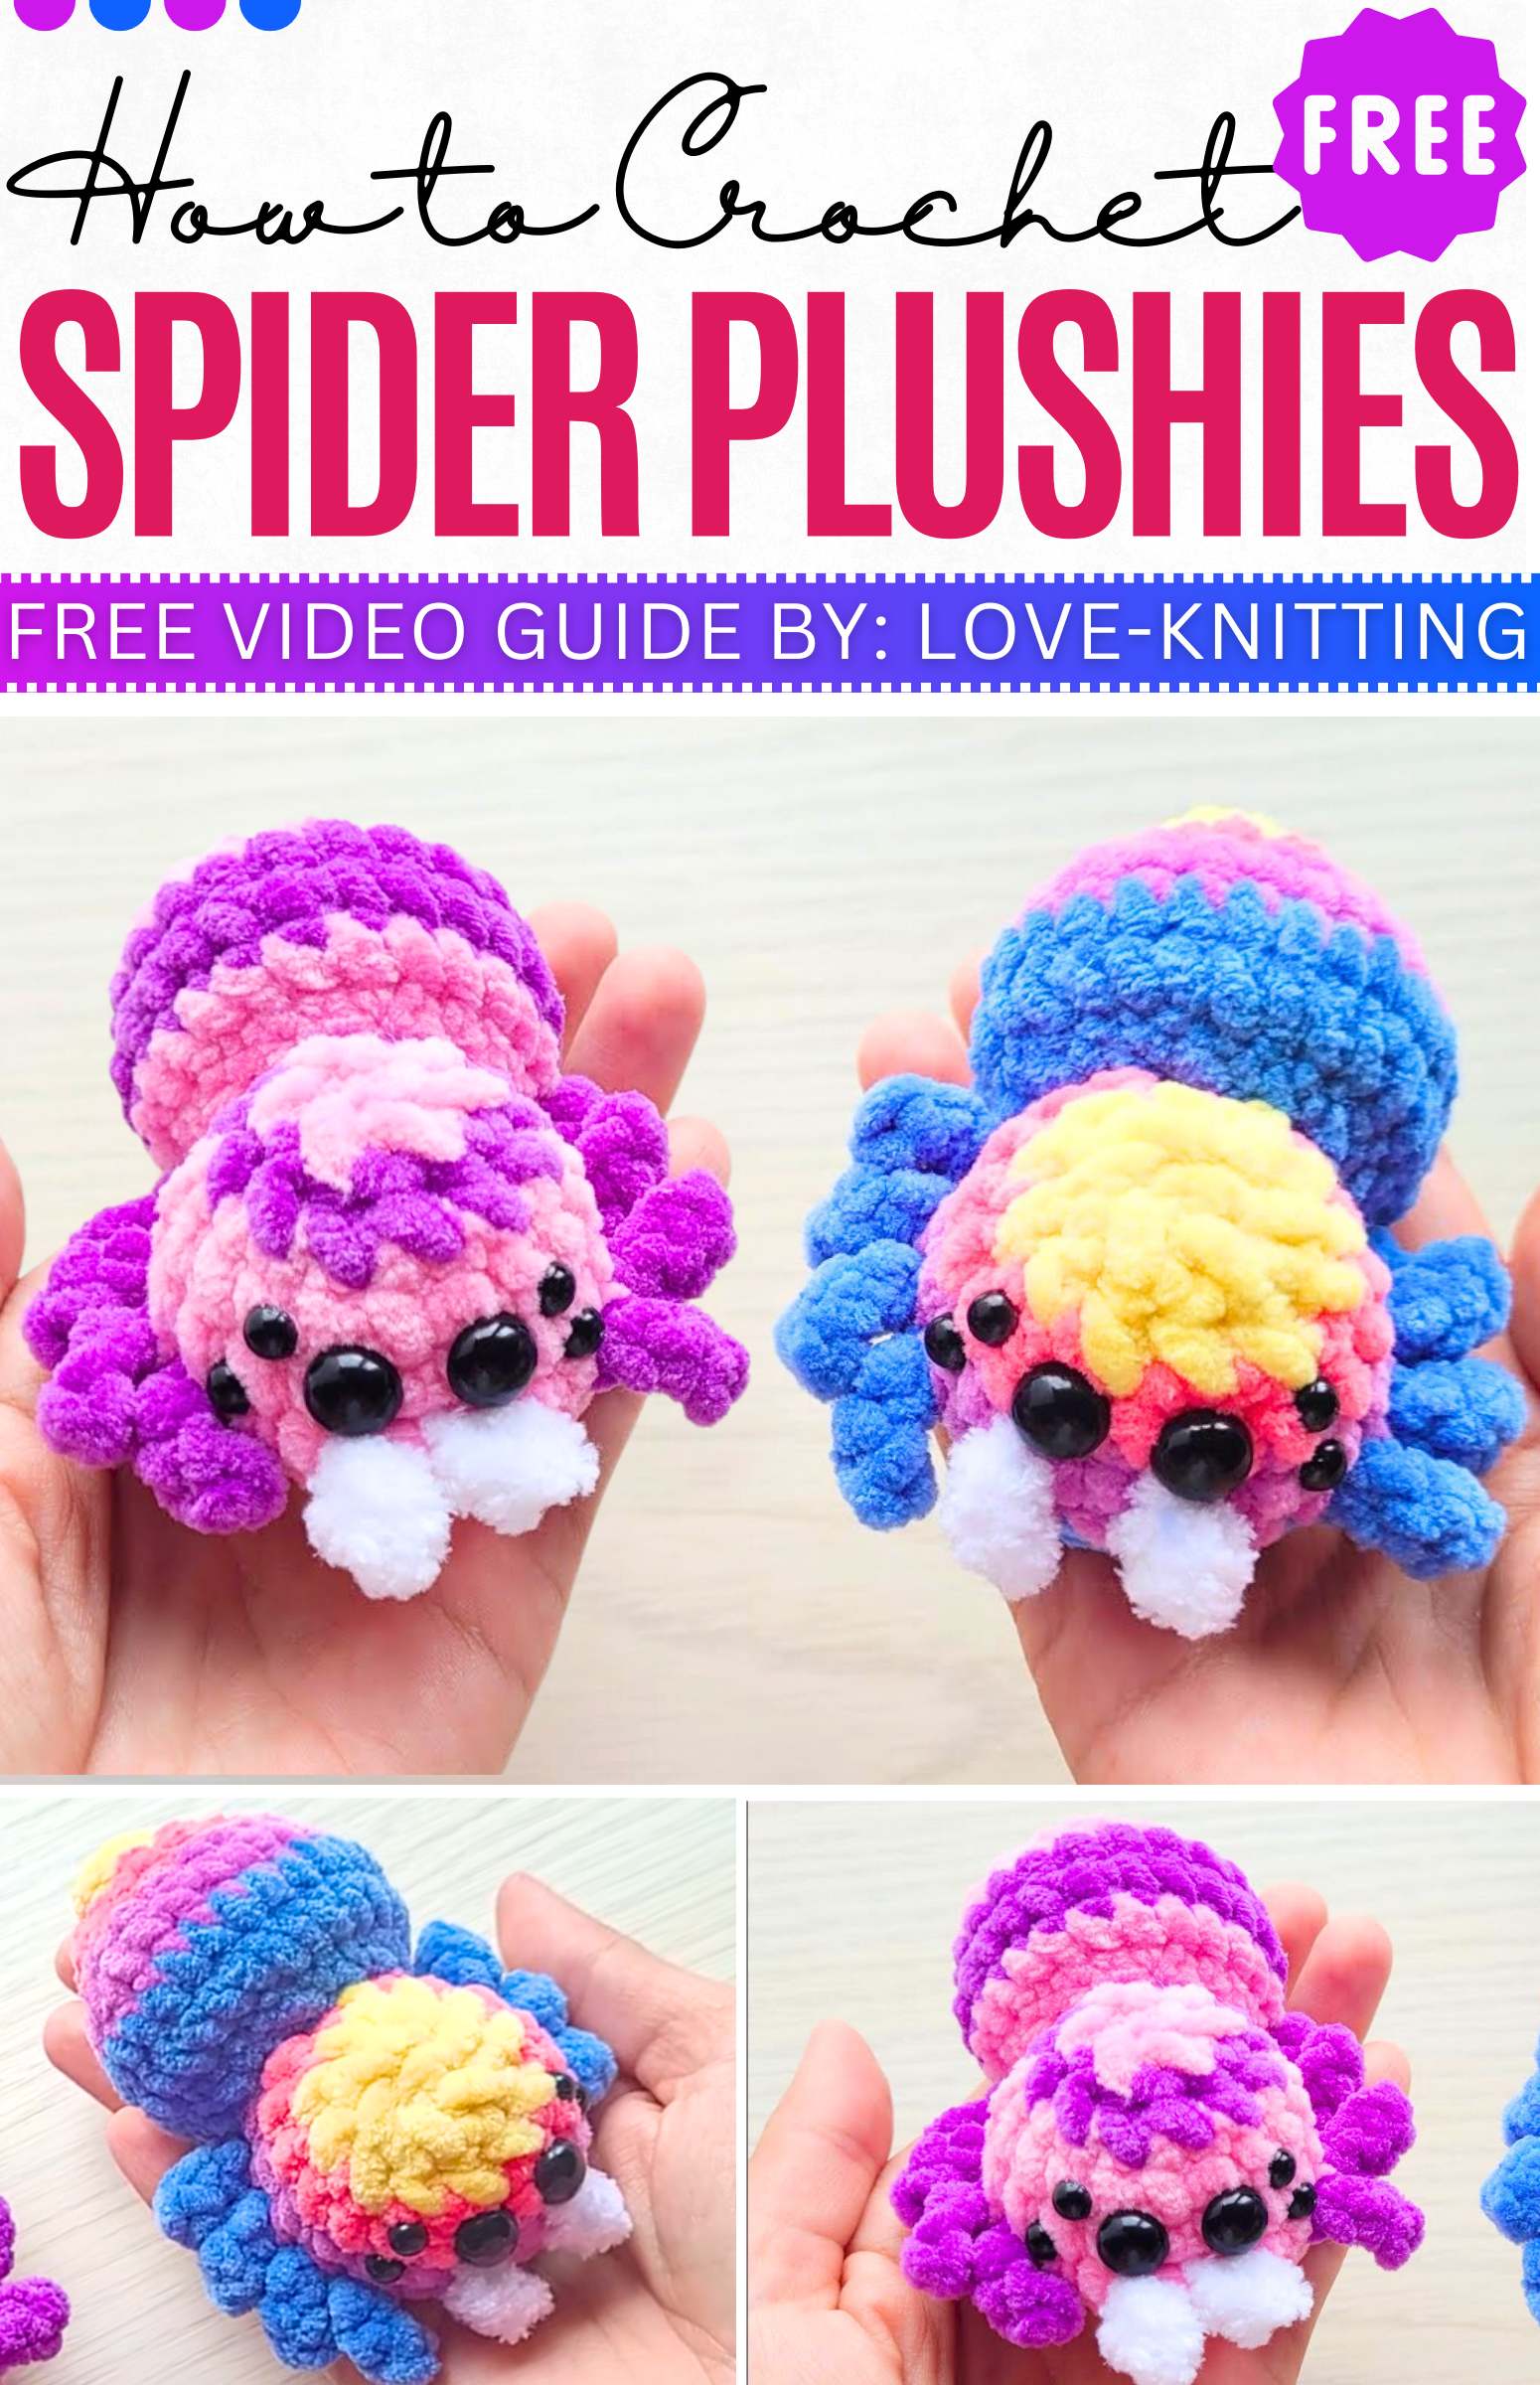
There is the most colorful, kawaii, and quick spider plushie that can be crocheted in any of two variations of color. This plushie is all about the jumping spider and uses unusual colors, including purple, pink, white, and more. Plus, this spider plushie has eight legs and eight eyes for making things life-like.
Again, crocheting this animal plushie is low-sew and works up fast. You can crochet one at any time of the year, not just for Halloween.
Materials Needed
The materials used in the tutorial for the crocheted spider (anti-stress toy) are:
Plush Yarn: (100g/120m) in:
Main Color (e.g., green/pink/rainbow for the body and tail).
Additional Color (for the two-tone version, or various colors for the rainbow version).
Fuzzy/Textured Yarn: (Alize Softy Plus or similar) in white (used for the antennae/whiskers).
Crochet Hook: 4 mm.
Stuffing: Holofiber or similar filling material.
Decorative Eyes (Half-Beads): Used instead of safety eyes, in black:
Large size: 10 mm.
Small size: 6 mm.
05 of 14 Crochet Snake Around Apple Plushie

When you are looking for a cute and unique Christmas decoration, crochet this snake perched on an apple plushie that is again low-sew. This animal plushie is designed just so well with an eaten apple and a cute green snake around it. The snake also has its tongue outside.
It should be fun to play with and can be placed in the middle of the Christmas table. I especially love the googly eyes of this crochet snake and the puffy parts of it.
Materials Needed
Plush Yarn (100g/120m) in the following colors:
Red (for the apple base and edging).
Milky White (for the middle band of the apple).
Green (for the snake and leaf).
White (for the snake’s eyes).
Brown/Coffee Color (for the apple stem/tail).
Crochet Hook: 4 mm.
Safety Eyes: 8 mm (for the snake’s head).
Red Yarn (Semi-Cotton): (Like Jeans Yarn) for the snake’s tongue (if making a snake).
06 of 14 Crochet Big Squirrel Plushie
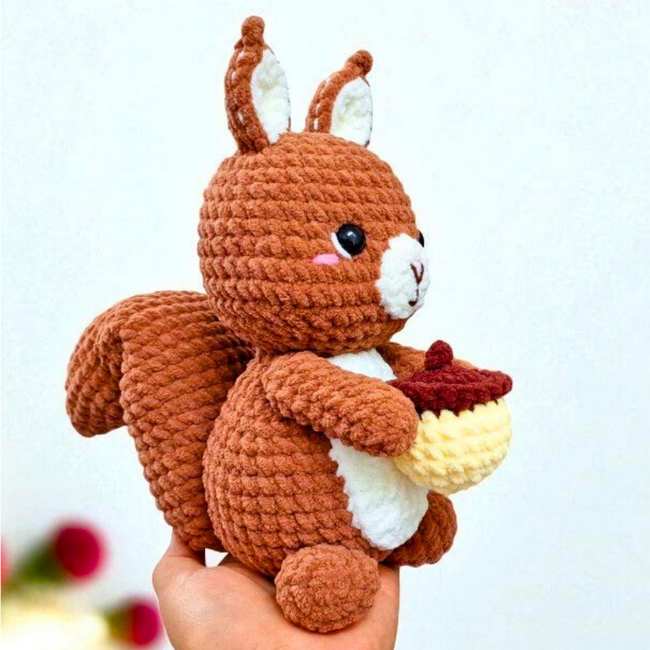
As a gift for a little one, crochet this sitting squirrel plushie holding an acron plushie with a curly stuffed tail. It covers patterns for the limbs, a large bushy tail, ears, and even a small nut accessory.
The process includes technical details like eye placement between specific rounds and the use of both front and back loop stitches for texture.
07 of 14 Crochet Hippo Plushie
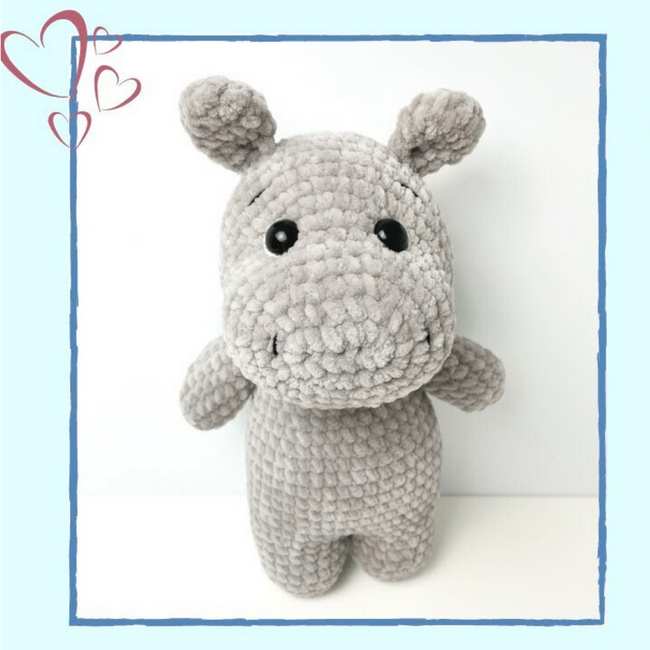
This is part 1, crocheting the head and ears of an adorable amigurumi hippo plushie doll that is standing. It starts with the face, using a chain and single crochets to build an oval shape that gradually expands.
After shaping the muzzle and attaching the safety eyes, the head is finished by decreasing the stitches and adding polyfill stuffing. Finally, the tutorial demonstrates how to create two small ears.
08 of 14 Crochet Chubby Duck Plushies
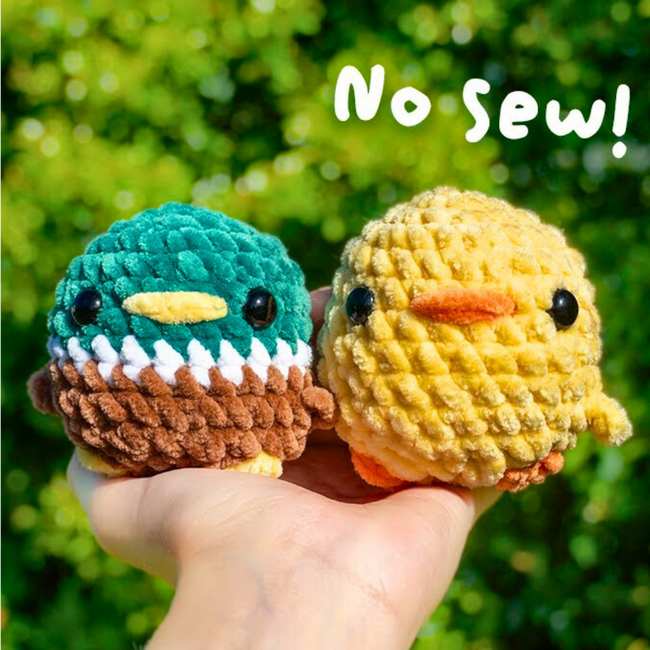
Here is a beginner-friendly tutorial to crochet an adorable, chubby “no-sew” crochet duck in either yellow or green and brown. The process starts with a magic ring and uses basic single crochet stitches, increases, and decreases to form the body.
The instructor shows how to add color changes to distinguish the head, neck, and body, while also explaining how to create wings and feet directly onto the piece. To finish, safety eyes are added, and a small yellow beak is embroidered on.
09 of 14 Crochet Duck Doll Plushie
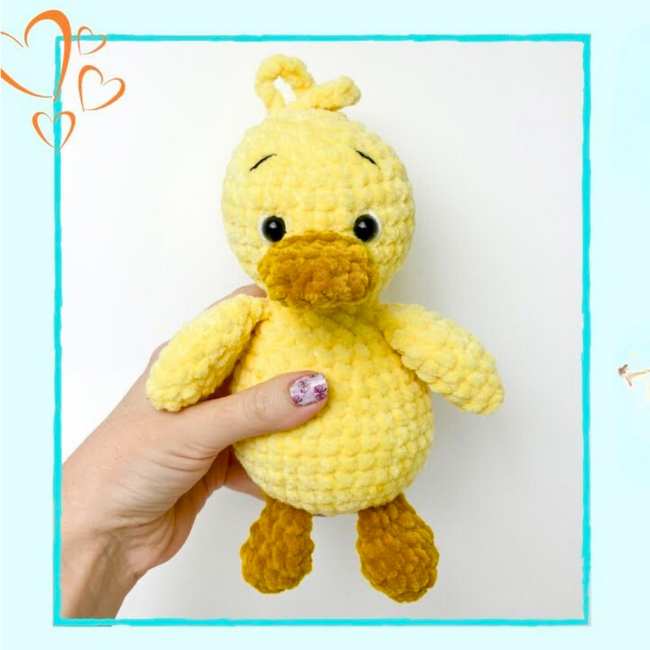
Here is how to crochet a big amigurumi duck plushie with a stuffed beak and hair. It starts from the bottom of the body, working upward through various rounds of increases and decreases to shape the form.
After stuffing the body, the tutorial demonstrates how to transition into the neck and head.
10 of 14 Crochet Hedgehog Plushie
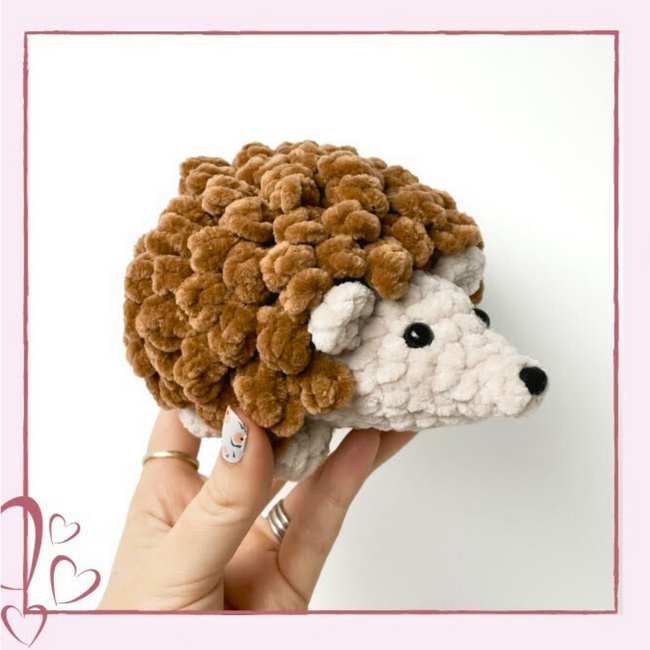
Learn how to crochet a small, plush hedgehog using the loop stitch for the hedgehog stripes. It begins at the nose and works backward to create the body, utilizing chunky yarn and basic stitches like single crochets, increases, and decreases. A
After forming the main body and stuffing it with polyfill, the creator demonstrates how to attach safety eyes and sew on small, rounded ears and four tiny legs.
11 of 14 Crochet Elephant Plushie
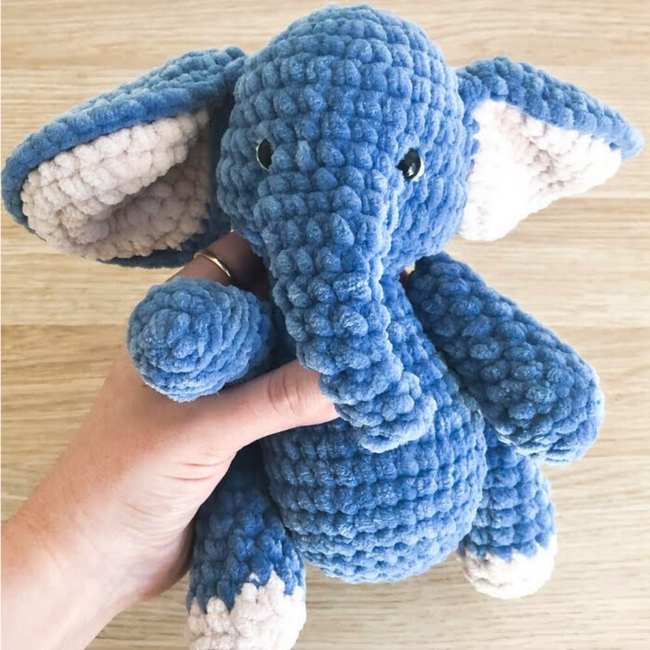
Here is how to crochet a plush baby elephant amigurumi using super bulky yarn. It is a perfect nursery item and a snuggler for a toddler. It starts from the head and moves down to the body, explaining how to shape the face and leave space for the trunk.
12 of 14 Crochet Bear Plushie
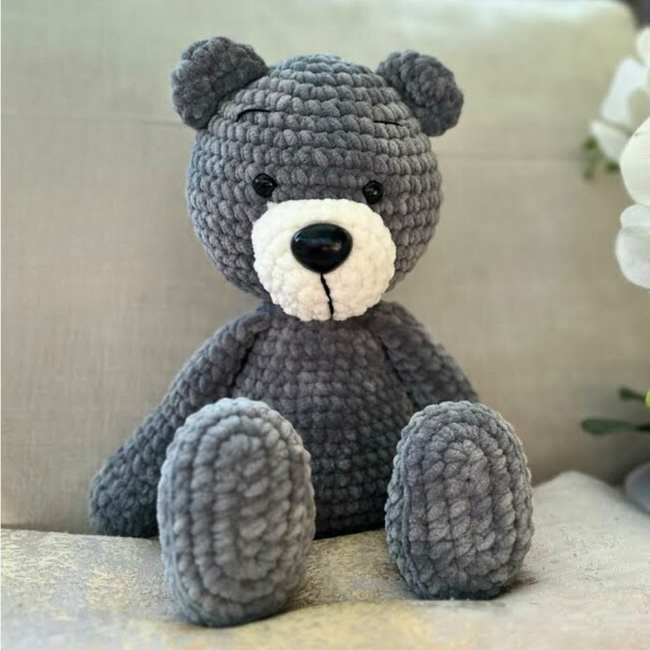
Learn how to crochet a large, cuddly teddy bear plushie in a unique color that is grey. It is crocheted from a “minimal sewing” approach, as the arms and legs are crocheted directly into the body rather than being attached separately.
The creator guides viewers through making the head, ears, limbs, and body using simple stitches like single crochets, increases, and decreases.
13 of 14 Crochet Penguin Plushie
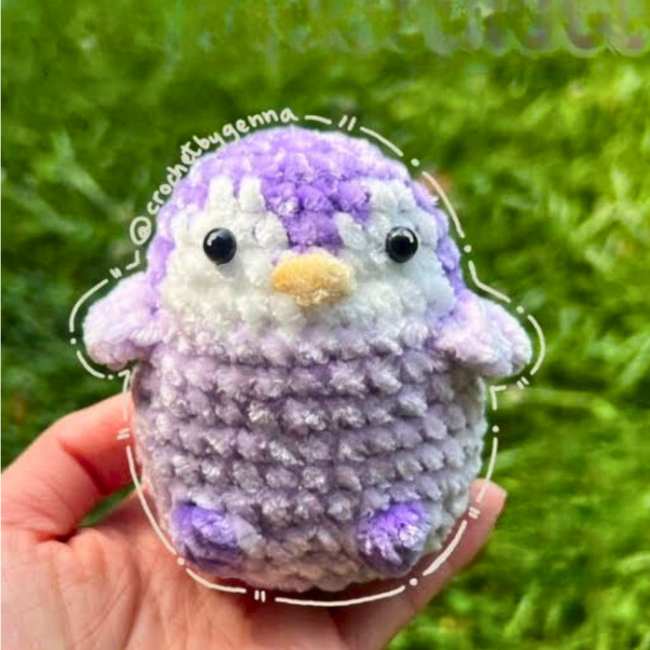
Here is how to crochet a miniature “no-sew” pocket penguin using crochet. It is unique in color and requires frequent color changes and various techniques like working in front or back loops and creating bobble stitches for the feet.
Using soft velvet yarn and a small crochet hook, the creator demonstrates how to shape the head, attach the white face, and form the flippers directly onto the body to avoid sewing later.
14 of 14 Crochet Chicken Plushie
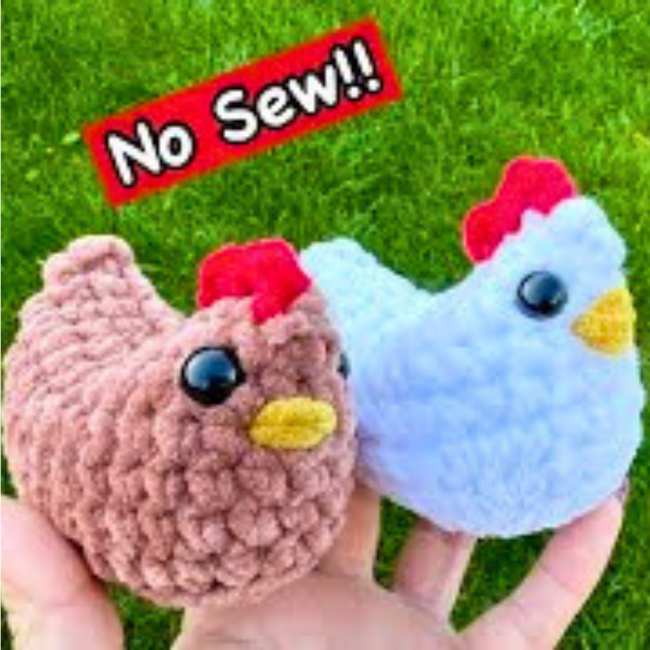
Check this beginner-friendly tutorial on how to crochet a small, no-sew chicken using plush yarn. The process begins by creating a foundation chain and working in rounds to form a flat-bottomed body.
Once the main shape is established, security eyes are attached, and the piece is stuffed with fiberfill before the top is sealed using slip stitches. To finish the project, a simple beak is embroidered with yellow yarn, and a red comb is crocheted directly onto the head.