
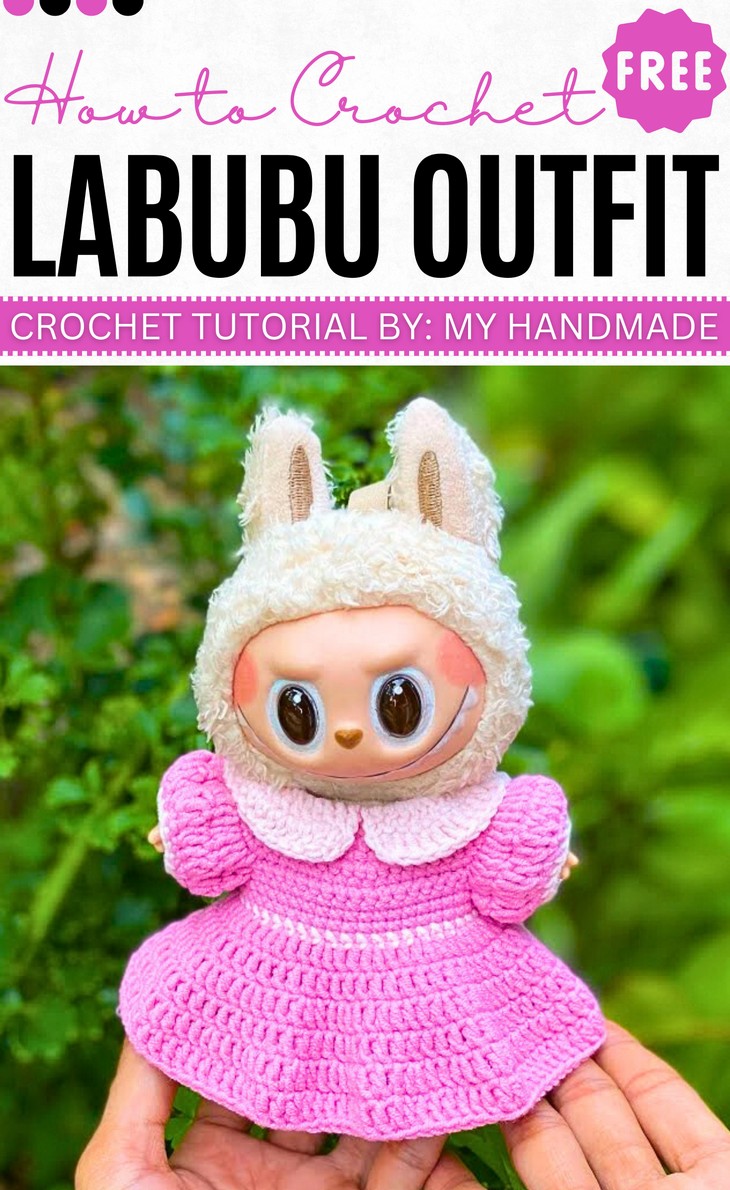
How to Crochet Labubu Peter Pan Collar Dress (Labubu Girl Outfit)
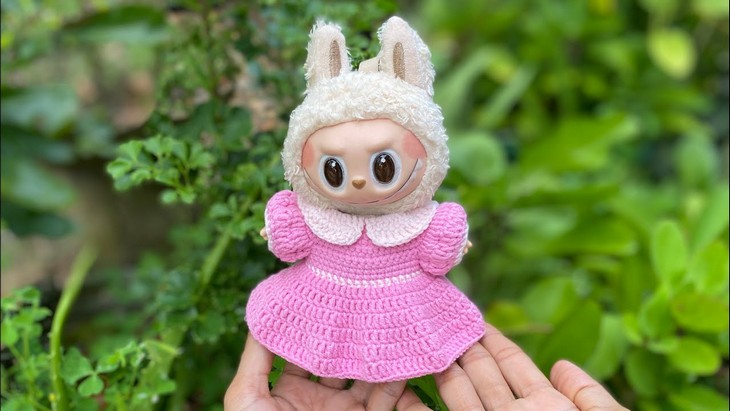
Fall all girls who are Labubu doll owners, here is a must-have outfit project with a stitch-by-stitch tutorial. Learn how to crochet a so cute and elegant Peter Pan collar dress, perfect for giving a 90s vibe to your Labubu doll for special occasions like Christmas or simply for fun! This Labubu dress is designed to fit a 17cm doll with the same puffy sleeves, the white collar, and the flowy bottom. This Labubu dress for girls is a gift worth crocheting, as the dress is super detailed.
So, if you have made up your mind to crochet this Peter Pan Collar Dress, continue reading this post till the end. You will love the final results!
About the Designer: The designer behind this is labubu peter pan collar dress
@Myhandmade – out of over 470 videos, she motsly has tutorials for crocheting clothing and accessories for Labubu doll, particularly for the 17cm collectible plushie LaBuBu. From dresses to hats (including sunflower hats), and mini bags, she crochets everything for Labubu dolls. One can see in a blink that she is a lover of Labubu doll. The videos show how to make outfits, including dresses, cowboy outfits, and hats like a sunflower or cowboy dress. She also has tutorials for smaller accessories such as mini bags and bows.Note: In respect for the creator’s pattern rights, there will be no provision of the written pattern. You can watch the tutorial with on-screen written instructions at the end of this post.
Crochet Labubu Girl Dress Tutorial Features
Skill Level: Beginners. Unlike the usual sweater projects, this Labubu dress also needs crochet decreases for shaping. Along with it, you will be using the same basic crochet stitches. These are the chain stitch, single crochet, double crochet, slip stitches, increase, FLO, chain-skipping, color-changes, and some basic sewing. The pattern is written in the US instructions. You will also use the flat work, starting from a slip knot.
Personalization Tips: The tutor used pink yarn for the dress, but you can use any color from red to purple and much more. While the tutorial provides a basic pattern, you can customize it by changing the colors of the yarn, adding embellishments, or changing the design.
Pattern Type: An on-screen written pattern is available if you find written instructions easy to follow along with.
Materials Needed
Gather the following crochet materials and tools for crocheting this Labubu outfit for beginners:
- Yarn: Baby Yarn, 4-ply: A lightweight, soft yarn made especially for delicate projects like baby clothes and doll outfits. It’s smooth, easy to work with, and creates fine, even stitches without being too bulky. 4-ply is thin enough to give the dress a neat drape and fit the small 17 cm doll without looking oversized.
- Hook: 2.5 mm: A small crochet hook that pairs well with thin yarns like 4-ply. Using a smaller hook makes the stitches tighter and denser, so the dress holds its shape, looks clean, and doesn’t have gaps (which is especially important for tiny doll clothing).
Techniques & Stitches
Here’s a one-line guide for each crochet stitch or technique used to crochet the Labubu outfit and the abbreviations to understand the pattern:
- Ch (Chain): Create a slip knot, yarn over, and pull through the loop on the hook to form a chain stitch; repeat for the desired number.
- Sc (Single Crochet): Insert the hook into the stitch, yarn over, pull through, yarn over again, and pull through both loops on the hook.
- Dec (Decrease – 2 sc together): Insert the hook into the first stitch, yarn over, pull through, insert the hook into the next stitch, yarn over, pull through, yarn over again, and pull through all loops.
- Inc (Increase – 2 sc in 1 stitch): Insert the hook into the stitch, make a single crochet, then insert the hook into the same stitch again, and make one more single crochet.
- Sl st (Slip Stitch): Insert the hook into the stitch, yarn over, and pull through both the stitch and the loop on the hook.
How is it done?
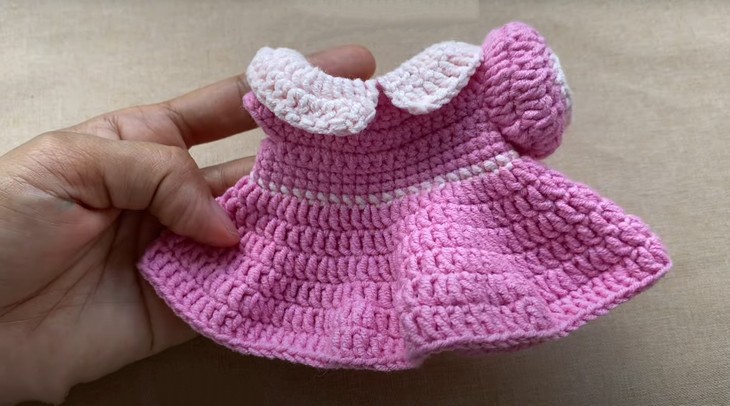
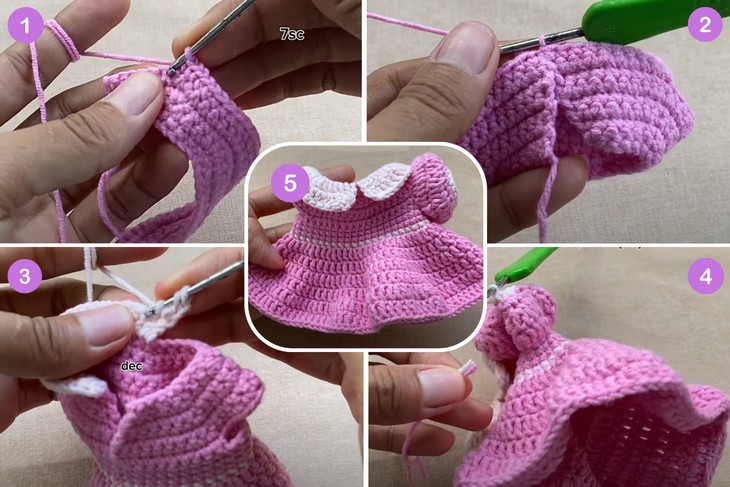
You begin by crocheting the dress bodice and skirt, which includes creating the initial chain, working in rows and rounds, and using increases to create the flare of the skirt. The collar is then crocheted separately using a mix of decreases and double crochet stitches. Finally, the dress is assembled by sewing the back seam and attaching the collar to the neckline. The creator also suggests stretching the skirt to enhance its flared appearance.
Complete Video Guide
Questions You May Ask
How can I adjust the pattern to fit other doll sizes?
To scale up or down, adjust the foundation chains and increase rounds proportionally. For a slightly larger doll, add extra rounds to the body of the dress; for smaller ones, reduce stitch counts—but always check fit with a doll before completing the project.
3. How do I customize the collar style?
While the tutorial features a classic Peter Pan collar, you can swap it out or embellish it with scalloped edges, picot trims, or mini bows to personalize the dress and match your doll’s personality.
What kind of closure works best for tiny doll clothing?
Using small snap fasteners or Velcro dots is ideal. They’re subtle, easy to attach, and secure enough to hold the dress in place without bulky buttons or lacing that can overwhelm the miniature scale.
Any tips for neat finishing on such a small garment?
Yes! Keep stitches consistent, weave in ends carefully with a sharp tapestry needle, and block gently (using spray and pins on fabric, not water-soaked yarn) to help the collar and dress shape stay crisp and smooth.