
How to Crochet Ribbed Fall Pumpkin (Tutorial for Beginners)
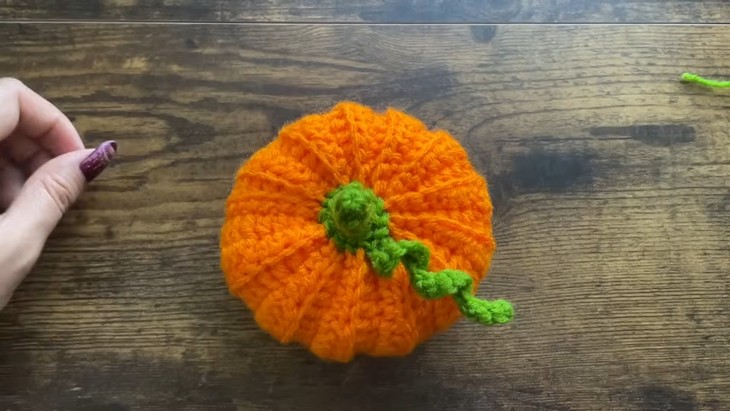
I have talked about so many fall pumpkins, but this one is my favorite. It has an average size that will never be overlooked in your fall decor and your lovely ribbing.
So, learn how to crochet this ribbed fall pumpkin without working in the rounds with a step-by-step tutorial for beginners presented by Make It Yourself By Papari. This amigurumi for home decor is designed to be easy for beginners.
It also features a unique touch of twisted vine and the same signature ribbed effect. It is customizable in shape and size and can be crocheted within 45 minutes. The whole pattern is just worked flat with a bit sewing.
So, if you are interested in crocheting this amigurumi pumpkin, you can follow through with the complete tutorial at the end of this post.

About the Designer: The designer behind this ribbed fall pumpkin amigurumi is @MakeItYourselfByPapari – she mostly crochets the nature-inpsired crochet projects and this one is one of her masterpiece.
She has a special affection for the green in her color pallete. You will love her crochet flower appliques, coasters and other accessories.
Note: In respect for the creator’s pattern rights, there will be no provision of the written pattern. You can watch the tutorial with on-screen written instructions at the end of this post.
Crochet Ribbed Fall Pumpkin
Skill Level: Beginner (Steps to make a pumpkin pattern using orange yarn, single crochet, half double crochet, and double crochet stitches.
The pattern involves creating a slip knot, chaining, and working back loop stitches to achieve a ribbed effect. It also touches on sewing techniques to join the ends seamlessly and form the pumpkin’s shape.)
Tutorial Timing: 21 Minutes Only (learn the ribbed stitch, perfect your sewing, and work with the smaller parts, making it worth watching.
Ribbing is used widely for crochet sweaters, dishcloths, and many other projects. A similar pattern can also be used to make slippers from a rectangle. You will also learn how to crochet a curl in fabric.)
Personalization Tips: For medium-sized pumpkin amigurumi, begin with a foundation chain of 34. Then, repeat the following pattern: (5sc, 5hdc, 13dc, 5hdc, 5sc) across 33 stitches of the chain for a total of 30 rows. For a large size, start with a foundation chain of 40.
Follow this pattern: (6sc, 6hdc, 16dc, 6hdc, 6sc) across 40 stitches of the chain for a total of 50 rows. The shape can also be slightly altered by varying the stitch heights in the main rows.
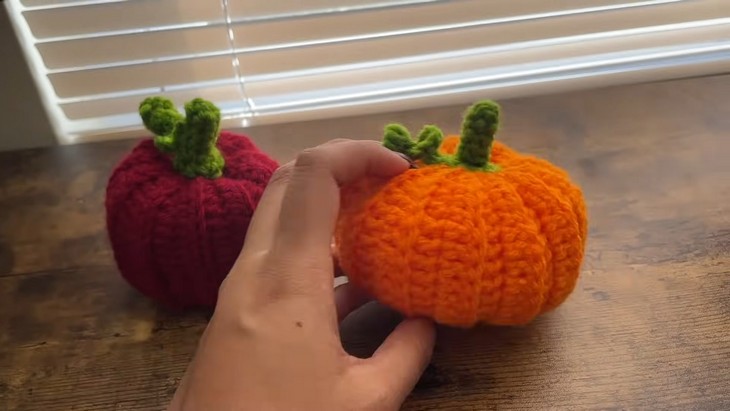
Using only Half Double Crochet throughout (as shown with the maroon pumpkin) will yield a squarer shape, while the mix of SC, HDC, and DC (as used for the orange one) creates a more realistic rounded shape.
Pattern Type: An on-screen written pattern is available if you find written instructions easy to follow along with.
Supplies Used
Gather the following crochet supplies that the tutor suggested for crocheting this pumpkin for beginners:
-
Crochet Hook Size: 4mm
Recommended crochet hooks can be found in the IMZAY crochet set available here. The ergonomic design ensures comfortable use and minimal fatigue during long crafting sessions. -
Yarn: Acrylic Size 4
Suggested yarns include Orange acrylic yarn for the pumpkin body and Green acrylic yarn for the stem and vine. Both are ideal for creating durable and vibrant crochet projects.
Other Items:
-
Scissors
Scissors are included in the IMZAY crochet set for convenient crafting. -
Needle
The set provides blunt, big-eyed needles, which are great for assembling and shaping your pumpkin project. -
Poly-fil
Use poly-fil as stuffing to give your pumpkin its plump and adorable shape.
Quick Summary!
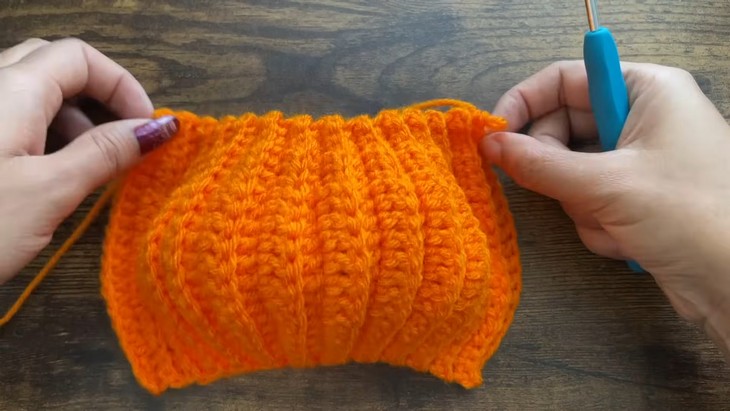
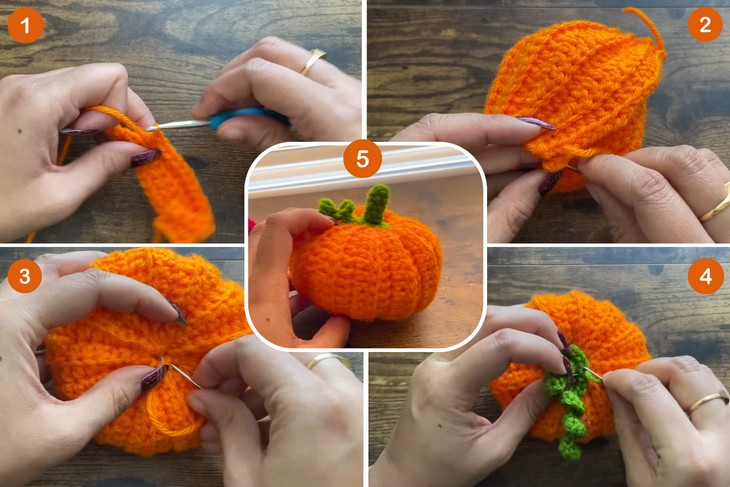
The project starts with an Orange foundation chain (21 CH), which determines the pumpkin’s height. This chain is followed by a row of differential stitches: SC, HDC, and DC, tapering back to SC. The body is then created by repeating this row pattern for 25 rows, working only in the Back Loop Only to create a ribbed fabric. After 25 rows, the piece is sewn to form a tube. A running stitch is used to cinch both the top and bottom openings, and the tube is stuffed with fiberfill.
To create the iconic pumpkin segments, the yarn tail from the closed bottom is run through the center to the top and pulled tight. Separately, the Green stem is crocheted as a short tube of Single Crochet in a spiral, and a curly vine is made from a chain where two single crochets are worked into every chain stitch. Finally, the stem/vine piece is stitched to the top of the pumpkin.
Techniques Used
The following are the techniques you will use to crochet this amigurumi pumpkin:
-
Slip Knot Technique
Guide: Start by creating a slip knot to secure the yarn on the hook. -
Chain Stitch (Chain 21)
Guide: Crochet a foundation chain of 21 stitches to begin shaping your pumpkin. -
Single Crochet (Row 1)
Guide: Work single crochets into the next three stitches, starting from the second chain. -
Half Double Crochet (Row 1)
Guide: Work three half double crochets in the next three stitches for a smooth gradient. -
Double Crochet (Row 1)
Guide: Add eight double crochets in the next eight stitches to create the central bulk of the pumpkin. -
Mirror Stitches (Row 1)
Guide: Reverse the process by working three half double crochets, followed by three single crochets, to taper toward the end.
Other Techniuqes
-
Back Loop Only Crocheting (Rows 2–25)
Guide: For each subsequent row, repeat the pattern of stitches working into the back loop only to create a ribbed texture. -
Seaming the First and Last Rows Together
Guide: Stitch the first and last rows together by sewing through the available loops with a long yarn tail and a darning needle. -
Top Closure (Gathering Stitches)
Guide: Use the needle to stitch in a zigzag over the top edge of the pumpkin, pull tightly, and secure with a knot to close the top. -
Filling the Pumpkin
Guide: Stuff the pumpkin with filling for shape and firmness. -
Bottom Closure (Mirroring the Top)
Guide: Stitch the bottom opening in the same manner as the top, zigzagging and pulling tightly to seal. -
Curly Vine (Chain and Two Single Crochets)
Guide: Chain 15 and work two single crochets in each chain stitch to create a curly vine that spirals naturally.
Complete Video Guide
Note! That the video may take a bit to load, we are working on this and correct this behaviour soon! Below is the video: