
How to Crochet Christmas Tree with Santa Hat and Pom-Poms
Two mini, super quick, and cute Christmas tree projects are here. You will crochet a tiered pumpkin keychain inspired by the realistic tree featuring beads and more, and a mini Christmas tree buddy keychain with eyes and arms. So, if you have made up your mind to crochet these mini tree keychains for the upcoming Christmas by yourself, continue reading this post till the end. There you will find the complete tutorial.

Crochet Tiered Christmas Tree
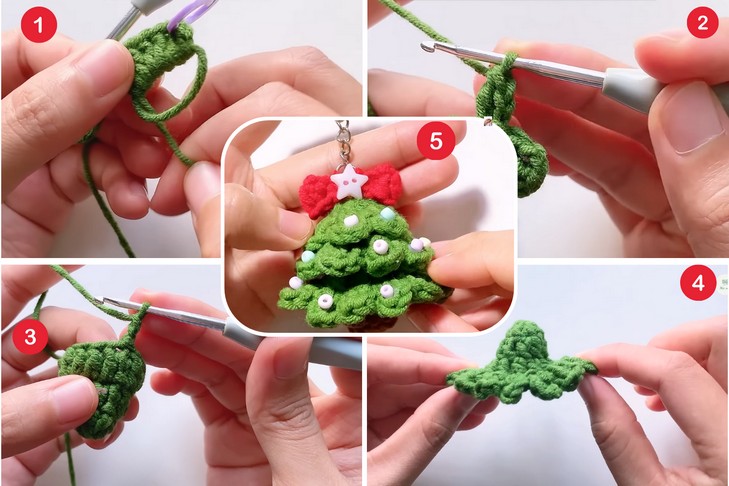
follow this stitch-by-stitch tutorial to crochet this mini tiered Christmas tree for absolute beginners that is finished with white beads, a star, and a beautiful bow embellishment! The special feature of this Christmas tree design is that it is made from three separate, tiered leaf sections and a base, which are then glued together. This tree is designed to be a keychain but can also be used as a desktop ornament and a wreath add-on. The tutorial from Moc Mien is quite detailed and cleverly teaches everything in 42 minutes.

Crochet Christmas Tree Tutorial
About the designer: the designer behind this Christmas tree project is @mocmiencrochet – To me, she is the most up-to-date and versatile designer, as she has a diverse collection of bag charms, coasters, bouquets, and much more. Her library includes a whole series of Christmas, Chinese New Year, capybara, fall, flower, plants, frogs, and many other categories. My favorite of her crochet projects are the Christmas tree, sheep flower pot and capybara, and a lot more unmentioned ones. She also has a presence on social media.
Note: In respect of the creator’s pattern rights, there will be no provision of the written pattern. You can watch the tutorial with on-screen instructions at the end of this post.

Skill Level: Beginner – Intermediate. All main parts start with a magic ring. The leafy tiers of the tree will be crocheted using a combination of the double crochet and chain stitch for a scalloped border. The trunk needs the same amigurumi techniques as the single crochet worked in rounds, with increases used.
The piece is completed using the slip stitch to join rounds and the half double crochet and single crochet to form the shape of the bow. So, you will also work in back & forth rows!

Personalization Tips: The simple and 3D tiered design of the tree makes it highly customizable. You can personalize the tree by varying the colors of the tiers, for instance, by creating a variegated or striped tree like the bear Christmas tree ornament. The bow can be replaced with a crocheted star or a different small ornament for the treetop. You can also crochet the white edging for the last round of the layer.
For decoration, you can use various embellishments like different-colored small beads, sequins, or even embroider small French knots to mimic lights, giving each tree a unique holiday look.

Tutorial Timing: 43 Minutes (You will learn the shell edging that is used in so many crochet projects, from dishcloths to crochet ghosts and even Labubu clothes. Plus, the tiered Christmas tree in a small size is the most accurate design of the Christmas tree, unlike the no-sew Christmas tree and the flat Christmas tree. You will also learn crocheting also learn decorating it. So, the tutorial is worth watching.)
Pattern Type: A detailed on-screen written pattern is available if you find written instructions easy to follow along with.
Materials Needed
You will have to gather the following suggested tools and materials for crocheting this mini Christmas tree amigurumi, mentioned in the tutorial:
- Yarn: Cotton milk 2mm (it is a lovely blend of cotton and the milk protein, and it is suggested by so many amigurumi designers)
- Hook: 2.5mm
- Scissors
- Hot stick glue
- Crochet marker needle
- Yarn Needle
- Fiber fill
- Beads
- Keychain
Techniques Used
The following are the crochet techniques that the tutor will use for crocheting this Christmas accessory for beginners:
| Technique | Guide for Crocheting |
| Magic Ring | Use to start a piece and ensure a tightly closed center for the rounds. |
| Chain Stitch (ch) | Yarn over and pull through the loop on the hook to create the base chain or height for a row. |
| Slip Stitch (sl st) | Insert hook, yarn over, and pull through all loops to join rounds or move across stitches. |
| Single Crochet (sc) | Insert hook, yarn over, pull up a loop, yarn over, and pull through both loops on the hook. |
| Double Crochet (dc) | Yarn over, pull through two loops, yarn over, and pull through the final two loops to create the stitch height. |
| Half Double Crochet (hdc) | Yarn over, insert hook, yarn over, pull up a loop, and pull through all three loops on the hook. |
| Increase (inc) | Work two stitches (e.g., single crochet or double crochet) into the same stitch to increase the stitch count. |
Complete Video Guide
2. Kawaii Christmas Keychain

If you want a kid-special Christmas tree, these two crochet chubby Christmas tree buddies are sure to grab attention. The designer has cleverly added the Christmas tree to a leg-less doll featuring the head as tree using a special stitch and bottom as a stem with arms and cute eyes. You can crochet this Christmas amigurumi either in pink shades or traditional green and brown as displayed in the tutorial. Finished with the star applique on head, this amigurumi tree is a must-have!
The Designer: @danielleldesigns
Materials Needed
The following are the materials and tools that the tutor suggests for crocheting this amigurumi Christmas buddy:
- Size 2 yarn / 4 ply milk cotton yarn, which is a blend of cotton and milk protein
- 2.5mm crochet hook
- Needle, stitch marker
- Poly filling
- 7mm eyes
- Glue