
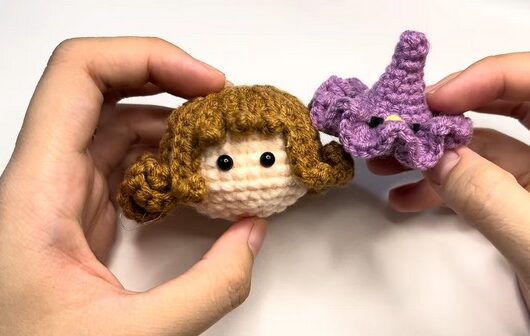
How to Crochet Witch Head Amigurumi for Halloween
No time for crocheting a complete Halloween doll for a little girl? With a stitch-by-stitch tutorial, learn how to crochet this mini witch doll head keychain designed by Ochy Crochet for Halloween. You will crochet three main things: the kawaii head, hair, and a removable witch hat. The hairs have varying lengths and curls, making a beautiful hairstyle. You will especially love the super ruffle brim of the hat and the basic facial expressions. You can crochet it within 30 – 45 minutes thanks to the easy and quick pattern.
So, if you are ready for crocheting this mini witch girl amigurumi, continue reading this post till the end. There you will find the complete tutorial!

About the designer: the designer behind this witch amigurumi project is @OchycrochetVN – she always crochets mini amigurumi, dolls, and keychains with unique twists on themes, like a tutorial for an apple pouch, candy with eyes, Jellycat birthday cake, Lantern amigurumi, and much more. I especially appreciate and recommend her Christmas projects that include the Christmas trees, bells, Santa, and more, plus her fall series that includes Lantern pumpkin, carrot, this Witch hat, and more!
Note: in respect of the creator’s pattern rights, there will be no provision of the written pattern. You can watch the tutorial with on-screen instructions at the end of this post.

Crochet Witch Amigurumi Tutorial
Skill Level: Beginner – Intermediate. The crochet witch head needs single crochet, slip stitch, increase and decrease, and chain by working in the round to crochet a ball. Increases and decreases in the round to begin the hair base and chain stitches in different numbers. Color changes are needed in the witch hat and FLO to begin the ruffle that is produced using the half-double crochet and treble cluster!
Tutorial Timing: 21 minutes only (perfect for learning a basic head pattern for crochet girl dolls, mostly immortally the hair. The witch hat pattern is also unique from the usual pattern, making it worth trying. So, the tutorial takes a little time, but worth watching!)
Personalization Tips: To personalize your witch doll, you can choose black and even orange for the hair. You could also add accessories like a small broom, a tiny cauldron, and also use the regular safety eyes instead of the beads. You can also complete your witch doll by crocheting a usual low-sew witch amigurumi pattern later. Make the witch hat in orange or black!
Pattern Type: A detailed on-screen written pattern is available if you find written instructions easy to follow along with.

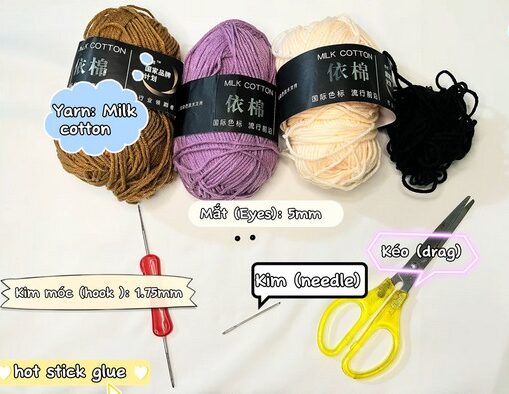
Materials Needed
Gather the following suggested tools and materials for crocheting this Halloween girl amigurumi, mentioned in the description:
Yarn: Milk Cotton (different colors: brown, purple, cream, and black)
Eyes (Mắt): 5 mm
Crochet Hook (Kim móc): 1.75 mm
Needle (Kim)
Scissors (Kéo)
Hot Glue Stick
Techniques Needed
Here’s a one-line guide for crocheting each stitch and technique in the witch head pattern:
- CH (Chain): Yarn over and pull through the loop on your hook to create a chain.
- Sl (Slip Stitch): Insert the hook, yarn over, and pull through both the stitch and loop on your hook.
- X = Sc (Single Crochet): Insert the hook into the stitch, yarn over, pull through, yarn over again, and pull through both loops.
- V = Inc (Increase): Crochet two single crochets into the same stitch.
- MR (Magic Ring): Wrap the yarn around your fingers, crochet into the ring to create a base for circular projects.
- A = Dec (Decrease): Insert the hook into two stitches, yarn over, pull through both, yarn over again, pull through the remaining loops.
- T = Hdc (Half Double Crochet): Yarn over, insert the hook, yarn over and pull through, yarn over again, pull through all three loops.
- FLO (Front Loop Only): Work into the front loop of the stitch instead of through both loops.