
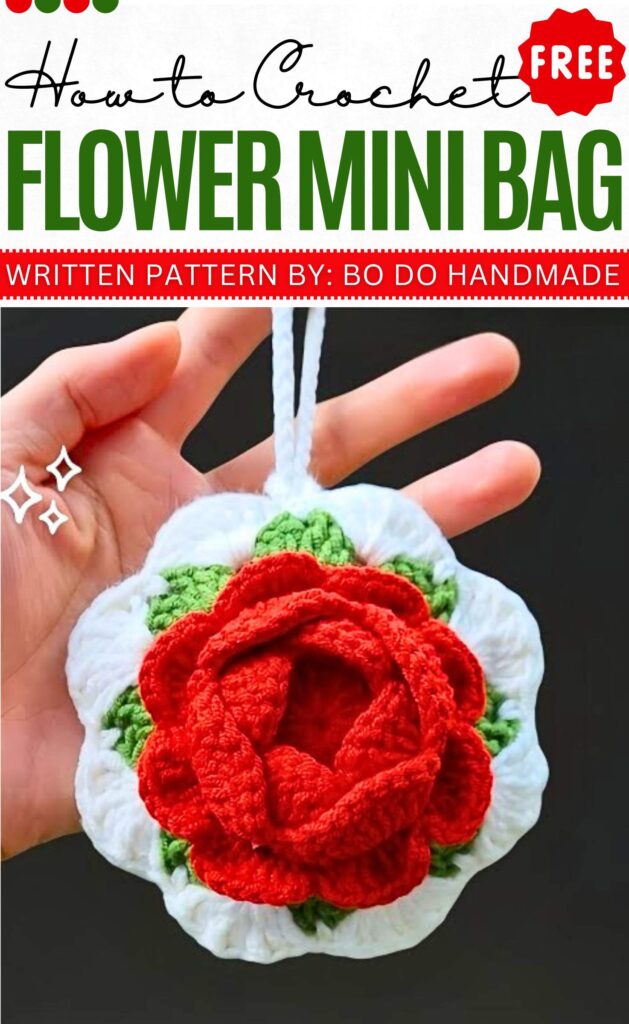
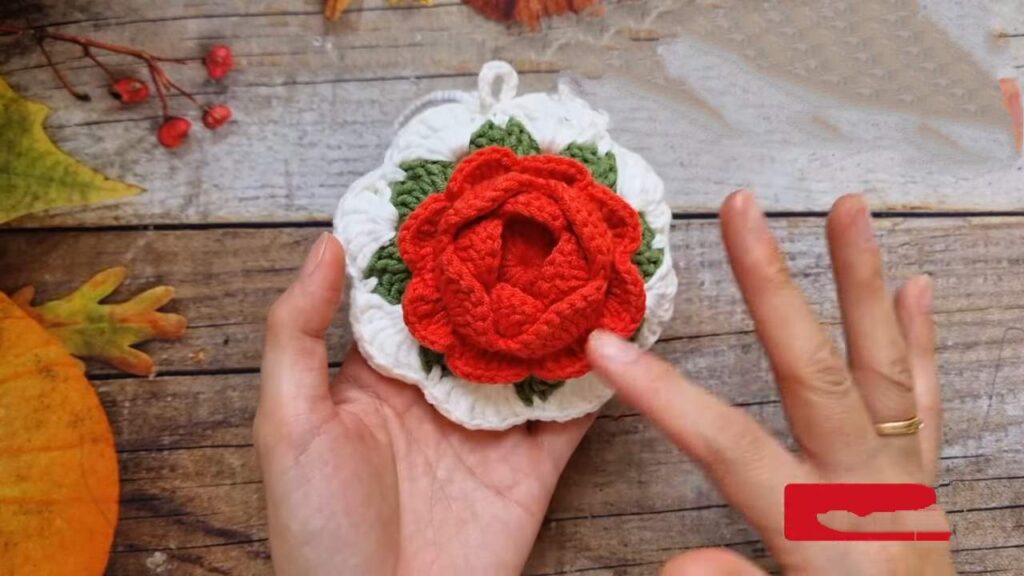
Crochet Rose Flower Mini Bag Pattern Step by step
This crochet pattern shows you how to make a tiny, cute bag that looks like a blooming rose. It is perfect for holding small things like earphones, coins, or little hair clips. The bag has a little loop and a strap so you can hang it on your main bag as a decoration or use it as a pretty keychain.
Crochet Rose Flower Mini Bag Easy
About The Creator:
Bi do Handmade has been an expert in crocheting and designing crochet amigurumi, bag charms, and pouches. Also visit her YouTube channel for more exciting projects.
Crochet Rose Flower Mini Bag Pattern
This pattern creates a cute, rose-shaped mini bag consisting of a 3D flower front panel and a solid back panel, joined together.
Materials:
-
Yarn: Cotton or Macrame yarn (approx. 2mm-3mm thickness recommended).
-
Color A: Flower/Rose color
-
Color B: Leaf color (Green)
-
Color C: Border/Back panel color (can be same as Color A)
-
-
Hook: 2.5 mm or 3.0 mm (or size suitable for your yarn)
-
Accessories: Yarn needle, scissors.
Abbreviations (US Terms):
-
MR: Magic Ring
-
Ch: Chain
-
Sc: Single Crochet
-
Dc: Double Crochet
-
Tr: Treble Crochet
-
Sl st: Slip Stitch
-
St(s): Stitch(es)
-
Sp: Space
-
Inc: Increase (2 stitches in the same stitch)
-
Sk: Skip
Part 1: Front Panel (Flower)
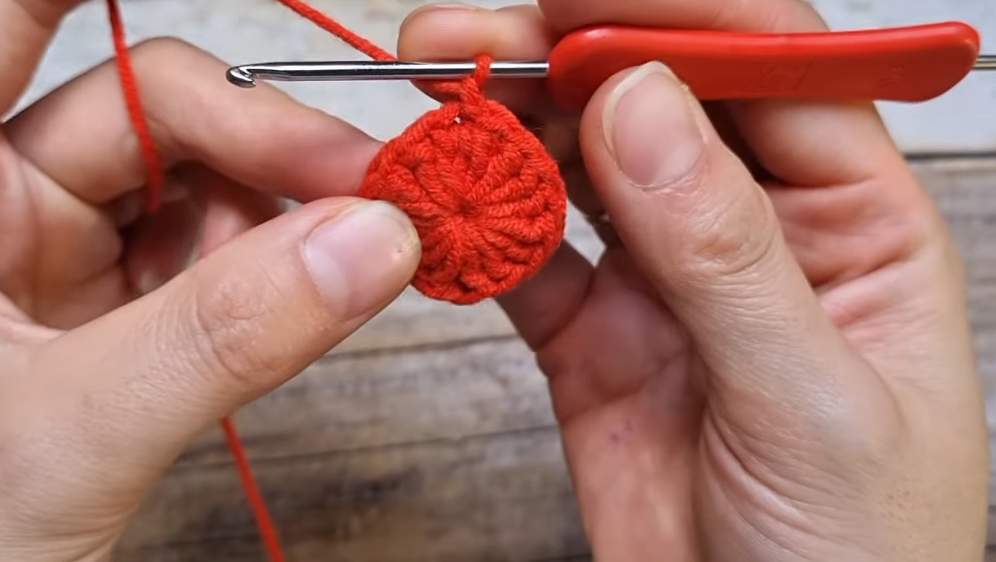
Round 1 (Center):
-
With Color A, make a MR.
-
Ch 2, work 16 dc into the ring.
-
Join with sl st to the first dc. (16 sts)
Round 2 (Petal Base 1):
-
Sc in the first st.
-
Ch 3, sk 1 st, sc in next st.
-
Repeat from * to * around.
-
End with sl st to the first sc. (8 chain loops).
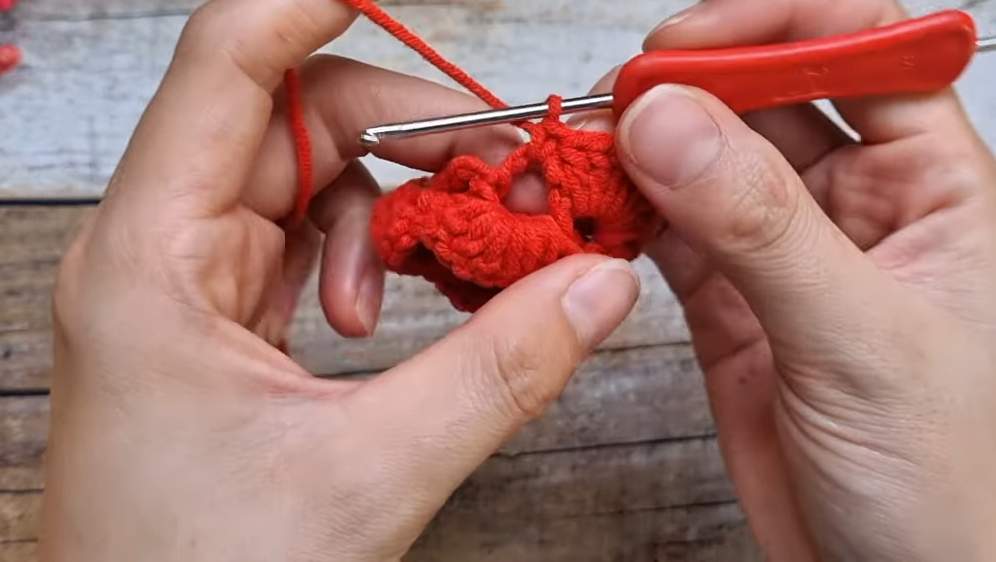
Round 3 (Petal Layer 1):
-
Sl st into the first Ch-3 sp.
-
Work 1 sc in the first loop. Work 6 dc in the next loop.
-
Repeat from * to * around. (4 Petals created).
Round 4 (Petal Base 2):
-
Work this round behind the petals of Round 3.
-
Ch 3. Sc around the post of the sc from Round 2.
-
Ch 4, sc around the post of the next sc from Round 2.
-
Repeat around. Join to start. (8 chain loops).
Round 5 (Petal Layer 2):
-
Work 1 sc in the first loop. Work 8 dc in the next loop.
-
Repeat from * to * around. (4 large Petals created).
Round 6 (Petal Base 3):
-
Work this round behind the petals of Round 5.
-
Ch 3. Sc around the post of the sc from the previous base round.
-
Ch 4, sc around the post of the next sc.
-
Repeat around. Join to start. (8 chain loops).
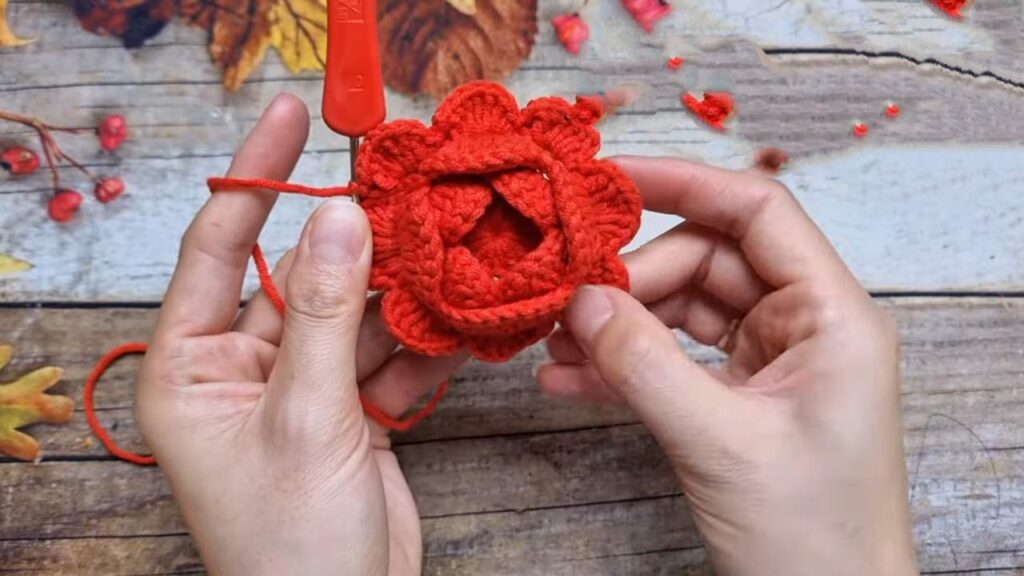
Round 7 (Petal Layer 3):
-
In each loop around, work: (1 sc, ch 1, 6 dc, ch 1, 1 sc).
-
Join with sl st. Fasten off Color A. (8 Petals created).
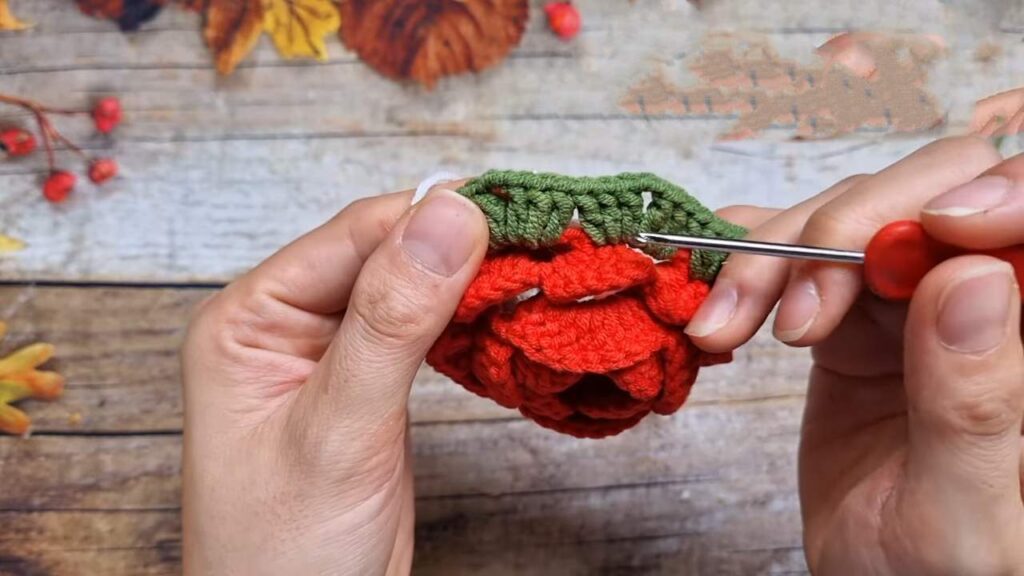
Round 8 (Leaf Base):
-
Join Color B (Green).
-
Work this round behind the petals of Round 7.
-
Insert hook from back to front to back through the center of a petal (splitting the 6 dc into 3 and 3) and make a sc to anchor.
-
Ch 5, sc around the center of the next petal.
-
Repeat around. Join to start. (8 chain loops).
Round 9 (Leaves):
-
In each Ch-5 loop around, work: (3 dc, Ch 2, 3 dc).
-
Join with sl st to first dc. Fasten off Color B.
Round 10 (Border):
-
Join Color C (Border Color) in any Ch-2 space of a leaf.
-
Sc in the Ch-2 space.
-
Work 7 Tr in the space between two leaves. Sc in the next leaf’s Ch-2 space.
-
Repeat from * to * around.
-
Join with sl st.
-
Closure Loop: Do not fasten off. Ch 8 to 10 (depending on button size). Sl st back into the same st to create a loop.
-
Fasten off and weave in ends.
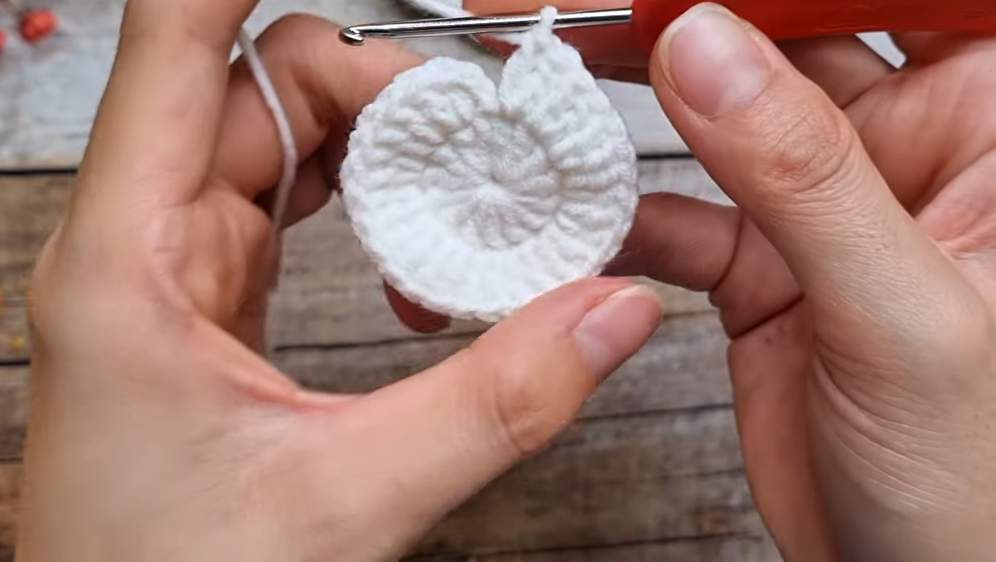
Part 2: Back Panel
Round 1:
-
With Color C, make a MR.
-
Ch 2, work 14 dc into the ring. Join. (14 sts)
Round 2:
-
Ch 2. Work 2 dc in each st around. Join. (28 sts)
Round 3:
-
Ch 2. Dc in next st, Inc in next st. Repeat around. Join. (42 sts)
Round 4:
-
Ch 2. Dc in next 2 sts, Inc in next st. Repeat around. Join. (56 sts)
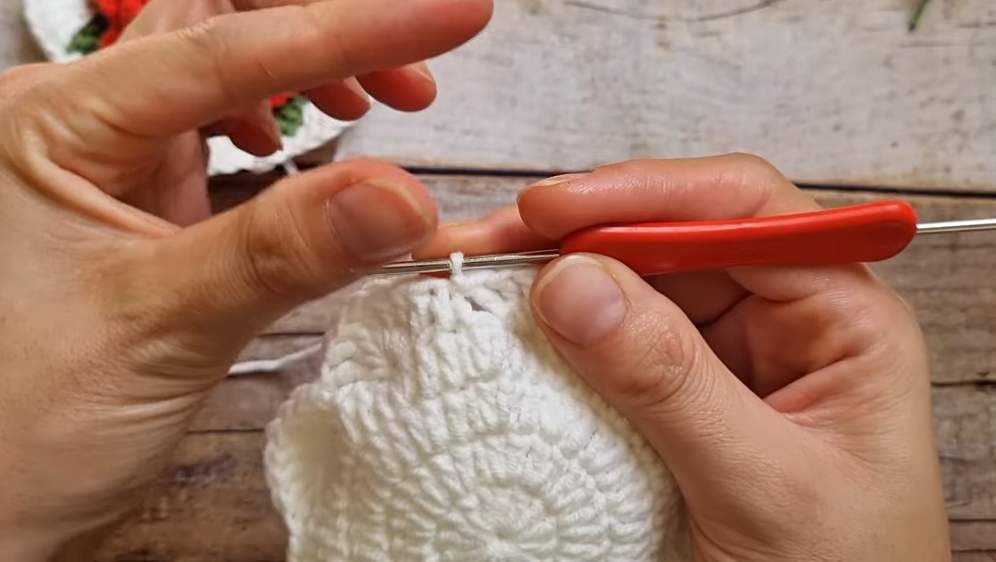
Round 5 (Border):
-
Ch 1. Sc in first st.
-
Sk 2 sts, work 7 Tr in next st. Sk 3 sts, Sc in next st.
-
Repeat from * to * around.
-
Join with sl st to first sc. (8 Scallops created).
Handle Strap:
-
Do not fasten off. Ch 35–40 (or desired strap length).
-
Sl st back into the base to form a handle loop.
-
Fasten off and weave in ends.

Assembly
-
Place the Front Panel and Back Panel with wrong sides facing together.
-
Align the scallops (flower petals) of both panels.
-
Using a yarn needle and matching yarn, sew the panels together through the back loops or hidden stitches of the border.
-
Sew approximately 5 to 6 scallops together at the bottom, leaving the top 2 to 3 scallops open for the bag mouth.
-
Hide all loose ends inside the bag.
To Close: Pass the long handle loop (from the Back Panel) through the small closure loop (from the Front Panel) or use the closure loop to button onto a bead/knot if added.
Video Tutorial:
Pattern In UK Terms
This is the UK Terms version of the flower mini bag pattern.
-
Materials
-
Yarn: Cotton or Macrame yarn (approx. 2mm-3mm thickness recommended).
-
Colour A: Flower/Rose colour
-
Colour B: Leaf colour (Green)
-
Colour C: Border/Back panel colour (can be same as Colour A)
-
-
Hook: 2.5 mm or 3.0 mm (or size suitable for your yarn).
-
Accessories: Yarn needle, scissors.
-
-
Abbreviations (UK Terms)
-
MR: Magic Ring
-
ch: Chain
-
dc: Double Crochet (US sc)
-
tr: Treble Crochet (US dc)
-
dtr: Double Treble Crochet (US tr – yarn over twice)
-
ss: Slip Stitch
-
st(s): Stitch(es)
-
sp: Space
-
inc: Increase (2 stitches in the same stitch)
-
sk: Skip
-
Part 1: Front Panel (Flower)
-
Round 1 (Centre)
-
With Colour A, make a MR.
-
Ch 2, work 16 tr into the ring.
-
Join with ss to the first tr. (16 sts)
-
-
Round 2 (Petal Base 1)
-
Work 1 dc in the first st.
-
Ch 3, sk 1 st, 1 dc in next st.
-
Repeat from * to * around.
-
End with ss to the first dc. (8 chain loops).
-
-
Round 3 (Petal Layer 1)
-
Ss into the first Ch-3 sp.
-
Work 1 dc in the first loop. Work 6 tr in the next loop.
-
Repeat from * to * around. (4 Petals created).
-
-
Round 4 (Petal Base 2)
-
Work this round behind the petals of Round 3.
-
Ch 3. Work 1 dc around the post of the dc from Round 2.
-
Ch 4, 1 dc around the post of the next dc from Round 2.
-
Repeat around. Join to start. (8 chain loops).
-
-
Round 5 (Petal Layer 2)
-
Work 1 dc in the first loop. Work 8 tr in the next loop.
-
Repeat from * to * around. (4 large Petals created).
-
-
Round 6 (Petal Base 3)
-
Work this round behind the petals of Round 5.
-
Ch 3. Work 1 dc around the post of the dc from the previous base round.
-
Ch 4, 1 dc around the post of the next dc.
-
Repeat around. Join to start. (8 chain loops).
-
-
Round 7 (Petal Layer 3)
-
In each loop around, work: (1 dc, ch 1, 6 tr, ch 1, 1 dc).
-
Join with ss. Fasten off Colour A. (8 Petals created).
-
-
Round 8 (Leaf Base)
-
Join Colour B (Green).
-
Work this round behind the petals of Round 7.
-
Insert hook from back to front to back through the centre of a petal (splitting the 6 tr into 3 and 3) and make a dc to anchor.
-
Ch 5, 1 dc around the centre of the next petal.
-
Repeat around. Join to start. (8 chain loops).
-
-
Round 9 (Leaves)
-
In each Ch-5 loop around, work: (3 tr, Ch 2, 3 tr).
-
Join with ss to first tr. Fasten off Colour B.
-
-
Round 10 (Border)
-
Join Colour C (Border Colour) in any Ch-2 space of a leaf.
-
Work 1 dc in the Ch-2 space.
-
Work 7 dtr (Double Treble) in the space between two leaves. Work 1 dc in the next leaf’s Ch-2 space.
-
Repeat from * to * around.
-
Join with ss.
-
Closure Loop: Do not fasten off. Ch 8 to 10 (depending on button size). Ss back into the same st to create a loop.
-
Fasten off and weave in ends.
-
Part 2: Back Panel
-
Round 1
-
With Colour C, make a MR.
-
Ch 2, work 14 tr into the ring. Join. (14 sts)
-
-
Round 2
-
Ch 2. Work 2 tr in each st around. Join. (28 sts)
-
-
Round 3
-
Ch 2. 1 tr in next st, inc in next st. Repeat around. Join. (42 sts)
-
-
Round 4
-
Ch 2. 1 tr in next 2 sts, inc in next st. Repeat around. Join. (56 sts)
-
-
Round 5 (Border)
-
Ch 1. Work 1 dc in first st.
-
Sk 2 sts, work 7 dtr in next st. Sk 3 sts, 1 dc in next st.
-
Repeat from * to * around.
-
Join with ss to first dc. (8 Scallops created).
-
-
Handle Strap
-
Do not fasten off. Ch 35–40 (or desired strap length).
-
Ss back into the base to form a handle loop.
-
Fasten off and weave in ends.
-
Assembly
-
Place the Front Panel and Back Panel with wrong sides facing together.
-
Align the scallops (flower petals) of both panels.
-
Using a yarn needle and matching yarn, sew the panels together through the back loops or hidden stitches of the border.
-
Sew approximately 5 to 6 scallops together at the bottom, leaving the top 2 to 3 scallops open for the bag mouth.
-
Hide all loose ends inside the bag.