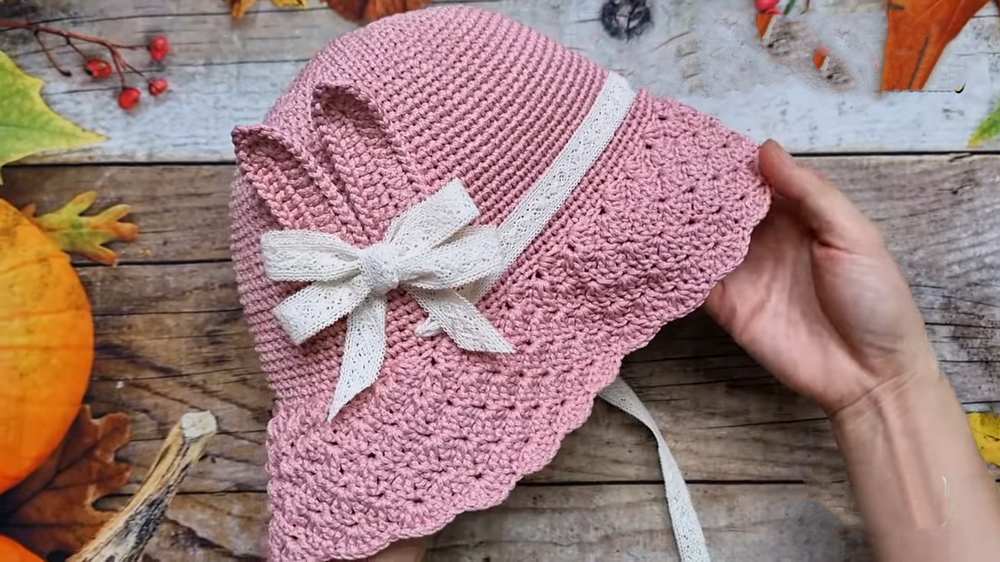
Free Crochet Bunny Ear Summer Hat Pattern
Learn how to crochet a beautiful, textured summer hat for girls with bunny ears and lace ribbon with this free pattern. There is an elegant shell stitch texture around the brim and a wide body that can fit any head size. You can also attach a small lace bow to it and other decorations, including the crochet bow.
This is an adult crochet hat, as the bunny ears are pretty simple. In this post, I will share both the UK and US patterns for crocheting it in different sizes. So, don’t miss crocheting this hat this summer.
Crochet Elegant Summer Hat
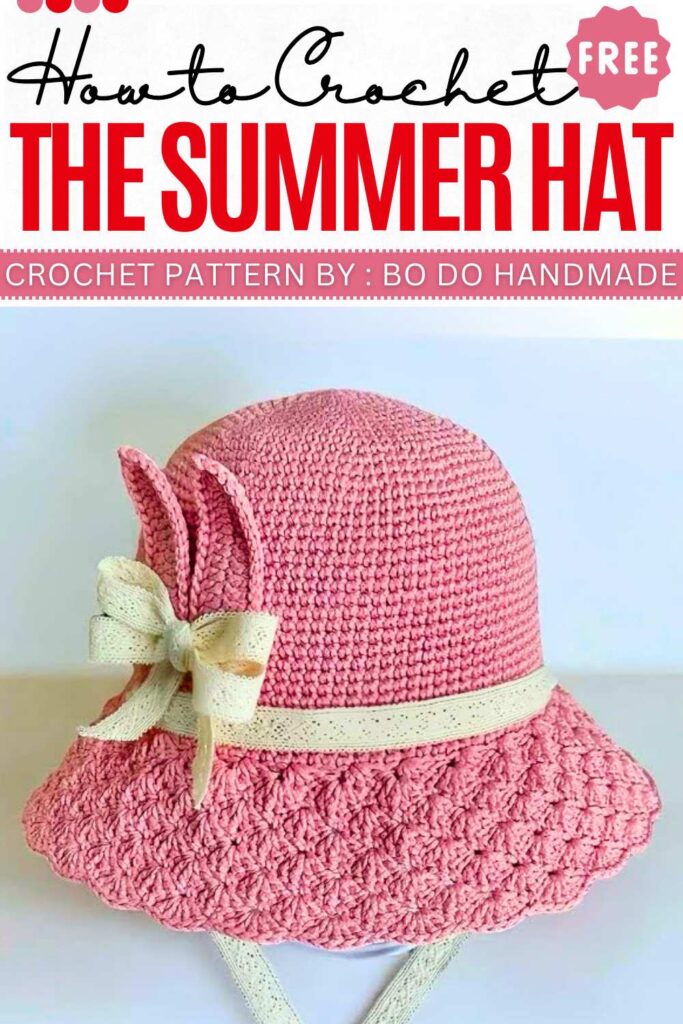
Bi Do Handmade has been an expert in crocheting and designing crochet hats, bag charms, and pouches. Also, visit her YouTube channel for more exciting projects.
Materials Used
- Yarn: Solid color yarn (suitable for hats, likely a cotton or cotton-blend based on the texture).
- Hook: Size appropriate for your yarn (usually 2.5mm – 3.5mm for this type of yarn, though not explicitly stated in the video, match it to your yarn weight).
- Accessories: Stitch markers, scissors, yarn needle, decorative ribbon (for the tie), decorative bow.
- Optional: Hot glue gun (if gluing ears instead of sewing).
Abbreviations (US English)
- MR: Magic Ring
- ch: Chain
- sc: Single crochet
- hdc: Half double crochet
- dc: Double crochet
- inc: Increase (2 single crochets in the same stitch)
- sl st: Slip stitch
- st(s): Stitch(es)
- sp: Space
Pattern Instructions
Crown & Body of the Hat
Note: The hat is worked in a continuous spiral. Do not join with a slip stitch at the end of each round unless specified. Use a stitch marker to mark the first stitch of every round.
- Rnd 1: Create a MR, ch 1. Work 8 sc into the MR. Pull the yarn tail tight to close the ring. (8 sts)
- Rnd 2: Inc in every st around. (16 sts)
- Rnd 3: [1 sc, inc] repeat around. (24 sts)
- Rnd 4: [3 sc, inc] repeat around. (30 sts)
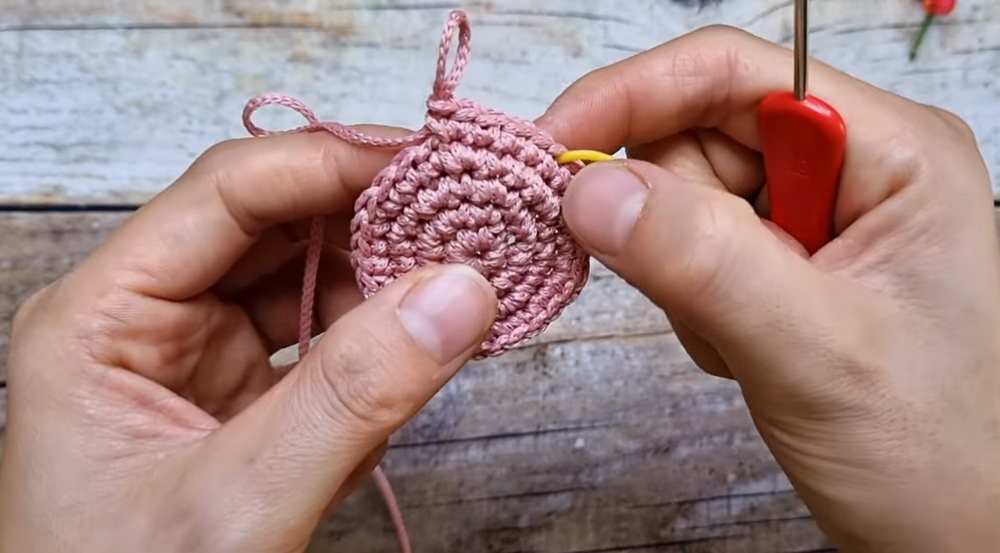
- Rnd 5: 2 sc, inc, [4 sc, inc] repeat until 2 sts remain, 2 sc. (36 sts) Note: This is an offset increase round to keep the circle round.
- Rnd 6: [5 sc, inc] repeat around. (42 sts)
- Rnd 7: 3 sc, inc, [6 sc, inc] repeat until 3 sts remain, 3 sc. (48 sts)
-
Rnd 8+: Continue increasing based on this established formula.
- Rule for Odd numbers between increases (e.g., 7 sc, inc): Work standard repeats around.
- Rule for Even numbers between increases (e.g., 8 sc, inc): Offset the increases by dividing the first even number in half (e.g., 4 sc, inc, then [8 sc, inc] around, ending with 4 sc).
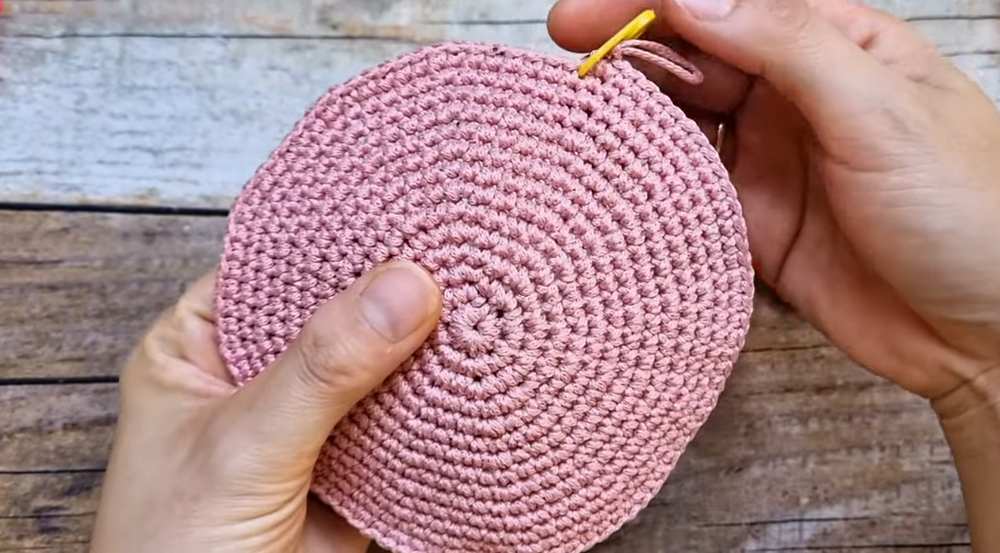
- Sizing Check: Flatten the piece and measure the diameter. Multiply the diameter by 3.14 to get the circumference. Continue increasing until the circumference matches your desired head size (e.g., for a 42cm head circumference, the diameter should be approx. 13.3cm). The video stops increasing after the round of [13 sc, inc] and does one final adjustment round of [7 sc, inc] for 4 repeats to get the exact measurement.
- Body: Once the desired diameter is reached, work 1 sc in every st around (no more increases) until the hat reaches from the crown to just above the ear.
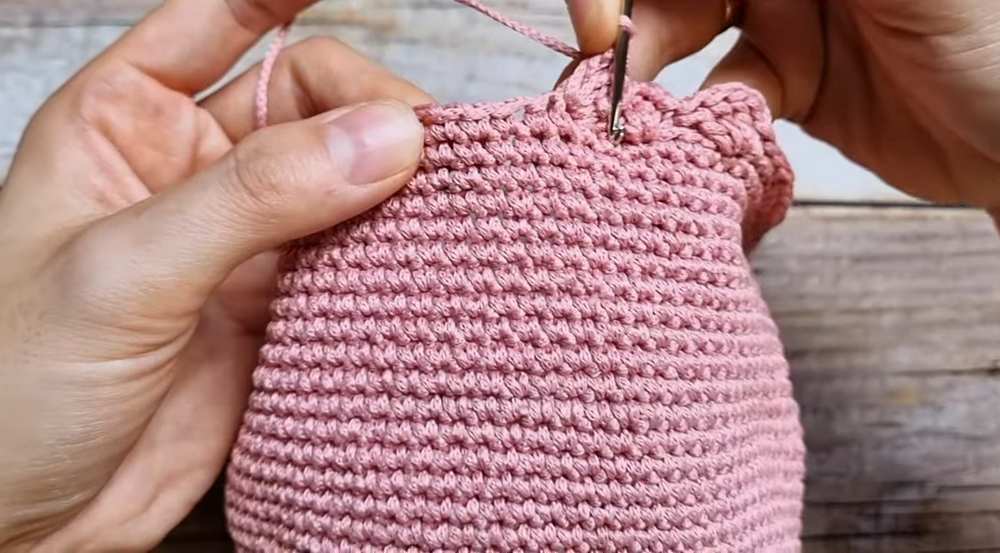
The Brim
The brim is worked in joined rounds.
- Rnd 1 (Half-Shells): Ch 2, 3 dc in the same st (the base of the ch 2). [Sk 2 sts, 1 sc in the next st. Sk 2 sts, 4 dc in the next st] repeat around. Adjust the skipped stitches at the end of the round (e.g., sk 3 or sk 2) to make the pattern fit evenly. Join with a sl st to the first st.
- Rnd 2 (Full Shells): Ch 3 (counts as 1 dc). 1 dc in the same st (the sc from the previous row), ch 1, 2 dc in the same st. [1 sc in the center sp of the next shell. In the next sc, work a full shell: (2 dc, ch 1, 2 dc)] repeat around. Join with a sl st to the 3rd ch of the starting ch-3.
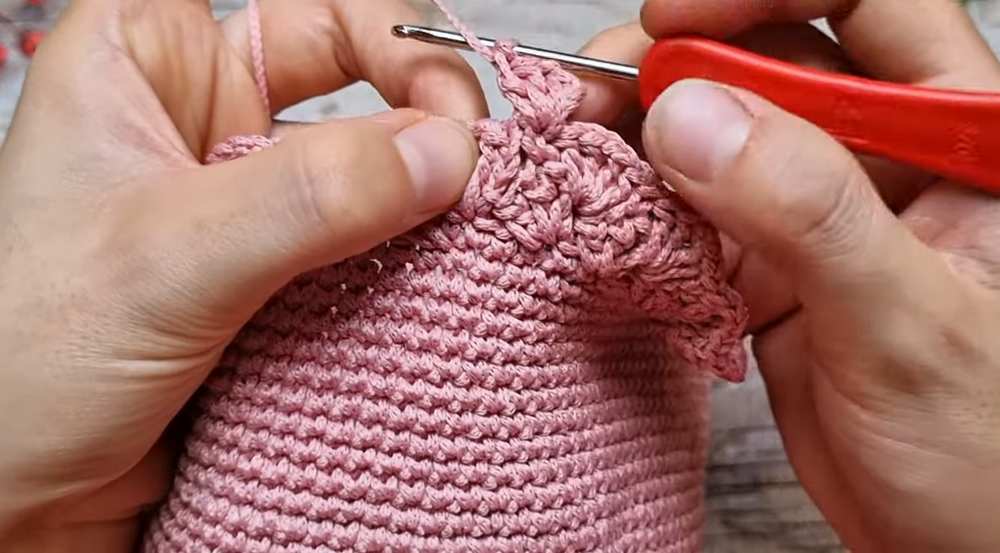
- Rnd 3 – 4: Turn work slightly to sl st back into the sc space just behind the join. Ch 3, 1 dc, ch 1, 2 dc in that same space. [1 sc in the ch-1 sp of the next shell. Full shell (2 dc, ch 1, 2 dc) in the next sc] repeat around. Join with a sl st.
- Rnd 5 (Brim Edge – Solid Shells): Sl st back into the sc space behind the join. Ch 3 (counts as 1 dc), 4 dc in the same space. [1 sc in the ch-1 sp of the next shell. 5 dc in the next sc space] repeat around. Join with a sl st. Fasten off and weave in ends.

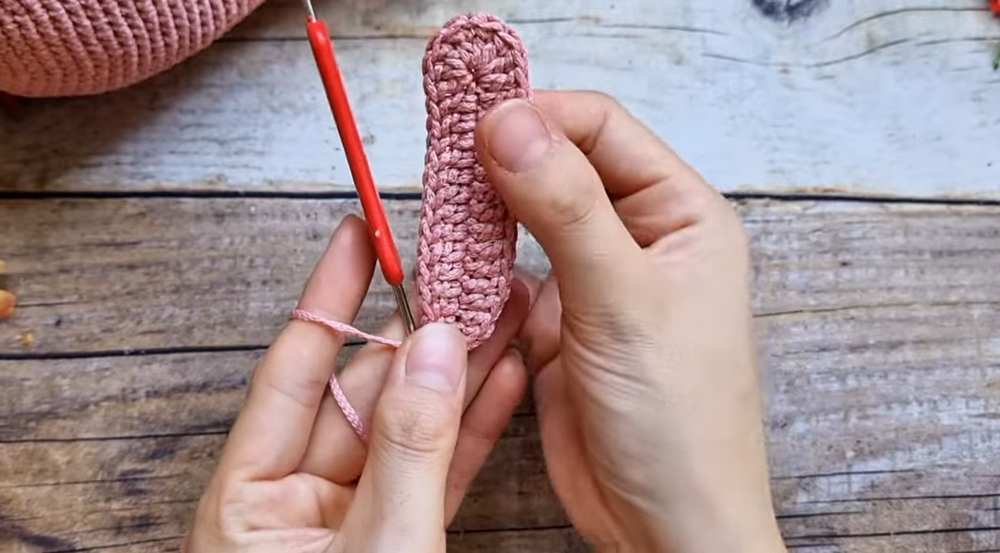
Bunny Ears (Make 2)
- Row 1: Ch 15 (or chain until you reach your desired ear length).
- Row 2: Sc in the 2nd ch from the hook. Hdc in the next ch. Dc in each ch until 1 ch remains. In the last ch, work (4 dc, ch 1, 4 dc).
- Row 3: Working down the opposite side of the chain: Dc in each st to mirror the other side, matching stitch for stitch until 2 sts remain. Hdc in the next st, sc in the last st.
- Row 4 (Edging): Ch 1, turn. Sl st loosely in each st up the side of the ear. When you reach the top ch-1 sp, work (1 sc, ch 2, 1 sc) into the space to create a point. Sl st loosely down the other side of the ear. Fasten off, leaving a long tail for sewing.
Assembly in Detail
- Positioning the Ears: Take the two finished bunny ears and position them on the front top section of the hat body. They should be placed symmetrically, close together, near the crown.
- Attaching the Ears: Use the long yarn tail left on the ears and a yarn needle to sew them to the hat. Alternatively, you can use a hot glue gun to attach them. The crucial step here is to sew or glue the ears down along the bottom 2/3 of their height. Do not just attach them at the base; securing them 2/3 of the way up ensures they stand firm and lay flat against the curve of the hat without flopping over.
- Adding the Bow: Take your pre-made decorative bow and attach it (via sewing or hot glue) directly centered at the base of the two ears. This acts as a cute decoration and hides the joined seam where the two ears meet the hat.
- Attaching the Tie Ribbon: Take a length of lace ribbon (or a crochet chain) and attach one end to the inside edge of the hat on the left side, and the other to the inside edge on the right side. This creates a chin strap to keep the hat secure on the wearer’s head.
- Optional Embroidery: If desired, use contrasting yarn and a yarn needle to cross-stitch a name or pattern onto the front flat section of the hat body.
Video Tutorial:
UK Pattern:
Crown & Body of the Hat
Note: The hat is worked in a continuous spiral. Do not join with a slip stitch at the end of each round unless specified. Use a stitch marker to mark the first stitch of every round.
Rnd 1: Create a MR, ch 1. Work 8 dc into the MR. Pull the yarn tail tight to close the ring. (8 sts)
Rnd 2: Inc in every st around. (16 sts)
Rnd 3: [1 dc, inc] repeat around. (24 sts)
Rnd 4: [3 dc, inc] repeat around. (30 sts)
Rnd 5: 2 dc, inc, [4 dc, inc] repeat until 2 sts remain, 2 dc. (36 sts) Note: This is an offset increase round to keep the circle round.
Rnd 6: [5 dc, inc] repeat around. (42 sts)
Rnd 7: 3 dc, inc, [6 dc, inc] repeat until 3 sts remain, 3 dc. (48 sts)
Rnd 8+: Continue increasing based on this established formula.
Rule for Odd numbers between increases (e.g., 7 dc, inc): Work standard repeats around.
Rule for Even numbers between increases (e.g., 8 dc, inc): Offset the increases by dividing the first even number in half (e.g., 4 dc, inc, then [8 dc, inc] around, ending with 4 dc).
Sizing Check: Flatten the piece and measure the diameter. Multiply the diameter by 3.14 to get the circumference. Continue increasing until the circumference matches your desired head size (e.g., for a 42cm head circumference, the diameter should be approx. 13.3cm). The video stops increasing after the round of [13 dc, inc] and does one final adjustment round of [7 dc, inc] for 4 repeats to get the exact measurement.
Body: Once the desired diameter is reached, work 1 dc in every st around (no more increases) until the hat reaches from the crown to just above the ear.
The Brim
The brim is worked in joined rounds.
Rnd 1 (Half-Shells): Ch 2, 3 tr in the same st (the base of the ch 2). [Sk 2 sts, 1 dc in the next st. Sk 2 sts, 4 tr in the next st] repeat around. Adjust the skipped stitches at the end of the round (e.g., sk 3 or sk 2) to make the pattern fit evenly. Join with a ss to the first st.
Rnd 2 (Full Shells): Ch 3 (counts as 1 tr). 1 tr in the same st (the dc from the previous row), ch 1, 2 tr in the same st. [1 dc in the centre sp of the next shell. In the next dc, work a full shell: (2 tr, ch 1, 2 tr)] repeat around. Join with a ss to the 3rd ch of the starting ch-3.
Rnd 3 – 4: Turn work slightly to ss back into the dc space just behind the join. Ch 3, 1 tr, ch 1, 2 tr in that same space. [1 dc in the ch-1 sp of the next shell. Full shell (2 tr, ch 1, 2 tr) in the next dc] repeat around. Join with a ss.
Rnd 5 (Brim Edge – Solid Shells): ss back into the dc space behind the join. Ch 3 (counts as 1 tr), 4 tr in the same space. [1 dc in the ch-1 sp of the next shell. 5 tr in the next dc space] repeat around. Join with a ss. Fasten off and weave in ends.
Bunny Ears (Make 2)
Row 1: Ch 15 (or chain until you reach your desired ear length).
Row 2: dc in the 2nd ch from the hook. htr in the next ch. tr in each ch until 1 ch remains. In the last ch, work (4 tr, ch 1, 4 tr).
Row 3: Working down the opposite side of the chain: tr in each st to mirror the other side, matching stitch for stitch until 2 sts remain. htr in the next st, dc in the last st.
Row 4 (Edging): Ch 1, turn. ss loosely in each st up the side of the ear. When you reach the top ch-1 sp, work (1 dc, ch 2, 1 dc) into the space to create a point. ss loosely down the other side of the ear. Fasten off, leaving a long tail for sewing.