
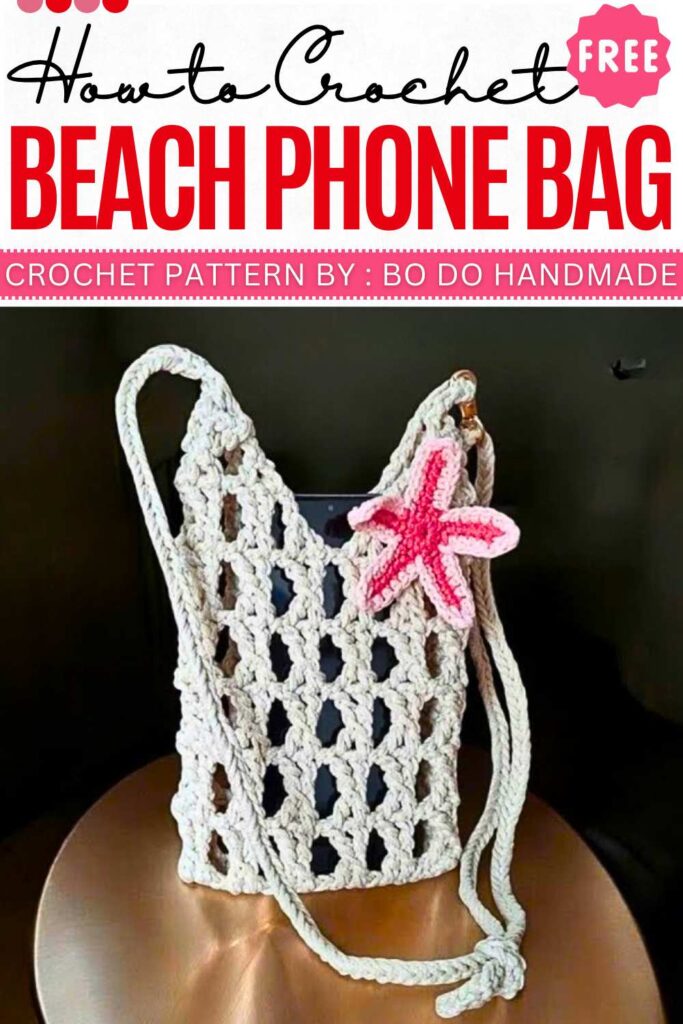
Free Crochet Beach Phone Bag Pattern for Summer
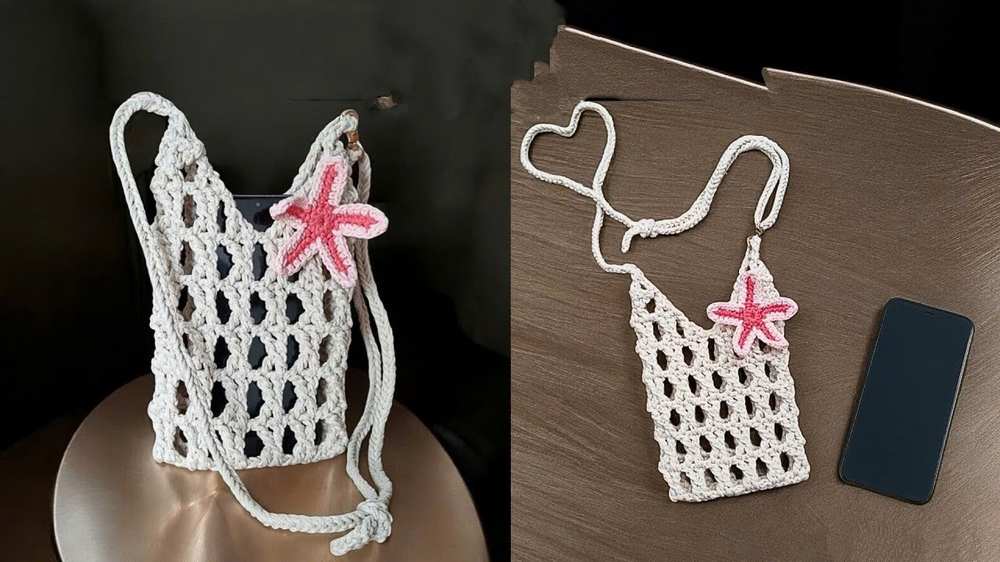
Learn how to crochet a mesh stitch phone bag with a sea creature applique and a sling handle following this written pattern. The mesh stitch requires the double crochet clusters and chain spaces, which means it should be easier for beginners. The pattern for the multi-colored starfish is also provided below.
You can also turn it into a water bottle holder using a round crochet base or oval base. There is an I-cord handle which looks kinda rustice when knotted. The straps are removable using the metal rings.
Summer Crochet Beach Phone Bag
Bi Do Handmade has been an expert in crocheting and designing crochet hats, bag charms, and pouches. Also, visit her YouTube channel for more exciting projects.
Materials Used
- Yarn: Woven cord (Sợi dệt), held double-stranded for the bag; single-strand for the starfish.
- Hooks: 4.0 mm (Bag) and 2.5 mm (Starfish).
- Accessories: 1 small lobster claw clasp, pink and light pink yarn for decoration.
- Tools: Scissors, yarn needle, hot glue gun or sewing thread.
Abbreviations (English)
- ch: Chain
- sc: Single crochet
- hdc: Half double crochet
- dc: Double crochet
- sl st: Slip stitch
- st(s): Stitch(es)
- sk: Skip
- yo: Yarn over
- MR: Magic ring
Pattern Outline
Bottom
- Foundation: 17 ch.
- R1: Sc in each ch to end, 3 sc in last ch to turn, sc in each ch on opposite side, 2 sc in starting ch. Join with sl st.
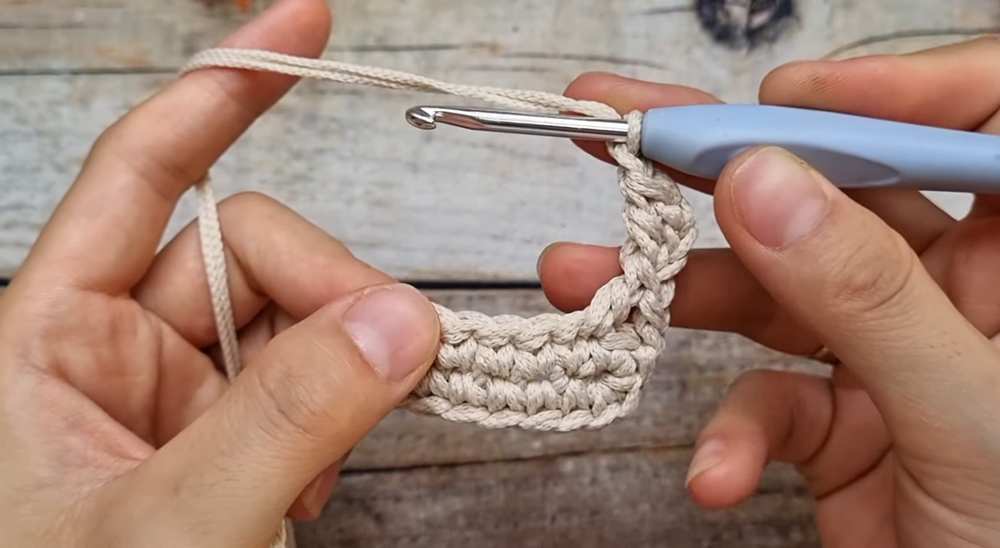
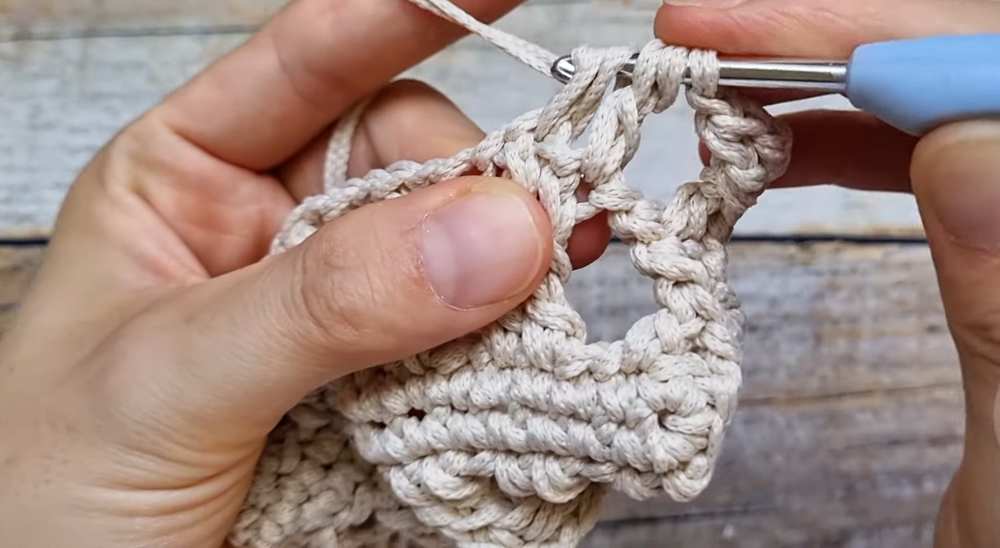
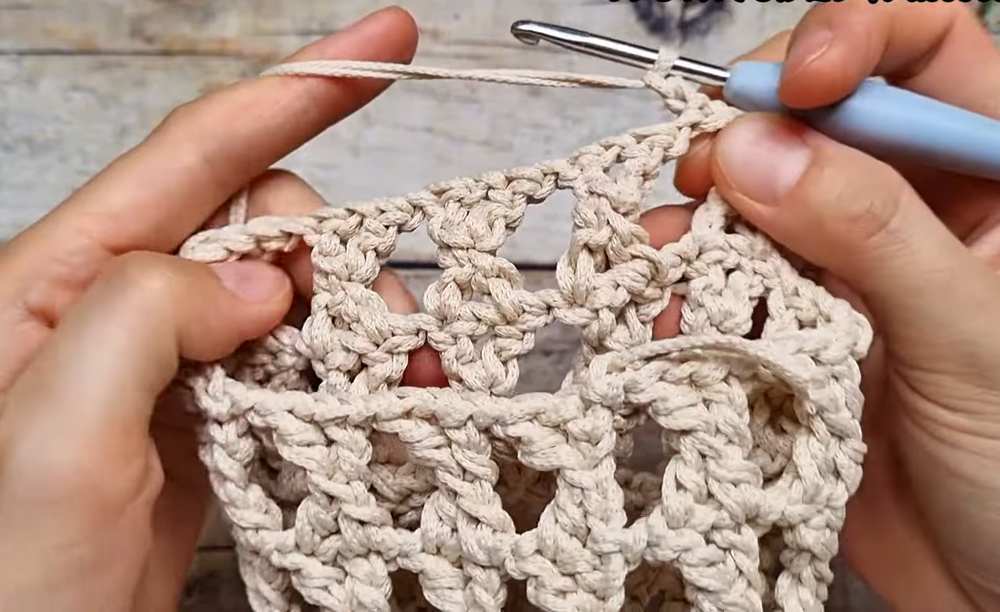
Body (Mesh Pattern)
- R1-5: [Yo 2, insert hook in next st, pull up loop, yo, pull through 2 (2 loops on hook). Yo, insert hook in next st, pull up loop, yo, pull through 2 (3 loops on hook). Yo, pull through 2, four times total to close. Ch 1, dc into the center crossing of the stitch.] Rep around for 12 total patterns. Join with sl st. Fasten off.
Assembly Detail
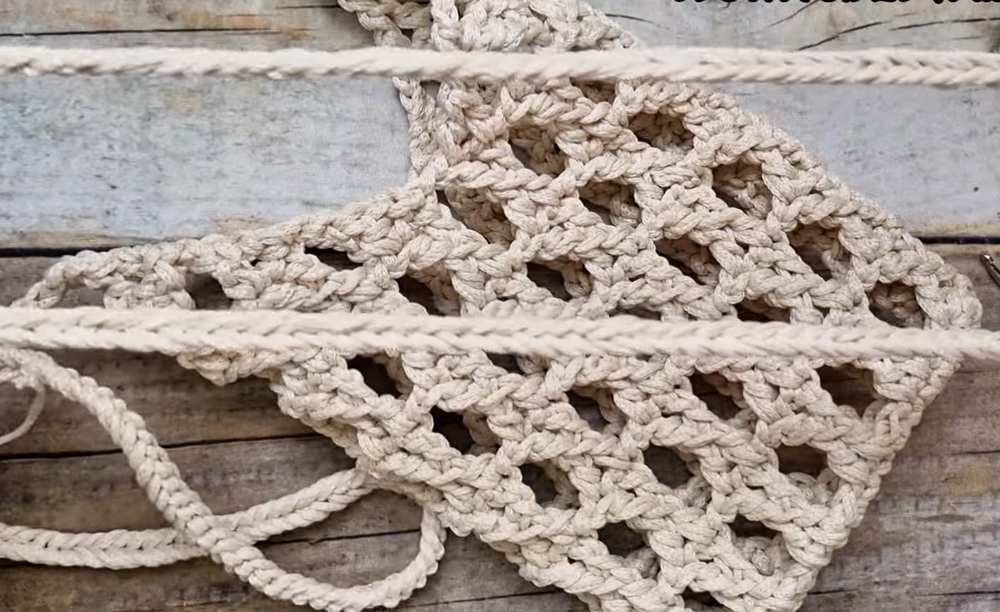
1. Tapering the Top Edges The bag top is divided into two sections (6 patterns each). Attach yarn to the first pattern of one side.
- Row 1: Work a half-pattern decrease at the start, 4 full patterns across, and a half-pattern decrease at the end.
- Row 2: Work a half-pattern decrease, 2 full patterns across, and a half-pattern decrease.
- Row 3: Work two half-patterns side-by-side to create a narrow peak. Repeat this entire process for the second side of the bag.
2. Creating the Strap (Sl st Cord) From the peak of the second side, do not fasten off.
- Ch 1, sc into the peak.
- Identify the vertical loop on the side of the sc. Insert hook into this loop, yo, and pull through for a sl st.
- Repeat by inserting the hook into the side loop of the previous sl st and working a new sl st. Continue this sequence until the cord reaches your desired length. Fasten off.
3. Attaching Hardware Thread one end of the finished cord through the eye of a small lobster claw clasp. Secure the yarn and weave in ends. Clip the lobster clasp onto the peak of the opposite side of the bag.
4. Making the Adjustable Sliding Knot Lay the strap flat. Take the loose yarn tail (or a separate length of cord) and place it over the main strap.
- Wrap the yarn around the main strap three times, moving toward the right.
- Tuck the end of the yarn back through the three loops created by the wraps.
- Pull both ends of the yarn to tighten the knot around the strap. This allows the knot to slide, making the strap length adjustable.
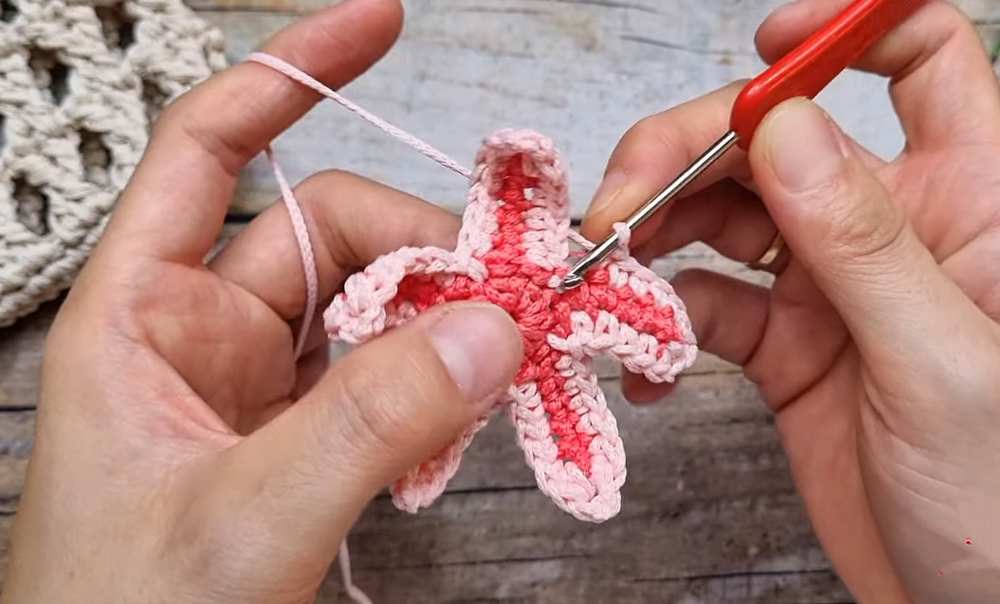
Crochet Starfish Pattern
Materials: Single-strand yarn, 2.5 mm hook.
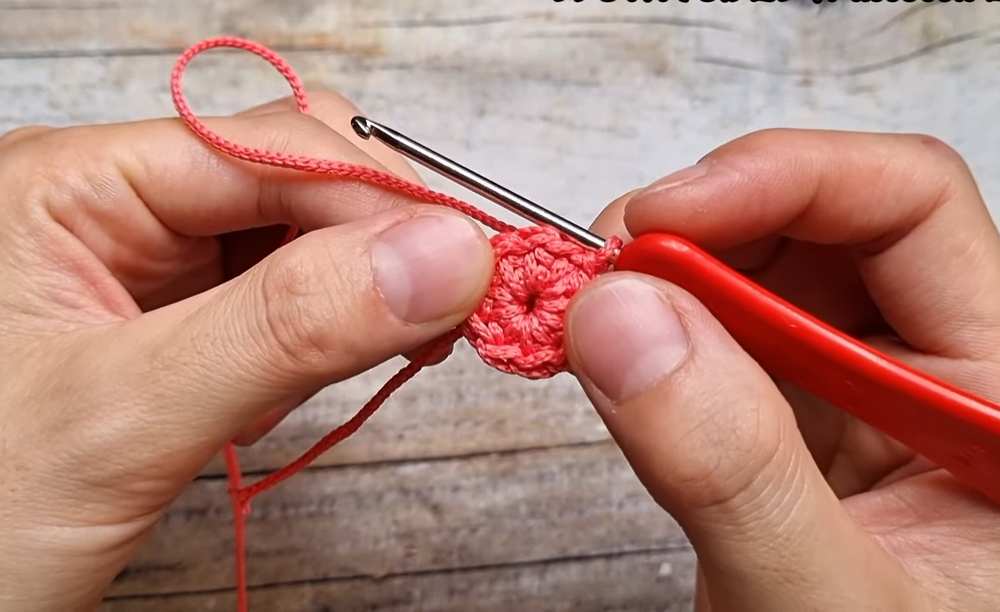
Inner Circle:
R1: Create a MR.
R2: Ch 1, work 10 hdc into the ring.
R3: Sl st into the first hdc to join. Pull the yarn tail to close the center tight.
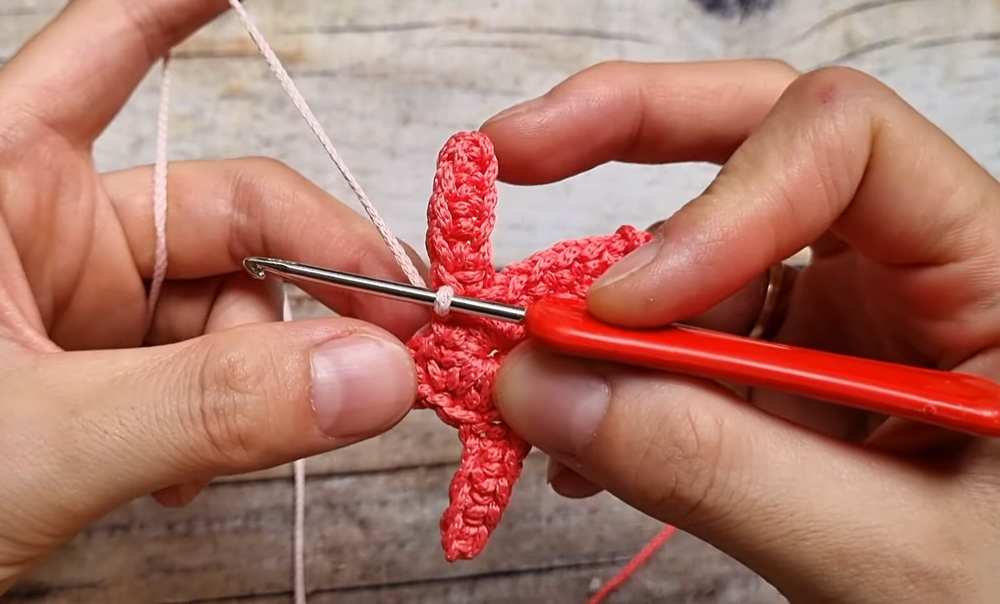
Starfish Arms (5 total):
Step 1: Ch 5.
Step 2: Ch 1 extra (turning chain), then work 5 sc back down the chain starting from the second ch from hook.
Step 3: Sl st into the next hdc of the inner circle to secure the arm.
Step 4: Sl st into the following hdc to move to the starting position for the next arm.
Step 5: Repeat until you have 5 arms. Join with sl st.
Contrast Border (Light Pink):
Attach light pink yarn to the base of an arm.
Side 1: Work 5 sc along the side of the arm.
Tip: In the last st at the tip, work (sc, hdc, ch 2, sl st into the first ch, hdc, sc) all in the same space to create a sharp point.
Side 2: Work 4 sc down the other side of the arm.
Join: Sl st into the base of the arm on the inner circle.
Repeat for all 5 arms. Fasten off and weave in ends.
Video Tutorial:
UK Pattern
Pattern: Mesh Phone Bag
Bottom
Foundation: 17 ch.
R1: Dc in each ch to end, 3 dc in last ch to turn, dc in each ch on opposite side, 2 dc in starting ch. Join with ss.
Body (Mesh Pattern)
R1-5: [Yo 2, insert hook in next st, pull up loop, yo, pull through 2 (2 loops on hook). Yo, insert hook in next st, pull up loop, yo, pull through 2 (3 loops on hook). Yo, pull through 2, four times total to close. Ch 1, tr into the center crossing of the stitch.] Rep around for 12 total patterns. Join with ss. Fasten off.
Assembly Detail
1. Tapering the Top Edges
Divide the bag top into two sections (6 patterns each). Attach yarn to the first pattern of one side.
Row 1: Work a half-pattern decrease at the start, 4 full patterns across, and a half-pattern decrease at the end.
Row 2: Work a half-pattern decrease, 2 full patterns across, and a half-pattern decrease.
Row 3: Work two half-patterns side-by-side to create a narrow peak. Repeat for the second side.
2. Creating the Strap (ss Cord)
From the peak of the second side, do not fasten off.
Ch 1, dc into the peak.
Identify the vertical loop on the side of the dc. Insert hook into this loop, yo, and pull through for a ss.
Repeat by inserting hook into the side loop of the previous ss and working a new ss. Continue until desired length. Fasten off.
3. Attaching Hardware
Thread one end of the cord through the eye of the lobster clasp. Secure and weave in ends. Clip the clasp onto the peak of the opposite side.
4. Adjustable Sliding Knot
Lay the strap flat. Use a separate length of cord over the main strap.
Wrap the yarn around the main strap 3 times toward the right.
Tuck the end back through the 3 loops.
Pull both ends to tighten.
Pattern: Starfish Decoration
Inner Circle
R1: Create a MR.
R2: Ch 1, work 10 htr into the ring.
R3: Ss into the first htr to join. Pull MR tight.
Starfish Arms (Make 5)
Step 1: Ch 5.
Step 2: Ch 1 extra (turning chain), work 5 dc back down the chain starting from 2nd ch from hook.
Step 3: Ss into next htr of the inner circle to secure arm.
Step 4: Ss into following htr to move to the starting position for the next arm.
Step 5: Repeat for 5 arms. Join with ss.
Contrast Border (Light Pink)
Attach light pink yarn to the base of an arm.
Side 1: Work 5 dc along the side of the arm.
Tip: In the last st at the tip, work (dc, htr, ch 2, ss into first ch, htr, dc) all in the same space.
Side 2: Work 4 dc down the other side.
Join: Ss into the base of the arm on the inner circle.
Repeat for all 5 arms. Fasten off and weave in ends.