
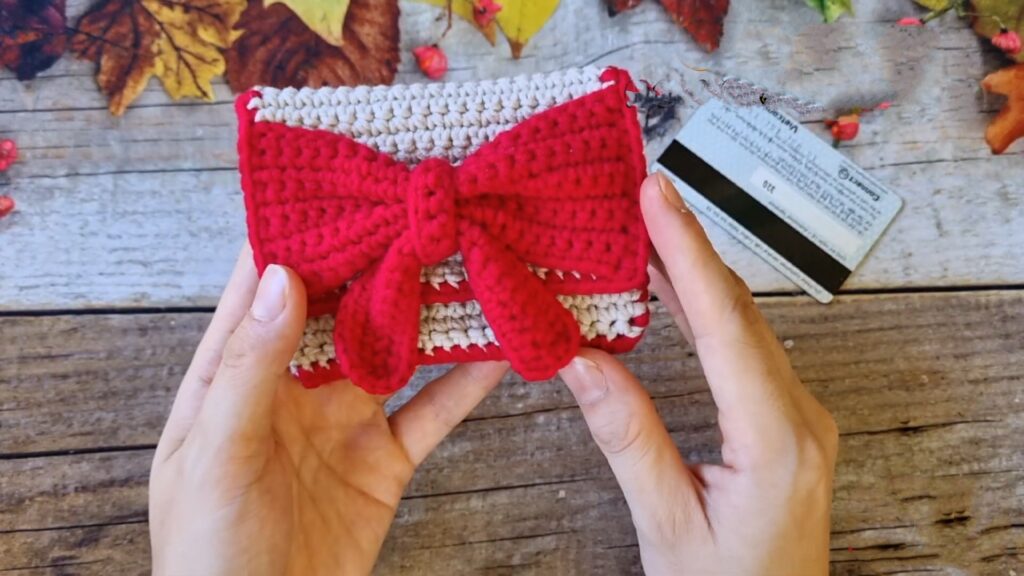
Crochet Card Wallet & Pouch Pattern Free
Ever feel like your bank cards and coins are just playing hide-and-seek at the bottom of your bag? You need to crochet this adorable wallet with our simplest pattern. It is compact and has a big, pretty bow on the front, looking like a wrapped present that you get to carry around with you every day. You can go with the same bow design or leave it simple; it’s all about you!
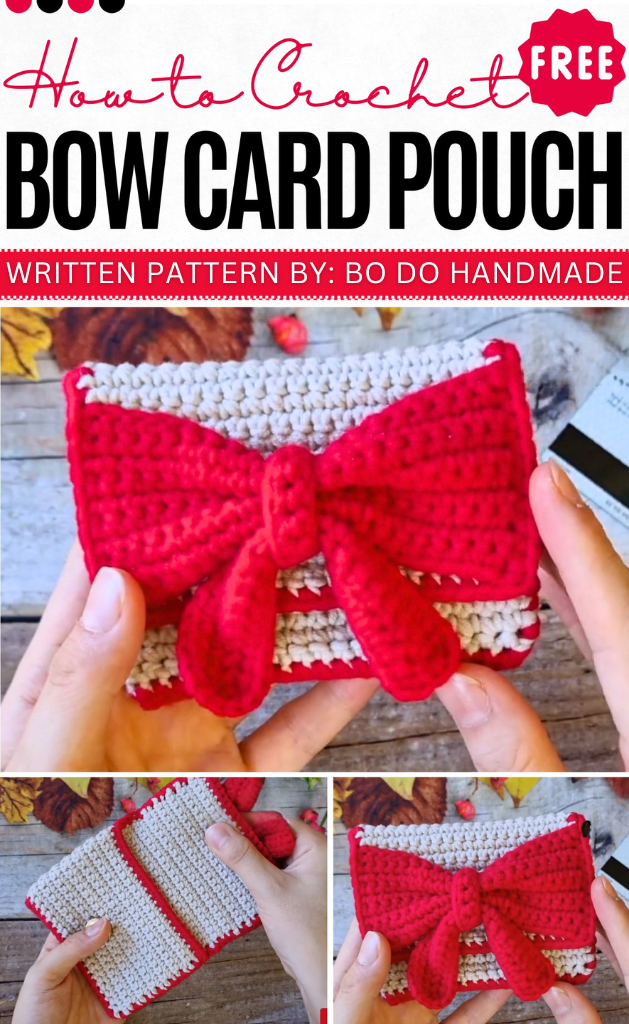
Making this pouch is super fun and easy! All you do is crochet one long, flat rectangle and fold the bottom up to make a little pocket for your cards. Then, you make a tiny separate square, pinch it in the middle to make it look like a bow, and sew it on. Finally, add a little button to keep it closed, and you’ve got a cute new pouch that’s ready to use!
About The Creator:
Bi do Handmade has been an expert in crocheting and designing crochet amigurumi, bag charms, and pouches. Also visit her YouTube channel for more exciting projects.
Let’s Crochet Card Wallet
Materials
-
Yarn (Fingering or Sport weight recommended)
-
Hook (size suitable for yarn, e.g., 2.5mm – 3.0mm)
-
Snap fastener (or button)
-
Yarn needle, scissors
Abbreviations (US Terms)
-
ch: Chain
-
sc: Single Crochet
-
st(s): Stitch(es)
-
sl st: Slip Stitch
-
RS: Right Side
-
WS: Wrong Side
1. Wallet Main Body
Base (Pocket Section)
-
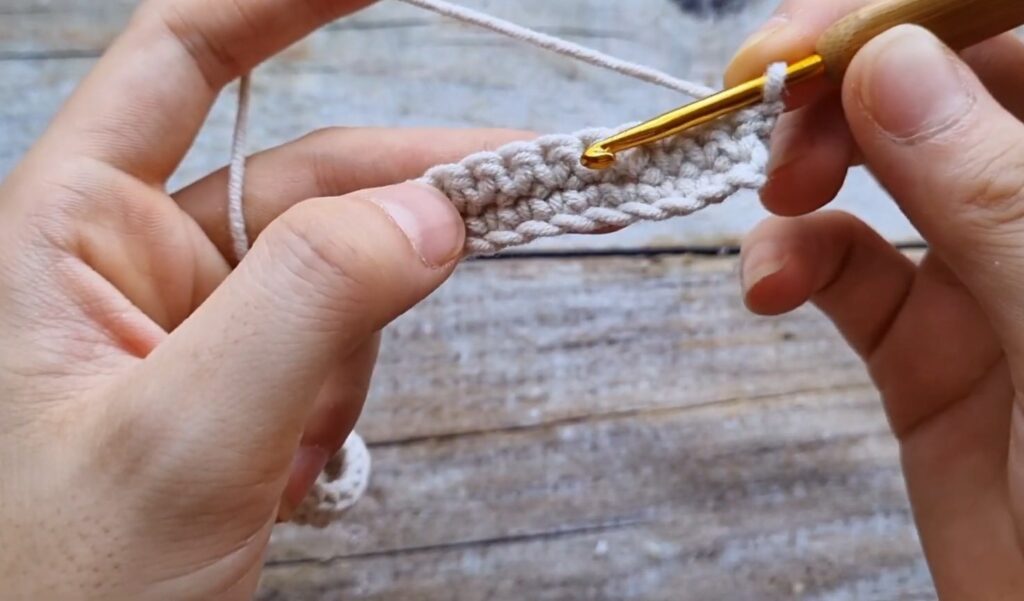
Row 1: Ch 41. Sc in 2nd ch from hook and in each ch across. (40 sts)
-
Row 2: Ch 1, turn. Sc in each st across. (40 sts)
-
Rows 3–14: Repeat Row 2.
-
Note: This section forms the pocket. Adjust number of rows if needed so height covers your card + approx 1cm.
-
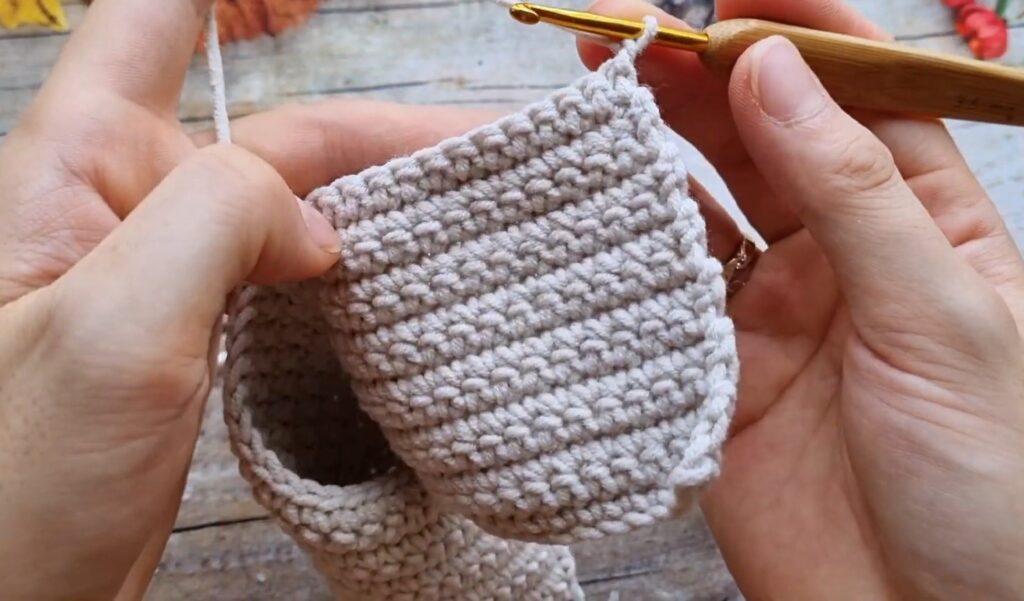
Flap Extension
-
Row 15: Ch 1, turn. Sc in next 20 sts only. Leave remaining 20 sts unworked. (20 sts)
-
Row 16: Ch 1, turn. Sc in each st across. (20 sts)
-
Rows 17–30: Repeat Row 16.
-
Note: Continue working until the flap is slightly longer than the pocket section (approx. 1-2 rows more than the Base).
-
-
Fasten off and weave in ends.
2. Bow Panel
-
Row 1: Ch 21. Sc in 2nd ch from hook and in each ch across. (20 sts)
-
Row 2: Ch 1, turn. Sc in each st across. (20 sts)
-
Rows 3–12: Repeat Row 2.
-
Note: The height of this panel should be approx. 2cm shorter than the Flap Extension.
-
-
Fasten off.
3. Bow Tails (Ribbon)
-
Row 1: Ch 21. Sc in 2nd ch from hook and in each ch across. (20 sts)
-
Row 2: Ch 1, turn. Sc in each st across. (20 sts)
-
Fasten off.
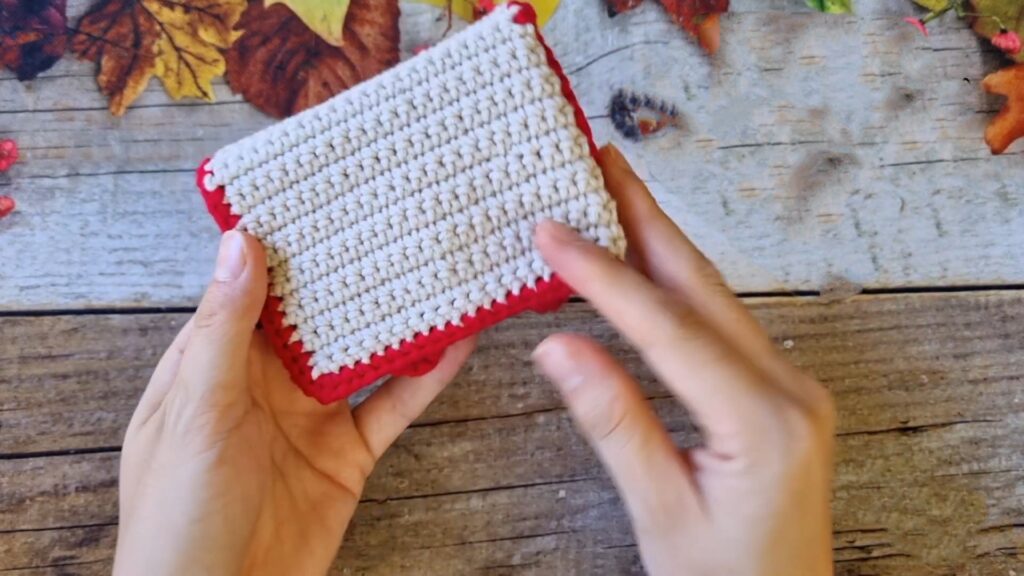
4. Assembly & Edging
Step 1: Positioning
-
Fold the Base (40 sts) in half widthwise so the 20-st sections align to form the pocket. The Flap Extension should stand up above the back of the pocket.
-
Place the Bow Panel on top of the Flap Extension, aligning the side edges.
Step 2: Bordering
-
Join yarn at the bottom corner of the folded pocket.
-
Sc evenly around the entire perimeter of the wallet:
-
Pocket Sides: Work sc through both layers (front and back of the folded base) to seal the pocket.
-
Flap Sides: Work sc through both the Flap and the Bow Panel to secure them together at the sides.
-
Flap Top Edge: Pull the Bow Panel slightly forward/down and work sc only into the Flap stitches (leaving the top edge of the Bow Panel open/loose).
-
Corners: Work 3 sc in each corner stitch to round them smoothly.
-
-
Sl st to the first sc to join. Fasten off and weave in ends.
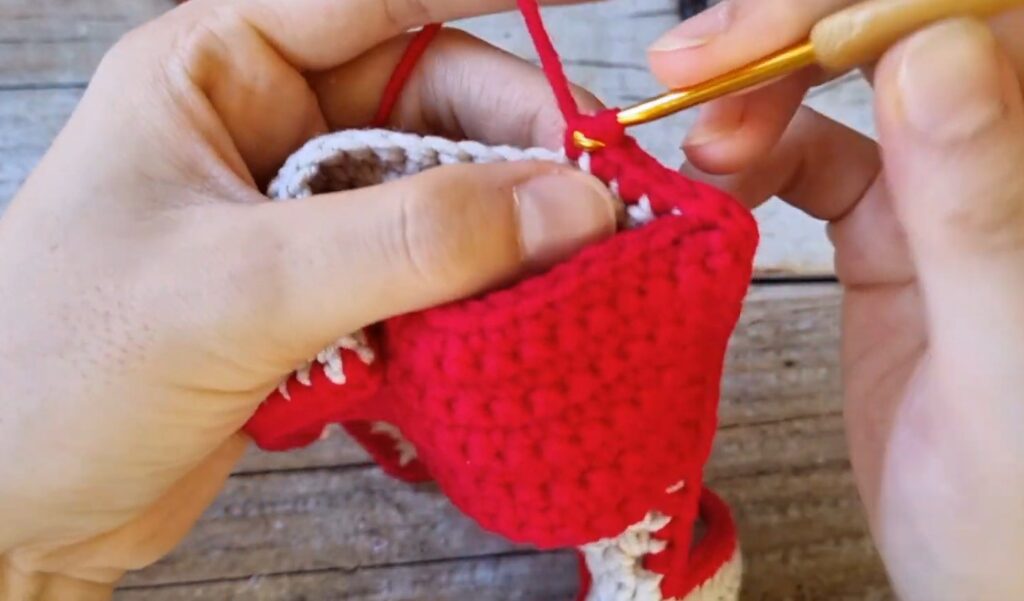
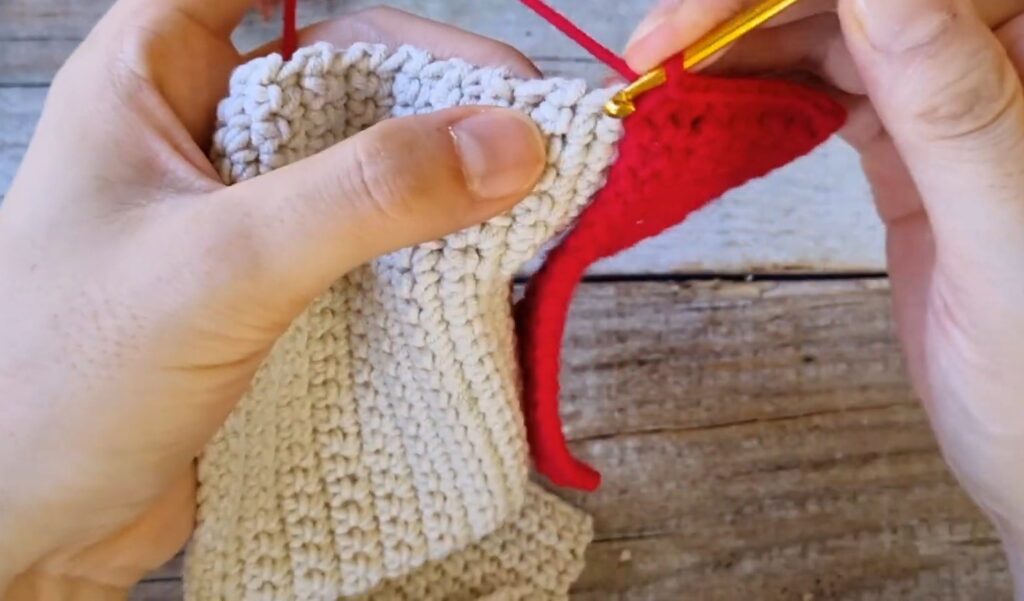
Step 3: Forming the Bow
-
Pinch the center of the Bow Panel (and the Flap underneath) to create a bow shape.
-
Fold the Bow Tails strip in half to form a “V” shape and place it underneath the pinched center.
-
Using a strand of yarn, wrap tightly around the center pinch multiple times to secure the shape and the tails. Knot securely at the back (inside the flap).
-
Use a yarn needle to stitch the wrapped center to the flap to prevent shifting.
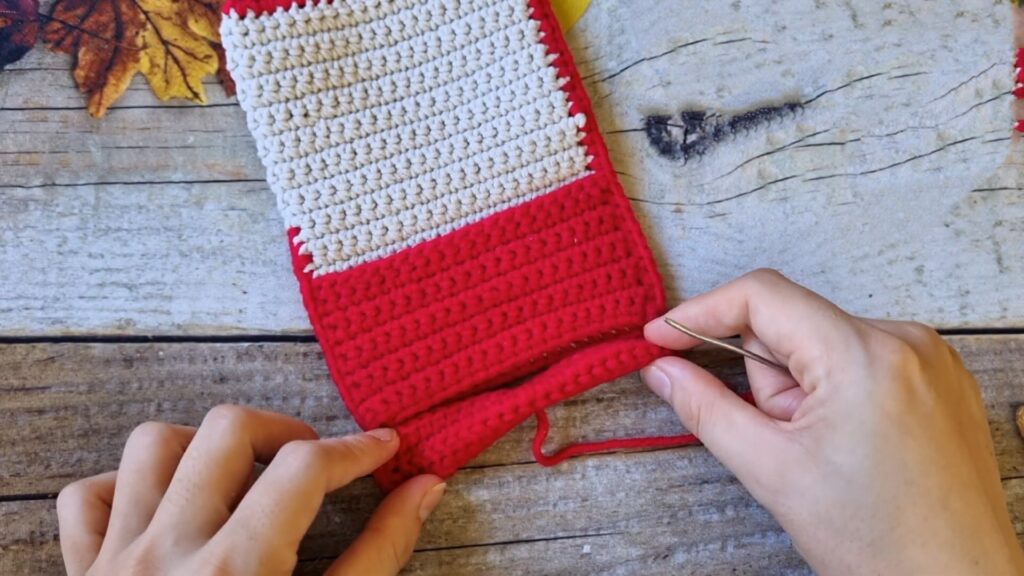
Step 4: Finishing
-
-
Sew a snap fastener or button to the inside of the flap and the corresponding spot on the pocket body.
-
Pattern In UK Terms
Abbreviations (UK Terms)
-
ch: Chain
-
dc: Double Crochet (US sc)
-
st(s): Stitch(es)
-
ss: Slip Stitch
-
RS: Right Side
-
WS: Wrong Side
1. Wallet Main Body
Base (Pocket Section)
-
Row 1: Ch 41. Dc in 2nd ch from hook and in each ch across. (40 sts)
-
Row 2: Ch 1, turn. Dc in each st across. (40 sts)
-
Rows 3–14: Repeat Row 2.
-
Note: Adjust row count if necessary to cover the height of your card plus approx. 1cm.
-
Flap Extension
-
Row 15: Ch 1, turn. Dc in next 20 sts only. Leave remaining 20 sts unworked. (20 sts)
-
Row 16: Ch 1, turn. Dc in each st across. (20 sts)
-
Rows 17–30: Repeat Row 16.
-
Note: Work until flap is slightly longer than the Base section (approx. 1–2 rows more).
-
-
Fasten off and weave in ends.
2. Bow Panel
-
Row 1: Ch 21. Dc in 2nd ch from hook and in each ch across. (20 sts)
-
Row 2: Ch 1, turn. Dc in each st across. (20 sts)
-
Rows 3–12: Repeat Row 2.
-
Note: Height should be approx. 2cm shorter than the Flap Extension.
-
-
Fasten off.
3. Bow Tails (Ribbon)
-
Row 1: Ch 21. Dc in 2nd ch from hook and in each ch across. (20 sts)
-
Row 2: Ch 1, turn. Dc in each st across. (20 sts)
-
Fasten off.
4. Assembly & Edging
Step 1: Positioning
-
Fold the Base (40 sts) in half widthwise so the 20-st sections align to form the pocket.
-
Place the Bow Panel on top of the Flap Extension, aligning the side edges.
Step 2: Bordering
-
Join yarn at the bottom corner of the folded pocket.
-
Dc evenly around the entire perimeter:
-
Pocket Sides: Work dc through both layers (front and back of folded base).
-
Flap Sides: Work dc through both the Flap and the Bow Panel.
-
Flap Top Edge: Pull Bow Panel forward/down; work dc only into Flap stitches (leaving top edge of Bow Panel open).
-
Corners: Work 3 dc in each corner stitch.
-
-
Ss to first dc to join. Fasten off.
Step 3: Forming the Bow
-
Pinch the centre of the Bow Panel (and Flap underneath).
-
Fold Bow Tails into a “V” shape; place underneath the pinched centre.
-
Wrap yarn tightly around the centre pinch multiple times to secure shape and tails. Knot securely at the back.
-
Stitch wrapped centre to flap to fix in place.
Step 4: Finishing
-
Sew a snap fastener or button to the inside of the flap and the corresponding position on the pocket.