
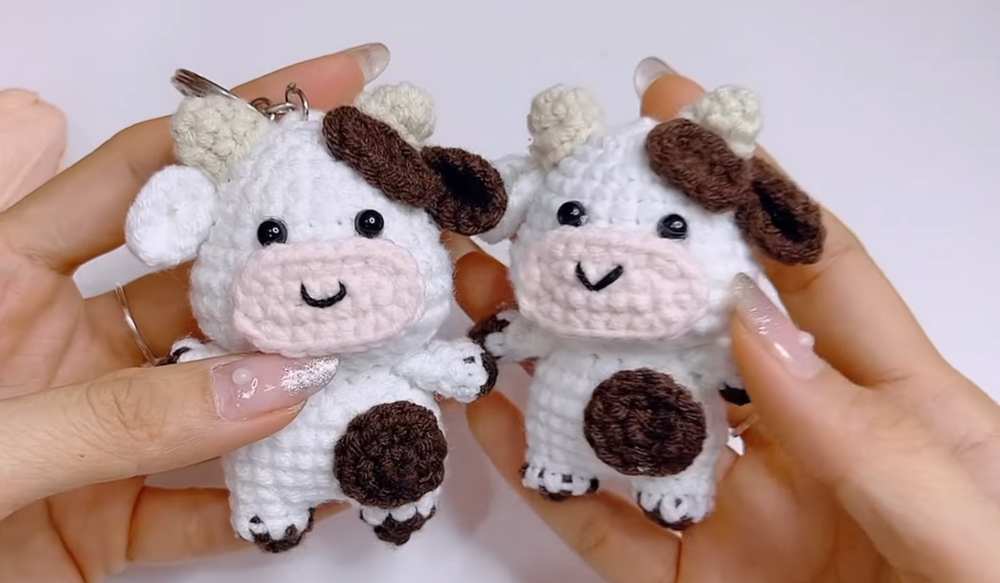
Crochet Cow Amigurumi Toy Pattern For Beginners
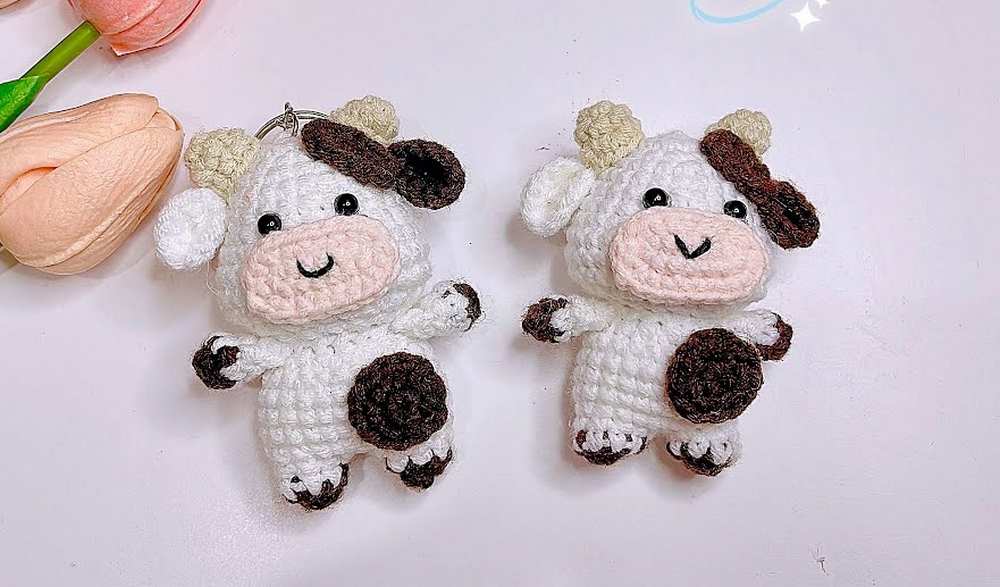
If you are a fan of small handmade toys, you are going to love today’s pattern. The pattern is for making a stuffed amigurumi cow to gift as a toy, keychain, or bag charm. There are two variations of the cow which you can label as male and female to make a lovely couple’s gift.
The cow is not made in one piece; make the small pieces and sew them together. The pattern might be tricky for beginners but is quite easy for pro crocheters. We have added the pattern in both US and UK terms and also added the video pattern for a smooth process!
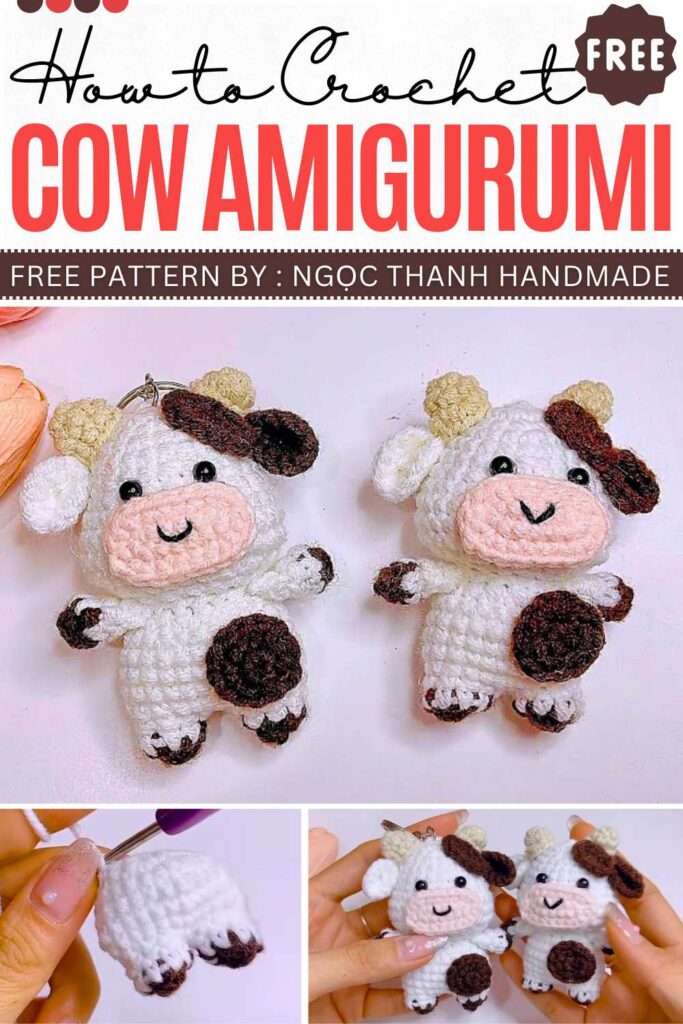
The designer behind this avocado keychain is Ngọc Thanh Handmade – she has quite a good grasp on kawaii amigurumi designing with added cuteness and surprises.
6 Free Crochet Wacky Animal Keychain Patterns
https://mycraftybasket.com/crochet-wacky-animal-keychain/
Materials
- Yarn: Milk Cotton (White, Dark Brown, Skin Pink, Beige)
- Hook: 2.5 mm
- Eyes: 5 mm safety eyes or beads
- Others: Fiberfill, hot glue gun, tapestry needle, black embroidery thread
Abbreviations
- MR: Magic Ring
- ch: Chain
- sc: Single crochet
- inc: Increase (2 sc in 1 st)
- dec: Decrease (Invisible decrease preferred)
- sl st: Slip stitch
- W: 3 sc in 1 st
- R: Round/Row
- […]: Total stitches at end of round
Step by step Pattern
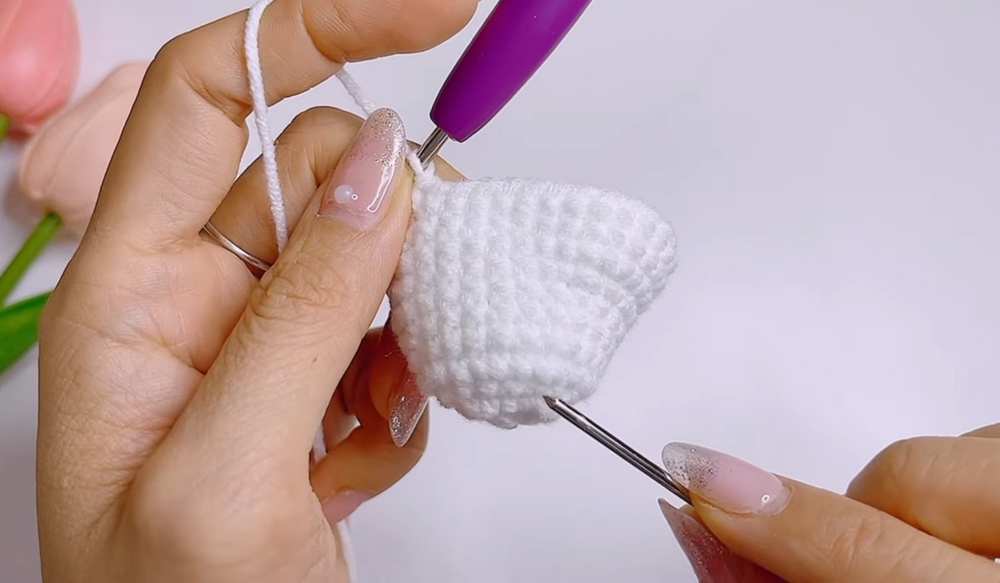
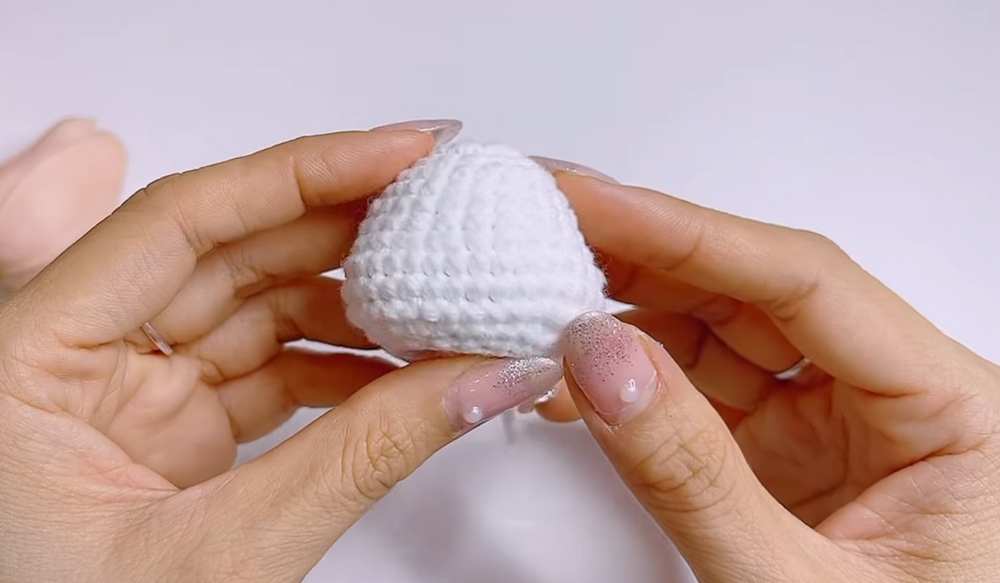
Head (White)
- R1: MR 8 sc [8]
- R2: 8 inc [16]
- R3: 16 sc [16]
- R4: (1 sc, inc) * 8 [24]
- R5–7: 24 sc [24]
- R8: 6 sc, 4 inc, 4 sc, 4 inc, 6 sc [32]
- R9–11: 32 sc [32]
- R12: 6 sc, 4 dec, 4 sc, 4 dec, 6 sc [24]
- R13: (1 sc, dec) * 8 [16]
- Sl st, fasten off. Stuff firmly, focusing on the “cheeks” created by the R8 increases.
Legs and Body
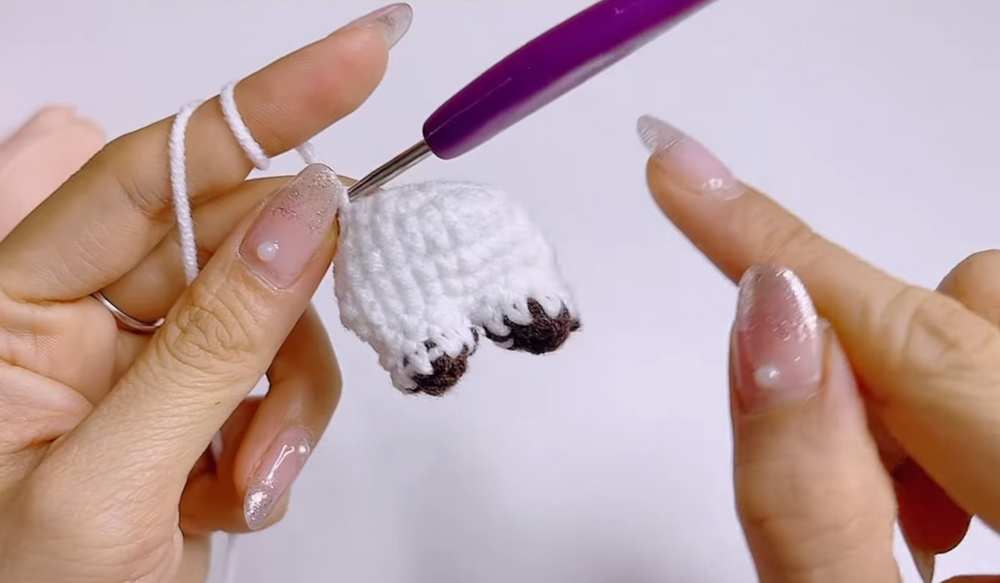
Legs (Make 2)
- R1 (Brown): MR 8 sc [8]
- R2 (White): 8 sc [8]. Fasten off the first leg. Do not fasten off the second leg. Body (White)
- Join: From 2nd leg, ch 2. Join to 1st leg with a sc.
- R3: 8 sc (on 1st leg), 2 sc (on ch), 8 sc (on 2nd leg), 2 sc (on other side of ch) [20]
- R4: 4 sc, inc, 3 sc, 2 inc, 3 sc, inc, 6 sc [24]
- R5–8: 24 sc [24]
- R9: (1 sc, dec) * 8 [16]
- Sl st, leave long tail for sewing. Stuff.
Arms (Make 2)
- R1 (Brown): MR 6 sc [6]
- R2–3 (White): 6 sc [6]
- Fold flat, 3 sc across both layers to close. Fasten off.
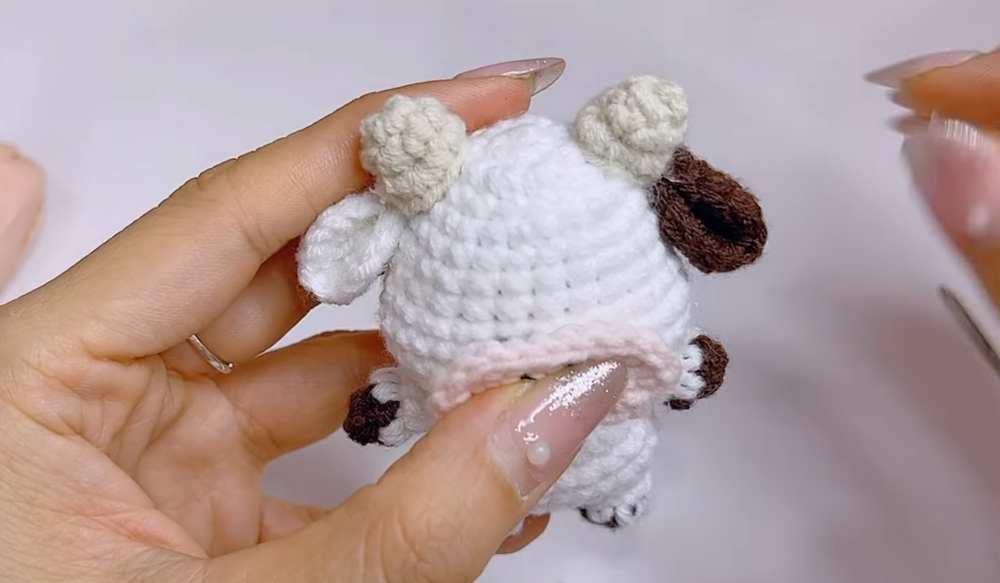
Ears (Make 2 – 1 White, 1 Brown)
- R1: MR 8 sc [8]
- R2: 8 inc [16]
- Sl st, fasten off. Fold slightly before attaching.
Horns (Make 2, Beige)
- R1: MR 6 sc [6]
- R2: 6 sc [6]
- R3: (1 sc, inc) * 3 [9]
- Sl st, fasten off.
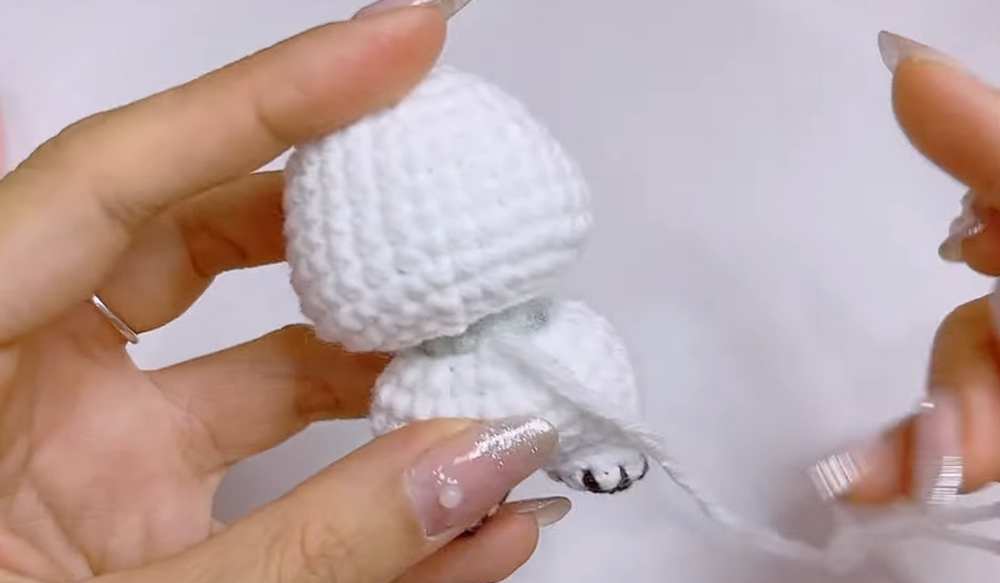
Snout (Skin Pink)
- Foundation: ch 7.
- R1: 5 sc, W, 4 sc, inc [14]
- R2: inc, 4 sc, 3 inc, 4 sc, 2 inc [20]
- Sl st, fasten off. Embroider a “V” shape in the center using black thread for the mouth.
Spots (Brown)
- Round Spot: R1: MR 6 sc [6]. R2: 6 inc [12]. Sl st, fasten off.
- Oval Spot: ch 5. R1: 3 sc, W, 2 sc, inc [10]. Sl st, fasten off.
Assembly Details
- Head and Body: Align the open neck of the body with the bottom of the head. Use the yarn tail from the body to whipstitch the 16 stitches of the neck to the head. Ensure the head is facing forward (increases from R8 should be on the sides for cheeks).
- Snout: Position the pink snout on the lower center of the face, approximately across R7 to R11. Use hot glue to secure it.
- Eyes: Position the 5 mm eyes just above the snout, roughly between R6 and R7, spaced about 4–5 stitches apart. Glue them in place.
- Horns: Place the beige horns on top of the head. Position them symmetrically, starting from R2–R3 away from the center magic ring. Glue firmly.
- Ears: Fold the ears slightly to give them a curved look. Glue them directly next to or slightly behind the horns on the sides of the head.
- Arms: Glue the arms to the sides of the body, just below the neck seam. They should be angled slightly forward.
- Spots: Glue the round and oval brown spots randomly on the head and body to create the cow’s “dairy” pattern.
- Final Touches: Hide all remaining yarn tails inside the body using a tapestry needle. Ensure all glued parts are held firmly until the glue sets completely.
Video Pattern
Pattern (UK Terminology)
Head (White)
- R1: MR 8 dc [8]
- R2: 8 inc [16]
- R3: 16 dc [16]
- R4: (1 dc, inc) * 8 [24]
- R5–7: 24 dc [24]
- R8: 6 dc, 4 inc, 4 dc, 4 inc, 6 dc [32]
- R9–11: 32 dc [32]
- R12: 6 dc, 4 dec, 4 dc, 4 dec, 6 dc [24]
- R13: (1 dc, dec) * 8 [16]
- Sl st, fasten off. Stuff firmly, focusing on the “cheeks” created by the R8 increases.
Legs and Body
Legs (Make 2)
- R1 (Brown): MR 8 dc [8]
- R2 (White): 8 dc [8]. Fasten off the first leg. Do not fasten off the second leg. Body (White)
- Join: From 2nd leg, ch 2. Join to 1st leg with a dc.
- R3: 8 dc (on 1st leg), 2 dc (on ch), 8 dc (on 2nd leg), 2 dc (on other side of ch) [20]
- R4: 4 dc, inc, 3 dc, 2 inc, 3 dc, inc, 6 dc [24]
- R5–8: 24 dc [24]
- R9: (1 dc, dec) * 8 [16]
- Sl st, leave long tail for sewing. Stuff.
Arms (Make 2)
- R1 (Brown): MR 6 dc [6]
- R2–3 (White): 6 dc [6]
- Fold flat, 3 dc across both layers to close. Fasten off.
Ears (Make 2 – 1 White, 1 Brown)
- R1: MR 8 dc [8]
- R2: 8 inc [16]
- Sl st, fasten off. Fold slightly before attaching.
Horns (Make 2, Beige)
- R1: MR 6 dc [6]
- R2: 6 dc [6]
- R3: (1 dc, inc) * 3 [9]
- Sl st, fasten off.
Snout (Skin Pink)
- Foundation: ch 7.
- R1: 5 dc, W, 4 dc, inc [14]
- R2: inc, 4 dc, 3 inc, 4 dc, 2 inc [20]
- Sl st, fasten off. Embroider a “V” shape in the center using black thread for the mouth.
Spots (Brown)
- Round Spot: R1: MR 6 dc [6]. R2: 6 inc [12]. Sl st, fasten off.
- Oval Spot: ch 5. R1: 3 dc, W, 2 dc, inc [10]. Sl st, fasten off.
Assembly Details
- Head and Body: Align the open neck of the body with the bottom of the head. Use the yarn tail from the body to whipstitch the 16 stitches of the neck to the head. Ensure the head is facing forward (increases from R8 should be on the sides for cheeks).
- Snout: Position the pink snout on the lower center of the face, approximately across R7 to R11. Use hot glue to secure it.
- Eyes: Position the 5 mm eyes just above the snout, roughly between R6 and R7, spaced about 4–5 stitches apart. Glue them in place.
- Horns: Place the beige horns on top of the head. Position them symmetrically, starting from R2–R3 away from the center magic ring. Glue firmly.
- Ears: Fold the ears slightly to give them a curved look. Glue them directly next to or slightly behind the horns on the sides of the head.
- Arms: Glue the arms to the sides of the body, just below the neck seam. They should be angled slightly forward.
- Spots: Glue the round and oval brown spots randomly on the head and body to create the cow’s “dairy” pattern.
- Final Touches: Hide all remaining yarn tails inside the body using a tapestry needle. Ensure all glued parts are held firmly until the glue sets completely.