
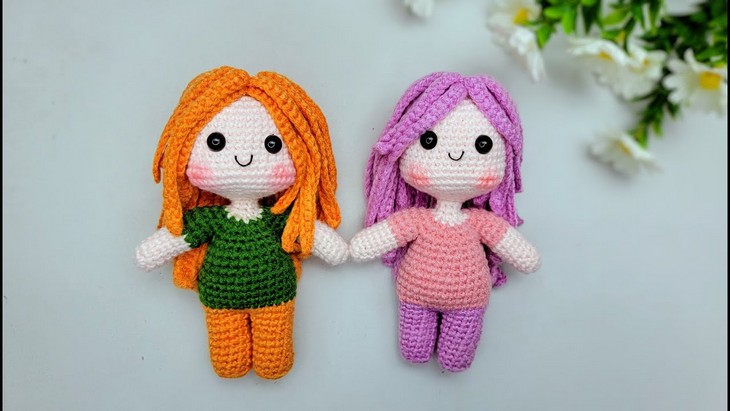
How to Crochet Cute Cartoon Girl Doll Amigurumi for Kids
Here is a cute but basic custom doll project for beginners! With a stitch-by-stitch tutorial, learn how to crochet a cute cartoon doll amigurumi for a little girl that has an easy, low-sew design and long curly hair. The process is broken down into five main parts in one tutorial: the hands, legs, and body, head, hair, and assembly. This amigurumi doll project is perfect for learning the basic as well as advanced doll techniques without making it too demanding. You will also find instructions for a simple way to straighten the hair for a different look.
So, if you have made up your mind to crochet this quick and easy doll amigurumi, continue reading this post till the end. There, you can follow the complete tutorial from Crochet By Hui.

About the Designer: The designer behind this smiling girl doll amigurumi is @CrochetByHui – Like An_design Crafts, she has excelled at amigurumi designing. From chibi dolls and mermaids to animal keychains like dolphins and mice with a lot of creative and unique variations, her library is a top, though underrated, amigurumi library. What sets this channel apart is the creator’s commitment to making these projects accessible to absolute beginners. She thoughtfully designs with step-by-step instructions, clear camera angles that focus on hand movements, and helpful subtitles.
Note: In respect for the creator’s pattern rights, there will be no provision of the written pattern. You can watch the tutorial with on-screen written instructions at the end of this post.
Crochet Girl Doll Amigurumi Tutorial
Skill Level: Beginner – Intermediate. The tutor uses many basic and a bit advanced crochet techniques to crochet the cartoon doll. The main stitch is the single crochet, which is used throughout the project. She also uses single crochet increases and decreases to crochet the doll’s body, head, and limbs. Other techniques include the magic ring to start each part, the slip stitch to join rounds, color changes, and working in the inner half stitch for specific parts. The hair is created using half double crochet and chain stitches.
Tutorial Timing: 58 minutes only (crocheting any doll always needs the same fundamental techniques. So, to start your crochet doll journey with something as basic but as cute as to gifted is worth the time.)
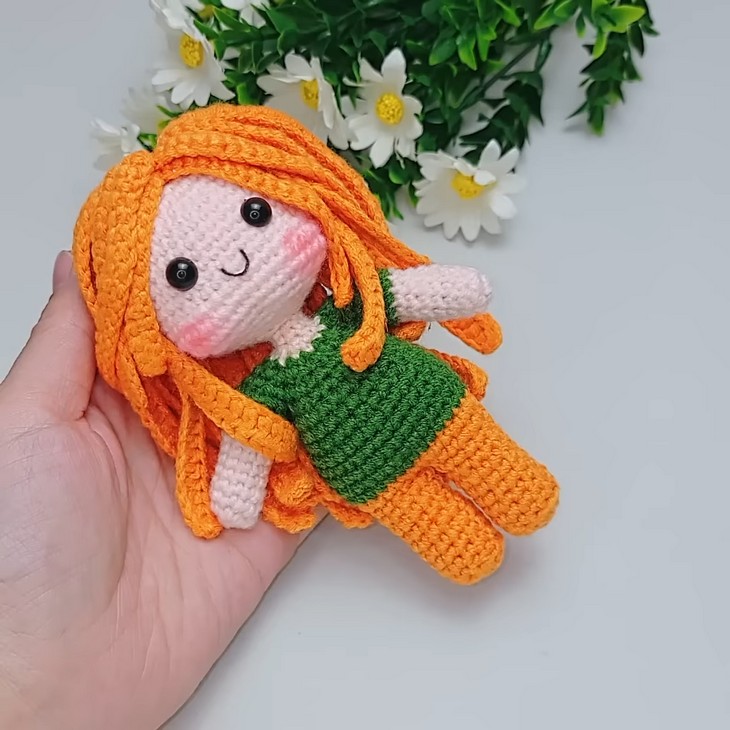
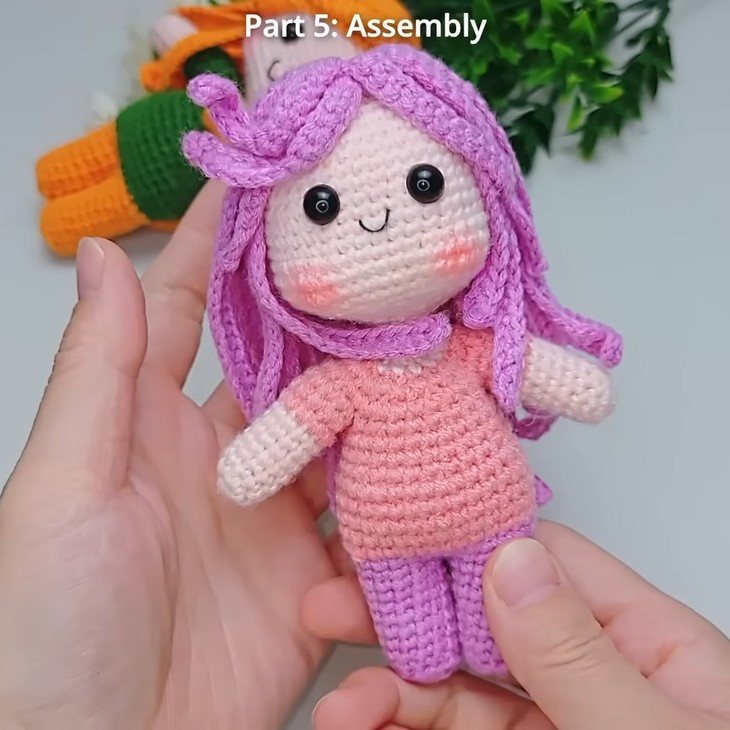
Personalization Tips: While the video does not provide specific personalization tips, you can easily customize the doll by using different colors for the hair, clothes, and skin tone. Also, the tutor shows two versions: orange for hair and green for outfit, dark pink for hair and pink for dress.
You can also experiment with different hair lengths. Additionally, you can add even detailed embroidery faces like freckles or to give the doll a unique personality.
Pattern Type: An on-screen written pattern is available if you find written instructions easy to follow along with.
Materials Needed
Gather the following crochet supplies for crocheting these large amigurumi dolls for kids:
- 4 colors of Milk Cotton yarn
- Skin shade is a must
- 2mm crochet hook
- Stuffing
- Yarn Needle
- Stitch Markers
Techniques Used
To understand the on-screen instructions and the pattern for the girl doll amigurumi, follow the following crochet pattern stitch guides:
- Magic Ring: Create a tight loop to begin a project in the round.
- Single Crochet: Insert the hook, yarn over, pull through the stitch, yarn over again, and pull through both loops on the hook.
- Slip Stitch: Join the end of a round to the beginning to form a circle.
- Increasing: Work two single crochets into the same stitch to add a stitch.
- Inner Half Stitch: Work a stitch into the back loop only.
- Decreasing: Combine two stitches into a single stitch to reduce the stitch count.
- Chain Stitch: Create a series of interconnected loops to form a foundation.
- Half Double Crochet: Yarn over, insert the hook, yarn over and pull up a loop, yarn over again and pull through all three loops on the hook.
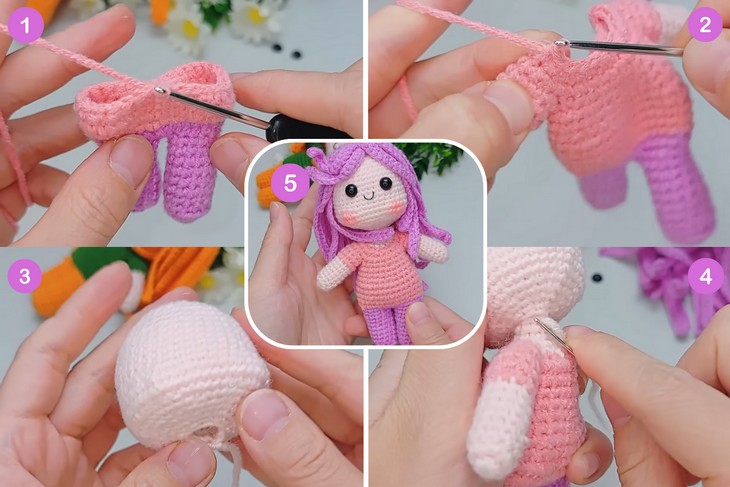
You will begin by crocheting the hands, followed by the legs and body, which are joined together to form the torso. Next, you create the head, which is shaped with increases and decreases. The hair is crocheted in separate strands, and a technique for straightening them is shown. Finally, you assemble all the crocheted pieces to complete the doll.