
13 Free Crochet Potted Plant Tutorials for Spring
Here are some of the most elegant crochet potted plants with step-by-step tutorials. Whether you want a cute desk buddy with your favorite flower or a heart flower for a dear one, this list has everything.
All the plants look realistic, with the grown and ungrown flowers, leaves, and lengths of stems. There are also quite a few variations for the pots you will love for sure.
Crochet Potted Plants

Potted plant tutorials shared already:
01 of 13 Crochet Monstera Leaf Jellycat Pot
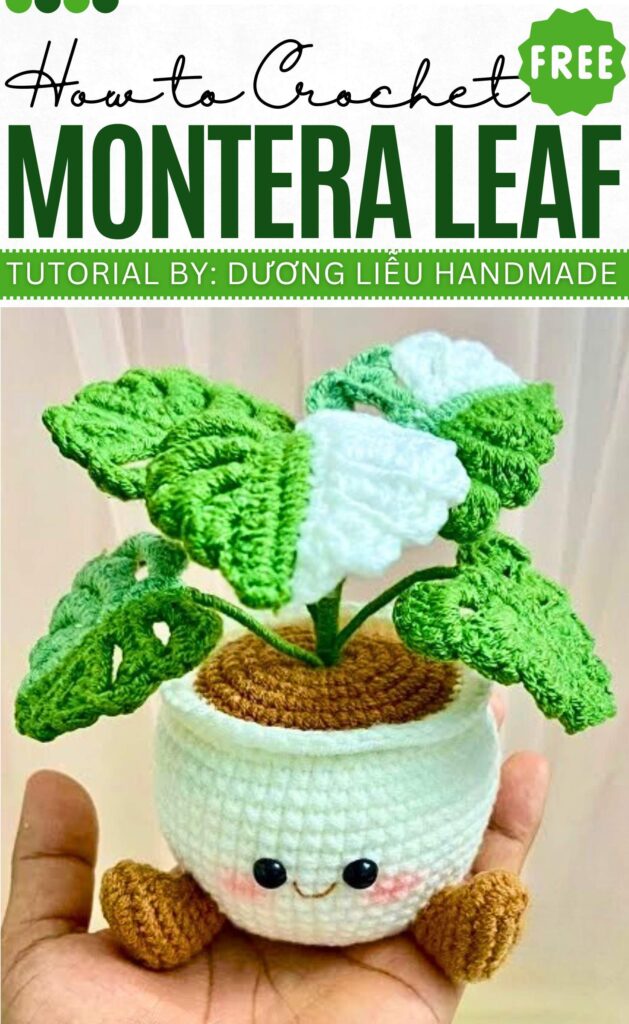
Crochet a beautiful Monstera plant pot with the three, one, and two-color Monstera leaves and an Amuseable smiling pot. For a random and natural feel, the tutor has crocheted five leaves in the following manner.
- Solid Green: Usual crochet leaf.
- Two-Colored: Half white and half green.
- Three-Color: Dark green, light green, and white
You will be crocheting a quite accurate sitting pot inspired by the popular plushie brand. The pot looks extra cute with the blush. Each leaf needs a 12-stitch base leaf.
02 of 13 Crochet Daisy Flower Pot
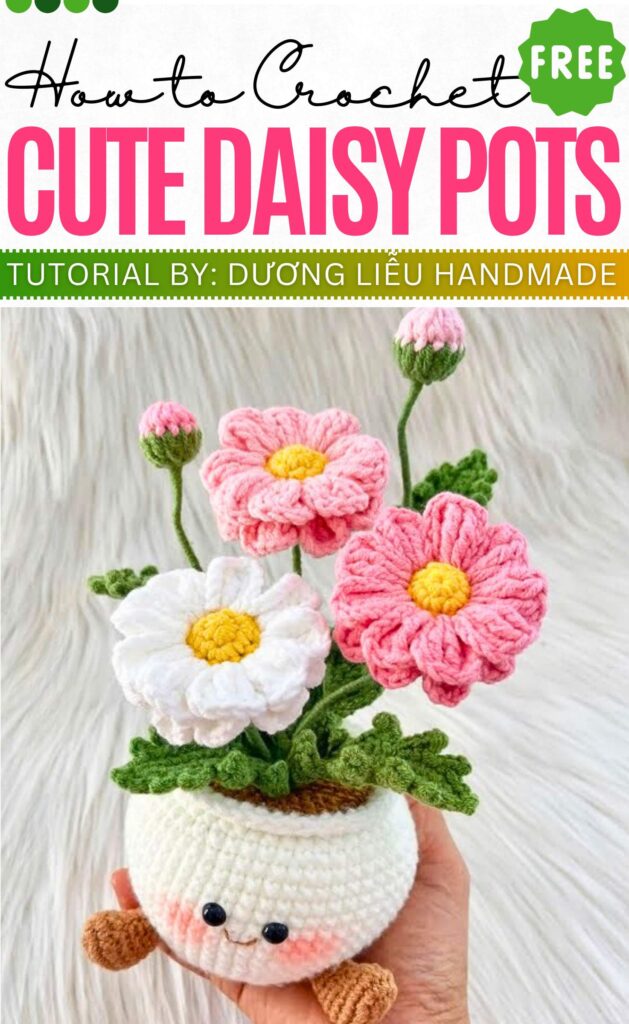
With two-layer daisy flowers, flower buds, and picot leaves, this crochet sitting daisy pot looks oh-so elegant. This also has the same Jelly Cat pot with eyes, a smile, and soil. The daisy uses long crochet stitches and can be crocheted in pink and white.
You will need three daisies and two buds for the same flower branch. For assembly, use craft wires, thin yarn, and hot glue. It is simply perfect for spring decoration.
03 of 13 Crochet Pink Flower Pot

This is how to crochet a small bell flower potted plant with a small budding flower, too. This looks so life-like and filled because the tutor has added small details to large blooms, many random stems, and leaves. Crochet it as an eternal flower pot for your desktop.
You can crochet the flowers in two shades of any color, from pink to purple and even blue. This one will have a simple ribbed pot. I especially love the puffy look of the bloom.
04 of 13 Crochet Heart Flower Pot
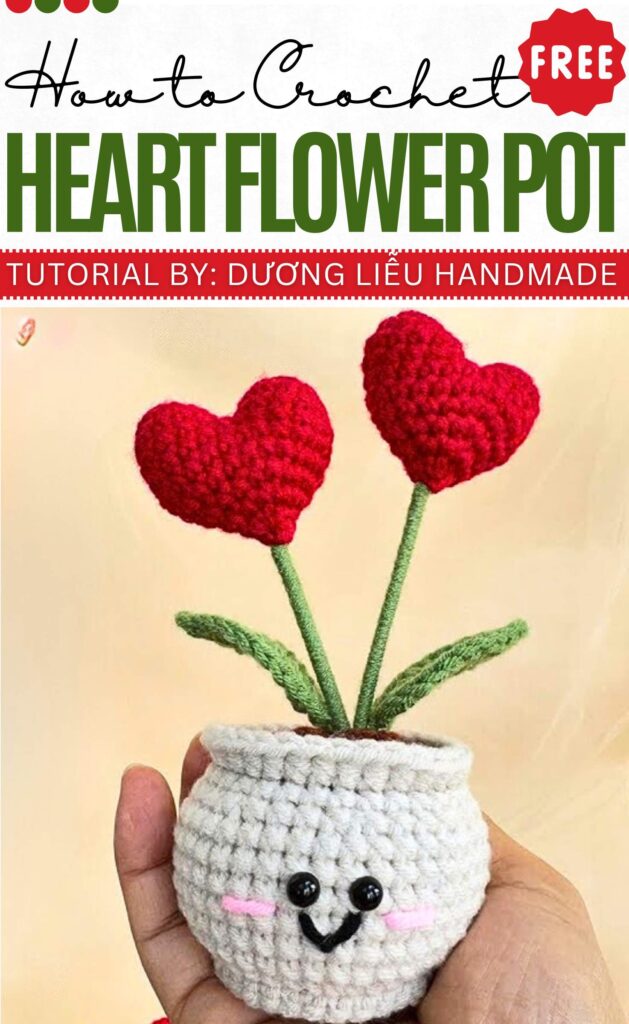
For anniversary decor, March 8th or October 20th, this crochet heart plant amigurumi pot is a must-have. Each pot also has a smiling face and a pair of heart flowers that make it a great desktop buddy. This time, you will have to sew the blush and crochet a rounded pot.
I especially think it’s a lovely gift for Mother’s Day. Use two hearts of different heights (stems measuring about 10cm and 12cm). The heart is basic and easy.
05 of 13 Crochet Pinwheel Flower Pot
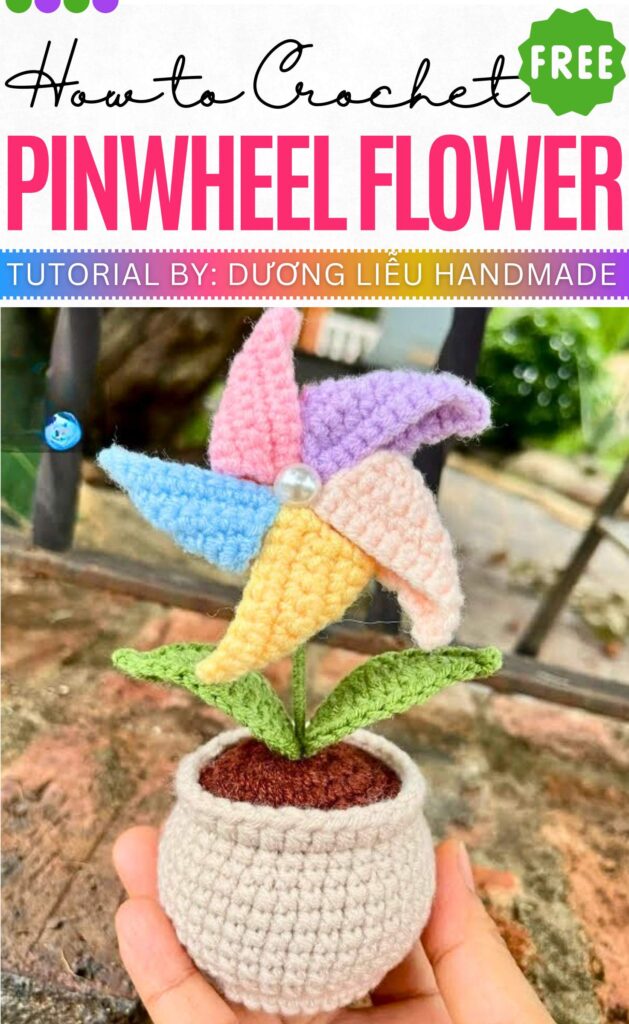
I am surprised that the colorful crochet pinwheel in this rainbow potted plant rotates. These can even move with the wind. The part below is the same as a usual crochet plant pot with leaves. So, in the tutorial, the lovely thing to learn is the pinwheel.
The middle will also have a small white bead. Choose yellow, purple, baby pink, hot pink, and blue. The blades are worked directly onto the hub or joined as you go. Crochet it for sure.
06 of 13 Crochet Pinwheel Flower Pot
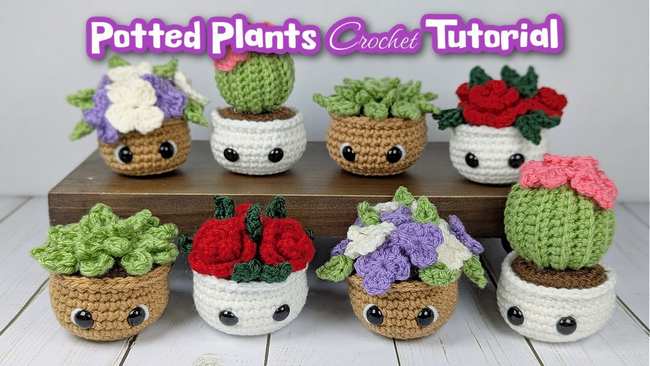
Here is how to crochet amigurumi potted plants, including succulents, roses, lilacs, and cacti. Using a 3.5 mm hook and colorful yarn, the project starts with a base pot pattern built, featuring a textured base and safety eyes for a cute face. The “topsoil” is then crocheted and sewn onto the pot.
Each plant type has specific instructions: the cactus involves a ribbed panel cinched into a ball, while roses are formed by rolling crocheted strips.
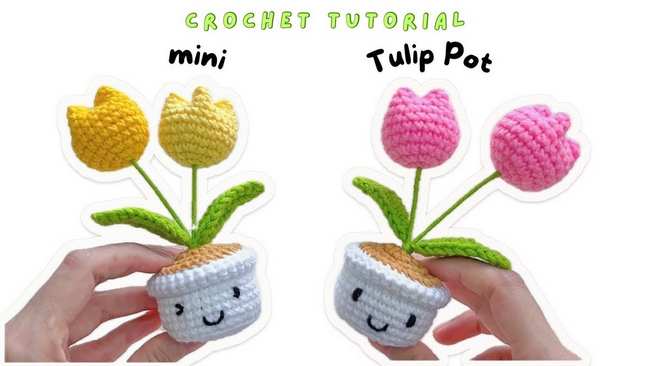
07 of 13 Crochet Tulip Flower Pot
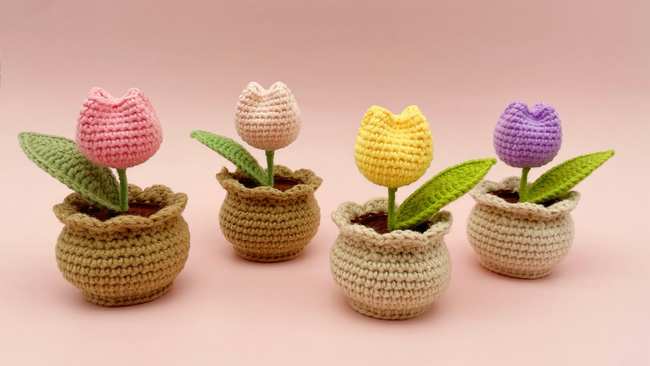
Crochet an amigurumi mini tulip pot, perfect for advanced beginners. The project is divided into five parts: crocheting the pot, the soil, the tulip bud, the leaf, and final assembly. The pot and soil are made using joined rounds and a 3mm hook, while the bud and leaf use a 2mm hook for a finer finish.
Unique techniques include working in back loops only to create the pot’s base and incorporating wire into the leaf for realistic shaping.
08 of 13 Crochet Pinwheel Flower Pot
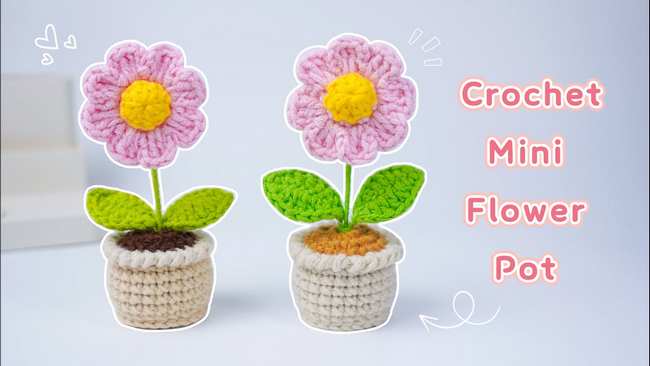
Follow this tutorial to crochet a mini daisy flower pot amigurumi for window decoration. It starts with a bright yellow stamen, a green sepal, and petals that are joined together using simple single and double crochet stitches. You will also learn to crochet leaves by crocheting around thin wire for flexibility.
The tiny pot is built using a magic ring and graduated increases, finished with a unique crab stitch border for texture.
09 of 13 Crochet Pinwheel Flower Pot
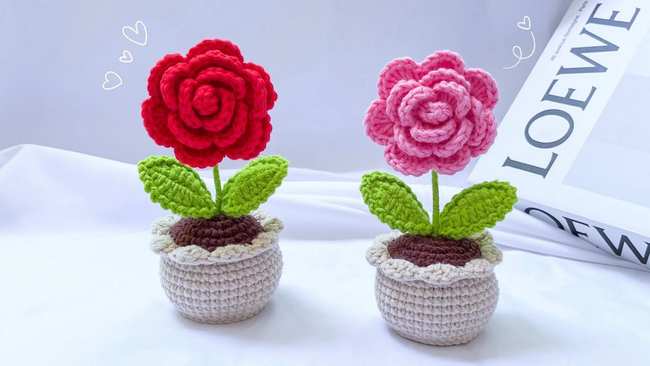
Learn how to crochet a beautiful rose pot, making it an ideal project for beginners. The process starts with crafting the rose petals by creating a long chain, followed by V-stitches to form a base, which is then rolled and glued into a floral shape.
Next, the tutorial covers making the green sepal and wired leaves to give the rose a realistic look. The project also includes instructions for a small crochet pot and a soil insert, which are stuffed and sewn together.
10 of 13 Crochet Pinwheel Flower Pot
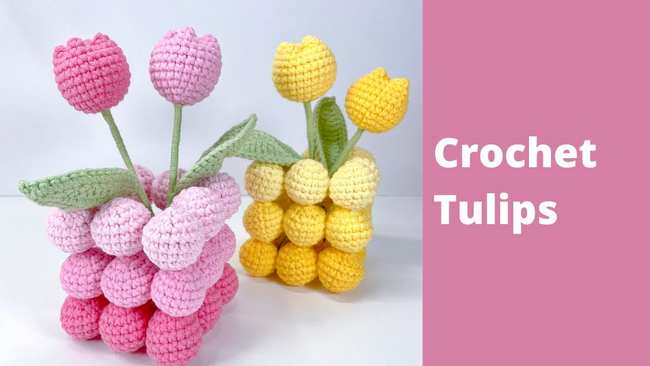
Crochet a charming potted tulip decoration. It starts with crocheting three main components: small decorative balls for the container, the tulip blossoms, and the green leaves. Using milk cotton yarn and a magic ring, you first crochet numerous tiny spheres to assemble into a textured pot.
The flowers are crocheted with an X-shaped single crochet stitch to ensure a neat finish, while the leaves are reinforced with craft wire for realistic shaping.
11 of 13 Crochet Pinwheel Flower Pot
Learn how to crochet a mini tulip pot, perfect for beginners. It starts with crocheting the pot using a magic ring and single crochet increases, followed by a separate piece for the soil. The tulip buds are formed using colorful yarn and stuffed with cotton to create a plump, rounded shape.
To add structure, wire is added into the leaves and the main stem, which are then wrapped in green yarn.
12 of 13 Crochet Pinwheel Flower Pot
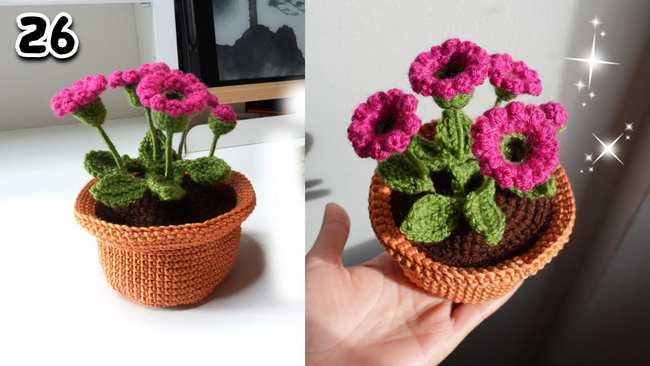
Learn how to crochet a charming decorative flower in a pot, perfect for home styling. The process starts with crocheting a small pot, where the creator suggests adding small rocks at the bottom for stability before filling it with fiberfill.
Using a 3.0mm hook and acrylic yarn, you craft the sepal using a magic ring and single crochets, followed by colorful petals worked into the front loops.
13 of 13 Crochet Pinwheel Flower Pot

Here is how to crochet a charming crochet sunflower pot. The sunflower head, where a green sepal and brown stamen are joined. After stuffing the flower, the tutorial transitions to making wire-reinforced leaves for a realistic look.
The process continues with a sturdy pot and a brown soil cap, which are later sewn together after stuffing with cotton.
Finally, the flower is mounted on a yarn-wrapped wire branch, with the leaves attached to complete this beautiful, handmade decorative piece for any home.