
How to Crochet Easy Skull Plushie for Halloween
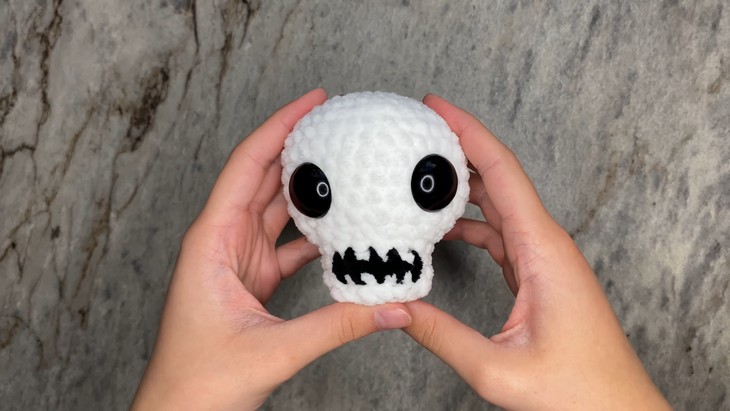
A quick, squishy, and easy crochet skull design is here! So, with a stitch-by-stitch tutorial from Chantelle, learn how to crochet the Spooky Skull Plushie that will make your Halloween super special. Thanks to the super bulky yarn and the easy pattern, you can crochet one within 30 minutes. This skeleton head has larger-than-life eyes and intentionally scary embroidery stitched teeth. This pattern needs absolutely zero sewing and is designed for absolute beginners. You will also find tips for shaping, stuffing, and adding finishing details.
So, if you are interested in recreating this skull amigurumi for the upcoming Halloween by yourself, continue reading this post till the end. There you will find the complete tutorial..

About the designer: the designer behind this witch amigurumi project is @Lalacrochet – she designs and presents mostly easy and plush versions of crochet animals, objects, and food that always end up so cute. Some of my favorites of her crochet plushies are the crochet hermit crab, football with eyes, earth with eyes, Peppermint Pal, and volcano. She has a good expertise in color choice and design. So, you can also check her guides on amigurumi basics. She offers free crochet tutorials and patterns, with some PDF versions available for purchase. She also shares videos with relatable crochet humor and tips.
Note: In respect of the creator’s pattern rights, there will be no provision of the written pattern. You can watch the tutorial with on-screen instructions at the end of this post.
Crochet Plush Skull Tutorial
Skill Level: Beginner. Working in the round, the main stitches are single crochet, increases, decreases, and front loop-only stitches for the skull shape. The mouth and teeth details are added using simple horizontal and vertical stitches for embroidery. The magic ring to begin the skull. Stitch markers (or alternatives like bobby pins) are recommended to maintain each row’s accuracy. Sewing the skull to close the base.
Tutorial Timing: 8 Minutes Only (perfect for practicing basic amigurumi techniques while trying the easiest pattern for crocheting a skull. You will also learn the unique stitched teeth embroidery that is also used in other Halloween projects like zombie, Frankenstein, and ghost amigurumi!)

Personalization Tips: Like the crochet colorful skulls tutorial, there are many ways to customize from a black and white skull. For example, use blue and yellow for the body or try crocheting tiny flower eyes. You can increase or reduce the number of tooth lines. You can also wear a witch hat or bow ties. The tutor’s usual style is to use the big eyes, but you can also use the smaller ones.
Pattern Type: A detailed CC instruction is available if you find written instructions easy to follow along with.
Tools & Materials
Gather the following suggested tools and materials for crocheting this Halloween skull plushie, mentioned in the tutorial:
- Scissors
- 4mm Crochet Hook
- Stitch Marker (or Bobby Pin)
- Darning Needle
- White Super Bulky Yarn
- Polyfill Stuffing
- 24mm Safety Eyes

Techniques Needed
Here’s a one-line guide for crocheting each stitch and technique in the skull pattern:
- Magic Ring: Creates a circular base. Wrap yarn around fingers, pull a loop through, and crochet into the ring.
- Single Crochet: A foundational stitch for shaping the skull. Insert hook into stitch, yarn over, pull through, yarn over, pull through both loops.
- Increase: Adds stitches to expand rows. Work two single crochets into the same stitch.
- Decrease: Reduces stitches to narrow rows. Crochet two stitches together.
- Front Loop-Only Stitches: Adds texture and dimension. Crochet only into the front loop of each stitch in the row.
