
How to Crochet Elf Ornaments For Christmas
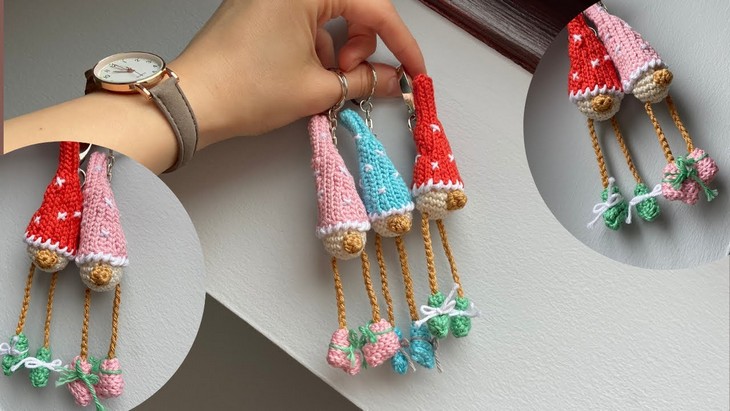
Designs for a crochet gnome elf are usually so complicated and time-consuming! But, these unique crochet Christmas elf ornaments are quick, easy, and simply cute with a stitch-by-stitch tutorial on how to crochet by Anhelinasv. You will love the long elf hats with ribbing and embroidery, and the long hanging legs. These ornaments will add aesthetic to your Christmas decor, according to the designer.
You can crochet these elf ornaments as a set of three using red, pink, and blue for the hats. They will also beautifully charm up your other Christmas gifts. There is more to find lovely: the crochet shoes with the ribbons. So, crochet for sure!
Crochet Elf Ornaments for Gifting

These crochet elf ornaments are part of my “last-minute” Christmas gift curation. Like all other, one of these elf ornaments can be finished within 45 minutes by working in many parts and joined in the end. There are so many tips although tutor says the tutorial is not quite ready in terms of presentation.
So, if you are ready to learn and crochet this Christmas ornament, continue reading this post till the end. There you will find the complete tutorial. You will also learn an interesting way of crocheting the hat!
About the Designer: The designer of this Christmas elf ornament set for kids is @anhelinasv – With the theme “let’s make something cute”, she has craft tutorials for beginners, mainly focusing on crochet and beadwork. Her tutorials are always quite detailed and provide many useful advices.
She has a complete series for Christmas named “Crochet Christmas” from which these elf ornaments belong and other projects like a gnome, a reindeer doll, and more. Make sure to follow her!
Note: In respect of the creator’s rights, there will be no provision of the written pattern. You will watch the tutorial at the end of this post.

Materials for Crochet Elf Ornaments
Gather the following suggested supplies for crocheting these elf Christmas ornaments in the same size:
- Sirdar Happy Cotton: 100% cotton DK yarn in a mini that comes in 20g ball.
- Beige (for the face/body)
- Brown (for the nose)
- White and gray (for the hat trim or other details)
- Blue (for the boots and legs)
- Crochet Hook: Size 2 mm mentioned in the tutorial.

Other Notions:
- Stuffing: Polyester fiberfill
- Tapestry/Darning Needle: Used for sewing parts together and weaving in yarn ends.
About Crochet Elf Ornaments
Quick Summary & Skill Level: Beginner – Intermediate. You will first crochet the elf hat as a flat panel using slip stitches in the backside loop only for a ribbed texture, which is later sewn into a cone.
The head/body, which is one piece, and the small nose are crocheted separately in the round using the single crochet, starting with a Magic Ring with rounds of increases and decreases.
The boots are also crocheted as small, flat pieces. Once all parts are crocheted, the body is stuffed, and all pieces, the hat, body, nose, and boots, are sewn together using a tapestry needle.
Tutorial-Timing: 30 Minutes Only

Abbreviations In Elf Pattern
Here are the quick guides for the crochet stitches needed for crocheting these elf ornaments and abbreviations:
- Chain Stitch (ch)
- Slip Stitch (sl st): (used for the hat’s ribbing).
- Single Crochet (sc): (used for the body and nose).
- Working in Back Loop Only (BLO): When making a stitch, insert your hook only into the loop furthest away from you to create a horizontal ribbed effect.
- Increase (inc): Make two single crochet stitches into one stitch from the previous row to increase the total stitch count and expand the piece.
- Decrease (dec): Work two single crochet stitches together.

Complete Video Guide
I thank the designer a lot for putting her effort on this Christmas elf ornament tutorial and hope my post helped you a bit!