
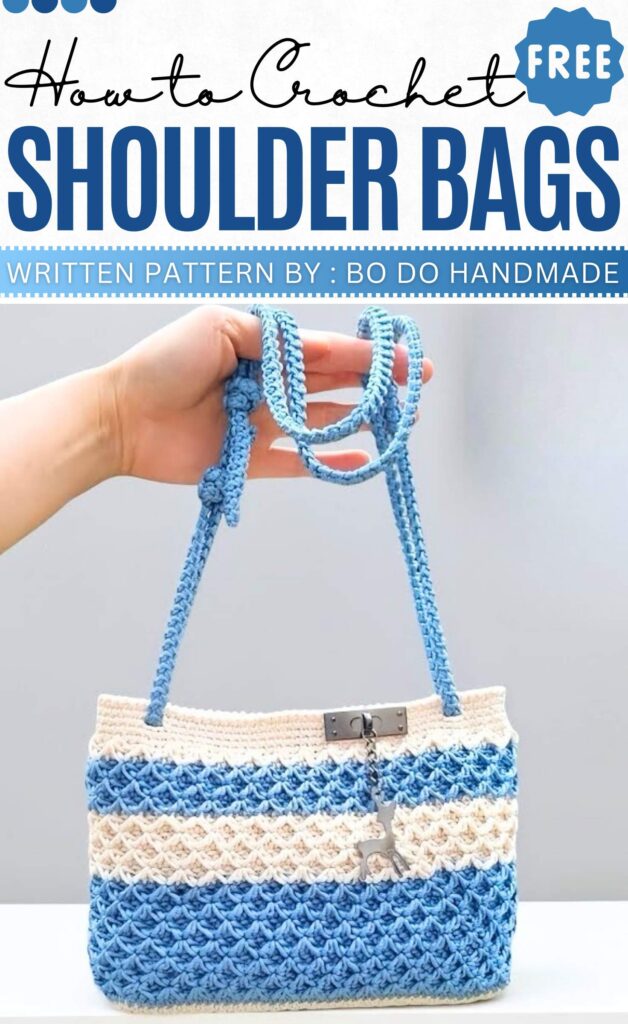
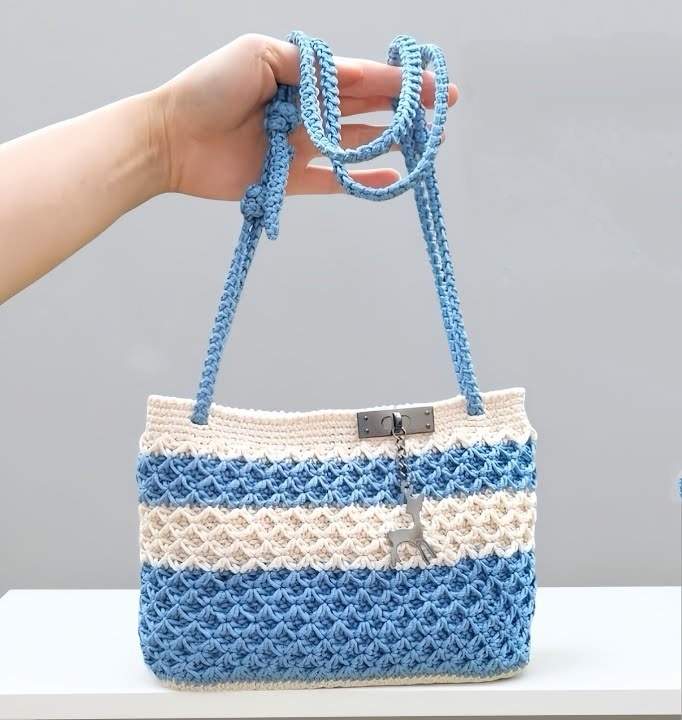
Crochet Handbag & Shoulder Bag Pattern
This project is a stylish and flexible mesh handbag that is perfect for shopping or daily use. You will need a 2.5mm crochet hook and ribbon-style yarn to ensure the bag keeps its shape even when it is full. The bag has a classic grid look that you can leave plain or decorate with small crochet flowers!
About The Creator:
Bi do Handmade has been an expert in crocheting and designing crochet amigurumi, bag charms, and pouches. Also visit her YouTube channel for more exciting projects.
Crossed Stitch Phone Bag Pattern
Terminology: US Terms Skill Level: Intermediate Materials:
-
2.5mm Crochet Hook
-
Yarn (Sport or DK weight, solid color recommended)
-
Magnetic snap button or standard button
-
Stitch markers
-
Tapestry needle
-
Scissors
Abbreviations:
-
ch: Chain
-
sc: Single Crochet
-
hdc: Half Double Crochet
-
dc: Double Crochet
-
sl st: Slip Stitch
-
st(s): Stitch(es)
-
sk: Skip
-
yo: Yarn Over
-
sp: Space
-
beg: Beginning
-
inv-V: Inverted V-Stitch (Cluster) – Explained in Special Stitches
Special Stitches:
-
Inv-V (Inverted V-Stitch): YO, insert hook into starting st, pull up a tall loop. YO, skip next 2 sts, insert hook into 3rd st, pull up a tall loop. YO, pull through all loops on hook. Ch 1 to close (counts as top of stitch).
-
Reverse SC (Crab Stitch): Working from left to right, insert hook into previous st, yo, pull up loop, yo, pull through both loops.
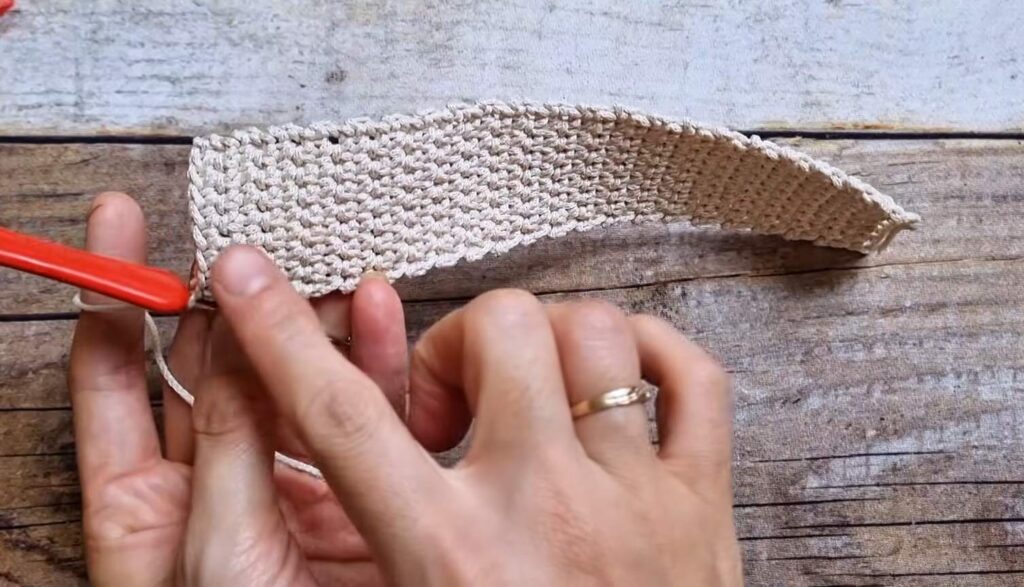
Part 1: Rectangular Base
-
Row 1: Ch 9 (ensure starting ch is a multiple of 3). Sc in 2nd ch from hook and each ch across. [8 sc]
-
Row 2: Ch 1, turn. Sc in each st across. [8 sc]
-
Rows 3–42: Repeat Row 2 until base reaches desired width of the bag (ensure total row count is a multiple of 3).
-
Border Round:
-
Ch 1, do not turn. Work sc evenly around the entire rectangle.
-
Work 3 sc in each of the 4 corner sts.
-
Along the long sides, work 1 sc per row end.
-
Note: Ensure total stitch count around the perimeter is a multiple of 3.
-
Join with sl st to first sc.
-
-
Optional: Change color here if a contrasting base is desired.
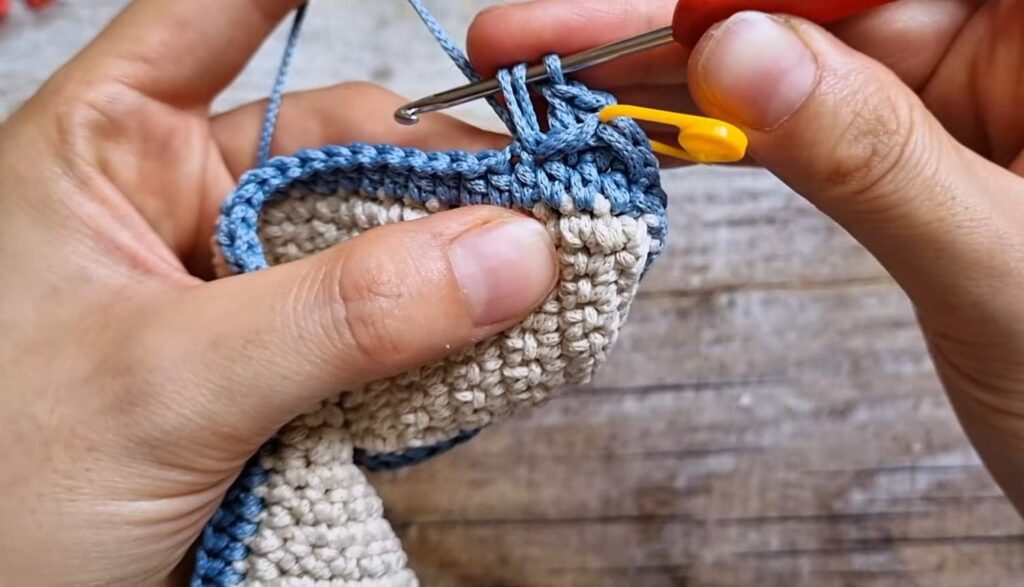
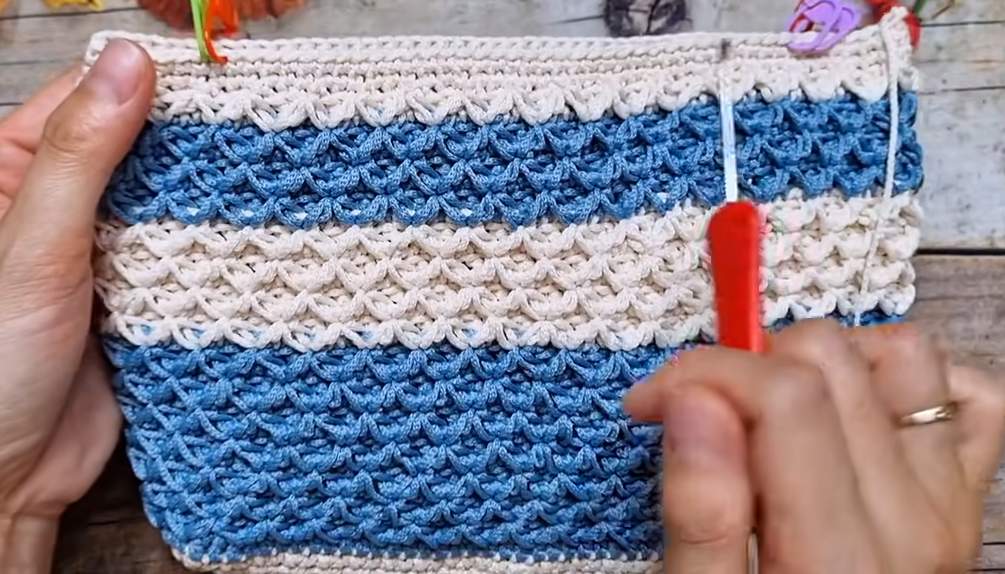
Part 2: Main Body
-
Setup Round: Ch 1. Work 1 hdc in each st around. Do not increase at corners. Join with sl st to first hdc.
-
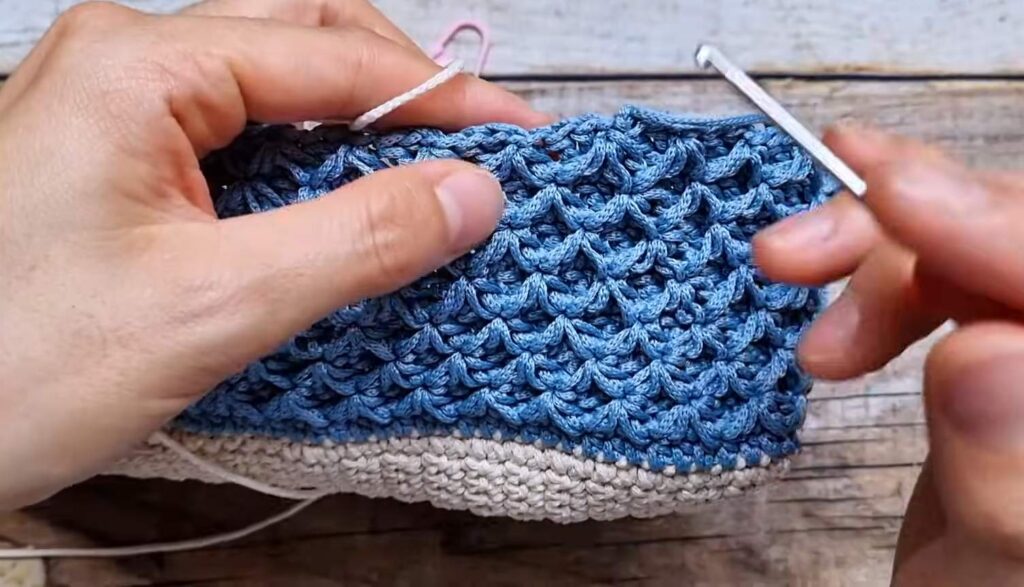
Round 1 (Pattern):
-
First inv-V: Ch 1, lengthen loop slightly. YO, insert hook into same st as join, pull up loop. YO, sk 2 sts, insert into next st, pull up loop. YO, pull through all loops. Ch 1 to close. Mark this closing ch.
-
Behind the V: Work 1 dc in each of the 2 skipped sts behind the inv-V just made. (Push the V forward to work behind it).
-
Next inv-V: YO, insert hook into same st where previous inv-V ended. Pull up loop. YO, sk 2 sts, insert into next st. Pull up loop. YO, pull through all loops. Ch 1 to close.
-
Behind the V: Work 1 dc in each of the 2 skipped sts behind the V.
-
Repeat from * to * around.
-
Join: Work the final inv-V leg into the base of the first inv-V to close the round continuous. Sl st into the marked top of the first inv-V.
-
-
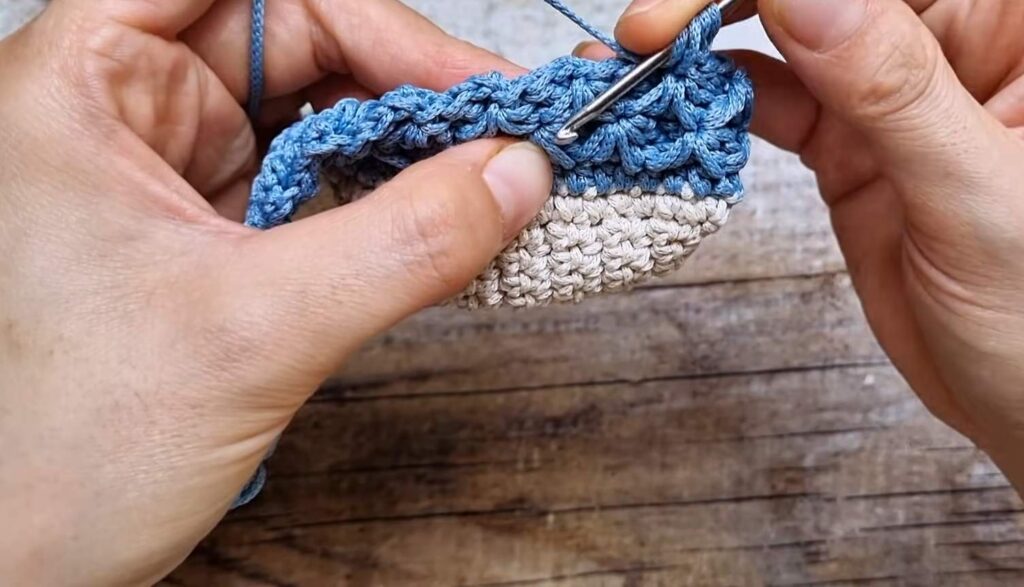
Round 2 onwards:
-
Repeat the pattern of Round 1.
-
The first leg of an inv-V goes into the top of the V below.
-
The second leg goes into the top of the next V below.
-
The 2 dc are worked into the 2 dc of the previous round (behind the V).
-
Continue until bag reaches desired height.
-
Part 3: Top Rim & Eyelets
-
Note: Change color back to base color if desired.
-
Row 1: Sc in each st around (work into tops of Vs and DC sts). Join.
-
Row 2: Ch 1, sc in each st around. Join.
-
Row 3 (Eyelet Holes):
-
Mark 4 positions for strap holes (2 on front, 2 on back, approx 1-2 cm from side edges).
-
Sc around to first marker. Ch 2, sk 2 sts, sc in next.
-
Repeat at each marker location. Sc in remaining sts. Join.
-
-
Row 4: Sc in each st around. Work 4 sc into each Ch-2 space to reinforce the hole. Join.
-
Row 5 (Edging): Ch 1. Work Reverse SC (Crab Stitch) in each st around. Fasten off and weave in ends.
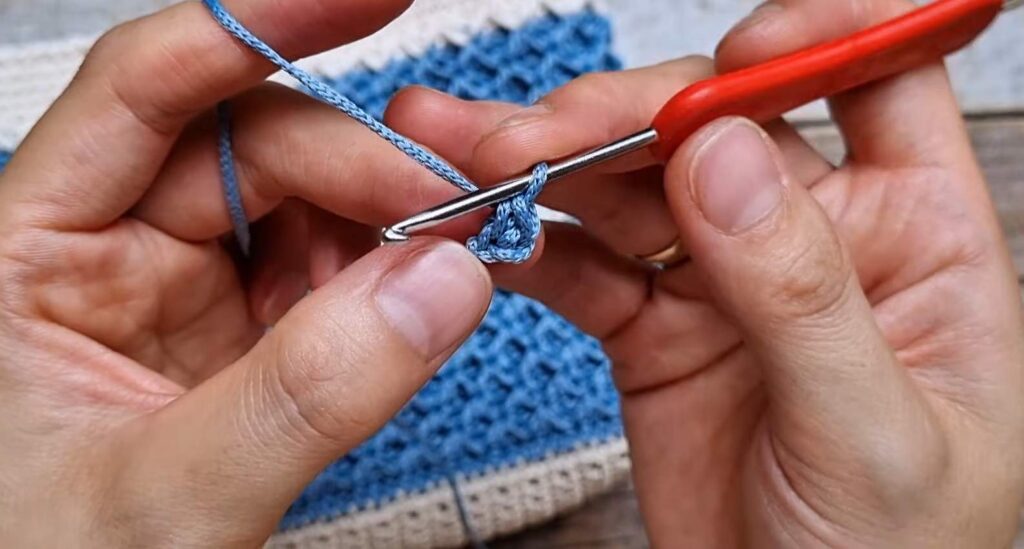
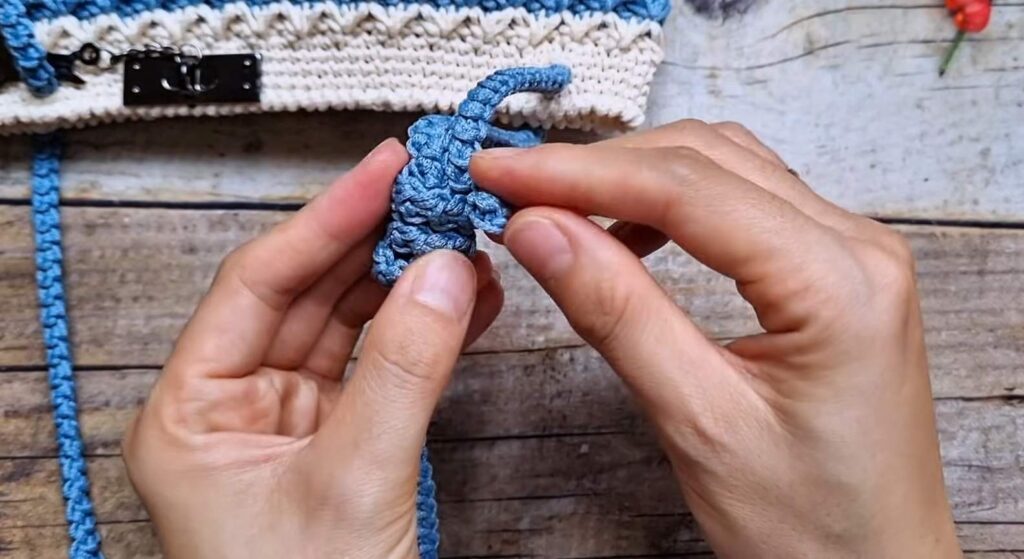
Part 4: Romanian Cord Strap
-
Leave a long tail. Ch 2.
-
Row 1: Sc in 2nd ch from hook. Turn.
-
Row 2: Insert hook under the single vertical loop on the side of the st. Sc. Turn.
-
Row 3 onwards: Insert hook under the two parallel vertical loops on the side. Sc. Turn.
-
Repeat Row 3 until strap reaches desired length.
-
Finishing: Fasten off.
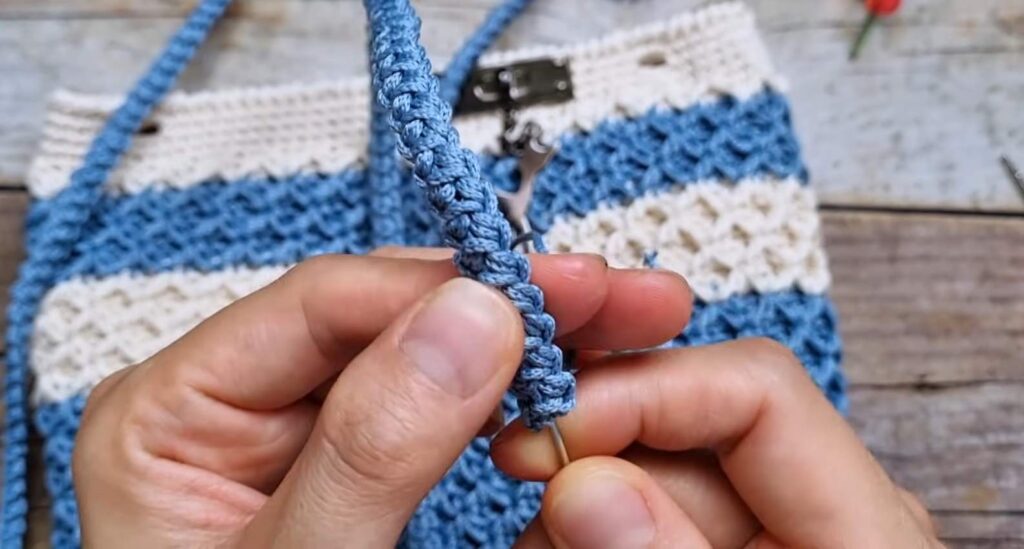
Assembly
-
-
Attach Strap: Thread strap ends through the eyelet holes (in from outside, out from inside).
-
Adjustable Knot: Tie the ends using a sliding fisherman’s knot to allow length adjustment.
-
-
Place strap end over main strap.
-
Wrap tail around main strap twice (working towards the loop).
-
Thread tail through the wraps. Pull tight.
-
-
Closure: Sew magnetic snap or button to the inside center of the bag opening.
-
Video Tutorial:
Pattern In UK Terms
Special Stitches:
-
Inv-V (Inverted V-Stitch): YO, insert hook into starting st, pull up a tall loop. YO, skip/miss next 2 sts, insert hook into 3rd st, pull up a tall loop. YO, pull through all loops on hook. Ch 1 to close (counts as top of stitch).
-
Reverse DC (Crab Stitch): Working from left to right (backwards), insert hook into previous st, yo, pull up loop, yo, pull through both loops. (Note: This uses the UK Double Crochet movement).
Part 1: Rectangular Base
-
Row 1: Ch 9 (ensure starting ch is a multiple of 3). dc in 2nd ch from hook and each ch across. [8 dc]
-
Row 2: Ch 1, turn. dc in each st across. [8 dc]
-
Rows 3–42: Repeat Row 2 until base reaches desired width of the bag (ensure total row count is a multiple of 3).
-
Border Round:
-
Ch 1, do not turn. Work dc evenly around the entire rectangle.
-
Work 3 dc in each of the 4 corner sts.
-
Along the long sides, work 1 dc per row end.
-
Note: Ensure total stitch count around the perimeter is a multiple of 3.
-
Join with ss to first dc.
-
Part 2: Main Body
-
Setup Round: Ch 1. Work 1 htr in each st around. Do not increase at corners. Join with ss to first htr.
-
Round 1 (Pattern):
-
First inv-V: Ch 1, lengthen loop slightly. YO, insert hook into same st as join, pull up loop. YO, sk 2 sts, insert into next st, pull up loop. YO, pull through all loops. Ch 1 to close. Mark this closing ch.
-
Behind the V: Work 1 tr in each of the 2 skipped sts behind the inv-V just made. (Push the V forward to work behind it).
-
Next inv-V: YO, insert hook into same st where previous inv-V ended. Pull up loop. YO, sk 2 sts, insert into next st. Pull up loop. YO, pull through all loops. Ch 1 to close.
-
Behind the V: Work 1 tr in each of the 2 skipped sts behind the V.
-
Repeat from * to * around.
-
Join: Work the final inv-V leg into the base of the first inv-V to close the round continuous. ss into the marked top of the first inv-V.
-
-
Round 2 onwards:
-
Repeat the pattern of Round 1.
-
The first leg of an inv-V goes into the top of the V below.
-
The second leg goes into the top of the next V below.
-
The 2 tr are worked into the 2 tr of the previous round (behind the V).
-
Continue until bag reaches desired height.
-
Part 3: Top Rim & Eyelets
-
Row 1: dc in each st around (work into tops of Vs and tr sts). Join.
-
Row 2: Ch 1, dc in each st around. Join.
-
Row 3 (Eyelet Holes):
-
Mark 4 positions for strap holes (2 on front, 2 on back, approx 1-2 cm from side edges).
-
dc around to first marker. Ch 2, sk 2 sts, dc in next.
-
Repeat at each marker location. dc in remaining sts. Join.
-
-
Row 4: dc in each st around. Work 4 dc into each Ch-2 space to reinforce the hole. Join.
-
Row 5 (Edging): Ch 1. Work Reverse DC (Crab Stitch) in each st around. Fasten off and weave in ends.
Part 4: Romanian Cord Strap
-
Leave a long tail. Ch 2.
-
Row 1: dc in 2nd ch from hook. Turn.
-
Row 2: Insert hook under the single vertical loop on the side of the st. dc. Turn.
-
Row 3 onwards: Insert hook under the two parallel vertical loops on the side. dc. Turn.
-
Repeat Row 3 until strap reaches desired length. Fasten off.
Assembly
-
Attach Strap: Thread strap ends through the eyelet holes (in from outside, out from inside).
-
Adjustable Knot: Tie the ends using a sliding fisherman’s knot:
-
Place strap end over main strap.
-
Wrap tail around main strap twice (working towards the loop).
-
Thread tail through the wraps. Pull tight.
-
-
Closure: Sew magnetic snap or button to the inside centre of the bag opening.