
How to Crochet Mochi Bunny in A Pot Plushie for Desktop Decor
A unique, squishy, and super cute Miffy bunny project is here for absolute beginners! So, learn how to crochet this adorable bunny in a pot mini plushie named “bunny bonsai” that is designed to be a calming desktop decor in green mochi shades. The tutor uses thin plush yarn for crocheting a small plushie, but with incredible detailing like two mud as edging around the pot, the mochi mouth, and two shapes of safety beads, and the same ears. You can easily complete crocheting this bonsai bunny plushie within 30 minutes. You can gift it to a plant decor lover for a kawaii surprise, and also crochet it for Christmas. I recommend that you make the pair!
So, if you have made up your mind to crochet these mini bunny plushies, continue reading this post till the end. There you will find the complete tutorial.

About the Designer: The designer behind this pair of mochi bunny keychains is @mikimeloco – she is a promising kawaii crochet designer, mostly popular with characters, including Hello Kitty, Mickey Mouse, and Chip and Dale, and the custom like this bunny and kitty desserts. She has a small library currently and you will love her sushi set tutorial and holiday-themed projects, like a Christmas bauble. Her tutorials are well-explained and have information on the materials needed for each project.
Note: In respect of the creator’s rights, there will be no provision of the written pattern. You can watch the tutorial with on-screen written instructions at the end of this post.

Crochet Bunny Bonsai Plushie Tutorial
Skill Level: Beginner – Intermediate. You will crochet the bunny as a crochet sphere with the ears separately as a simple shape. The magic ring is used to begin the head, ears, and pot. The primary stitch is single crochet. To shape the pieces, the tutorial uses increase and decrease stitches. The back loop only technique is used for the pot to create a specific texture. Other stitches include chain stitches and half double crochet for the mud part, and a slip stitch is used to finish off rounds.
Tutorial Timing: Approximately 14 minutes only (perfect for quickly learning how to work with the plush yarn and crocheting a pot, which can also be used for crochet flower and plant decor projects and bouquet coasters. The mud edging can also be used for coasters and dishcloths. The tutorial is quick and perfect for absolute beginners and teaches crocheting a mochi bunny!)

Personalization tips: As mentioned, you can crochet the two versions, which differ in the color of the pot and the bunny. The first one uses light shades of green and brown, while the other one uses dark shades of the two. You can also crochet a simple bunny by crocheting the bobble stitch legs, and it will turn out to be cute. If you could, a little adjustment in shape will further adjust it. Try oval and round miniature eyes. You can also choose the regular smile!
Pattern Type: An on-screen written pattern is available if you find written instructions easy to follow along with. The instructions are written using US terms.
Materials Suggested
The tutor specifies this list of materials and tools for the mini bunny in a plant pot project for beginners. Gather all for similar results:
- 1.5mm yarn will work best (use the chenille yarn for the shimmering texture)
- 4/0 2.50mm crochet hook
- Stitch marker
- Scissors
- Hot glue/ tacky glue
Techniques Used
Here are the quick crochet guides for crocheting each stitch mentioned and used in the tutorial for crocheting this amigurumi:
Magic Ring – Wrap yarn in a loop, insert the hook, pull up a loop, and crochet stitches into the ring to form a tight center.
Single Crochet (sc) – Insert hook into stitch, yarn over, pull through, yarn over again, pull through both loops.
Increase (inc) – Work two single crochet stitches into the same stitch to widen your piece.
Decrease (dec / sc2tog) – Insert hook into the next two stitches, yarn over, pull through both, yarn over again, pull through remaining loops.
Back Loop Only (BLO) – Insert hook under the back loop of the stitch only (furthest from you) before completing your stitch.
Chain Stitch (ch) – Yarn over, pull through loop on hook to create a foundation or turning chain.
Half Double Crochet (hdc) – Yarn over, insert hook, yarn over, pull through, yarn over again, pull through all three loops on hook.
Slip Stitch (sl st) – Insert hook into stitch, yarn over, and pull through both stitch and loop on hook in one motion.
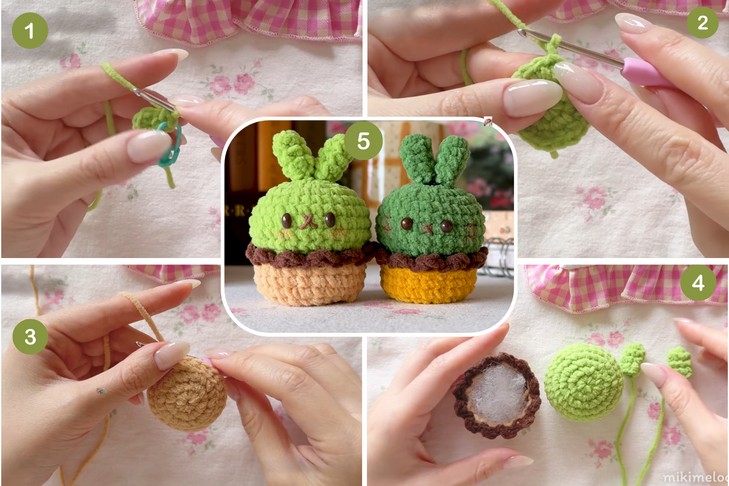
How is it done?
The process involves first crocheting the bunny’s head, ears, and pot separately. The head and ears are created with single crochet stitches, using increases and decreases to form their shapes. The pot is also crocheted with single crochets, but includes a section worked in the back loop only for texture. A mud layer is added to the pot using chain stitches and half double crochets. Finally, all the pieces are assembled using sewing or glue.