How to Crochet Spooky Pumpkin Basket for Halloween
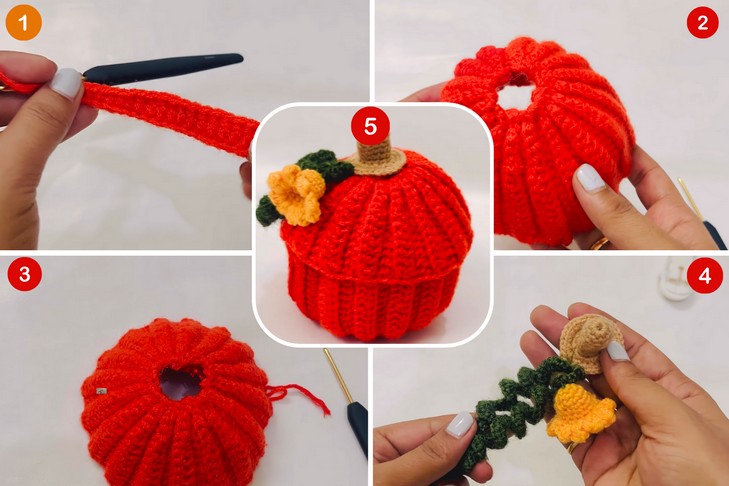
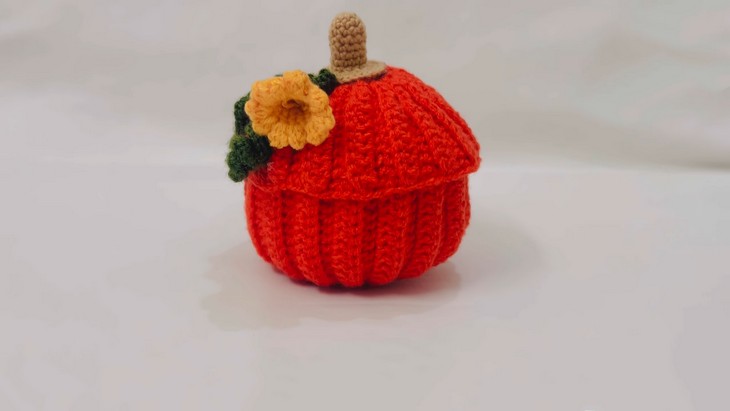
Halloween baskets are all-rounders, save, display, and play with! So, for upcoming Halloween or other fall celebrations, make sure to crochet this cute, easy, and spooky pumpkin basket with a stitch-by-stitch tutorial that’s perfect for hiding candies, trick-or-treating, or simply as a centerpiece decoration. This is shaped like a pumpkin with appealing additions like pumpkin vines, a flower, and a stem for ease of opening the pumpkin-half lid. This pumpkin container also features the same pumpkin ribbing and has ample space for so many treats, your mini pumpkins or walnuts!
This beginner-friendly tutorial is easy to follow! So, if you are ready to crochet this pumpkin basket and container by yourself, keep reading this post till the end. There you will find the complete guide!

About the Designer: The designer behind this pumpkin bucket and container project is @thehappyhues – she is an Indian crochet designer but has oh-so cute projects for celebrations like Halloween, Easter, and Christmas, along with some Kanha Ji and Rakhi projects. She has mostly tried crochet flower bouquets and flower accessories and bags, leaves and plants and many other home decor and wearable projects. The channel’s slogan is “Tale of Happy Yarn, where creativity & fun meets personal expression!” You should certainly check her talented tutorials with on-screen patterns!
Note: In respect of the creator’s pattern rights, there will be no provision of the written pattern. You can watch the tutorial with on-screen written instructions at the end of this post.

Halloween Pumpkin Basket Tutorial
Skill Level: Intermediates. Her method for crocheting the half pumpkin and the cap from a rectangle is a bit unique, as it is worked in connected triangle patches by working in back-and-forth rows. For this reason, you will be using stitches of different heights along with BLO for the ribbed texture. Sewing is needed in the end. The stem is worked in round, and similarly the flower. For the vines, use the cluster in foundation chains. The tutorial uses basic crochet stitches (single crochet, chain stitch, half-double crochet, double crochet, slip stitch, and more that will be easy even for beginners.)
Tutorial Timing: Approximately 30 minutes only. (Most crochet pumpkins are crocheted by working in simple back-and-forth rows, but this one is unique. Therefore, watching the tutorial is worth learning the no-sew patchwork technique and improving your sewing. You will also learn a lovely flower.)

Personalization Tips: You can also use the lighter colors, including yellow, like in the previous pumpkin container, or simply use light orange. A little leaf and flower addition makes it oh-so-cute, but you can also add a jack-o’-lantern face using the felt for Halloween. To adjust the size, you need to reduce or increase the number of rows or the width of each fabric. The tutor uses double yarn, but you can also use the single!
Pattern Type: The on-screen written pattern is available if you find written instructions easy to follow along with. Also, the tutorial is slow-paced.
Materials and Tools
Here is a list of crochet supplies for crocheting a pumpkin container and basket by yourself:
- 3ply Green Yarn (you can use the Milk Cotton)
- Hook size 2.5mm
- 2ply orange color yarn
- 2ply brown color yarn
- Scissors
- Sewing Needle
- Hot Glue Gun
Crochet Stitch Guides
Learn the following crochet techniques for crocheting this pumpkin-shaped basket:
- Chain Stitch (ch): Yarn over and pull through the loop on the hook.
- Single Crochet (sc): Insert the hook into the stitch, yarn over, pull through, yarn over again, and pull through both loops.
- Slip Stitch (sl st): Insert the hook into the stitch, yarn over, and pull through both the stitch and the loop on the hook.
- Half Double Crochet (hdc): Yarn over, insert the hook into the stitch, yarn over again, pull through, and yarn over to pull through all three loops.
- Double Crochet (dc): Yarn over, insert the hook into the stitch, yarn over again, pull through, yarn over, pull through two loops, yarn over again, and pull through the last two loops.
- Back Loop Only (BLO): Work the specified stitch, but insert the hook into only the back loop of the stitch for ribbed texture.
- Cluster Stitch: Work multiple unfinished double crochets (or other specified stitch) in the same chain space, then yarn over and pull through all loops on the hook.
- Sewing: Use a needle to stitch together the edges or folds for assembly.