
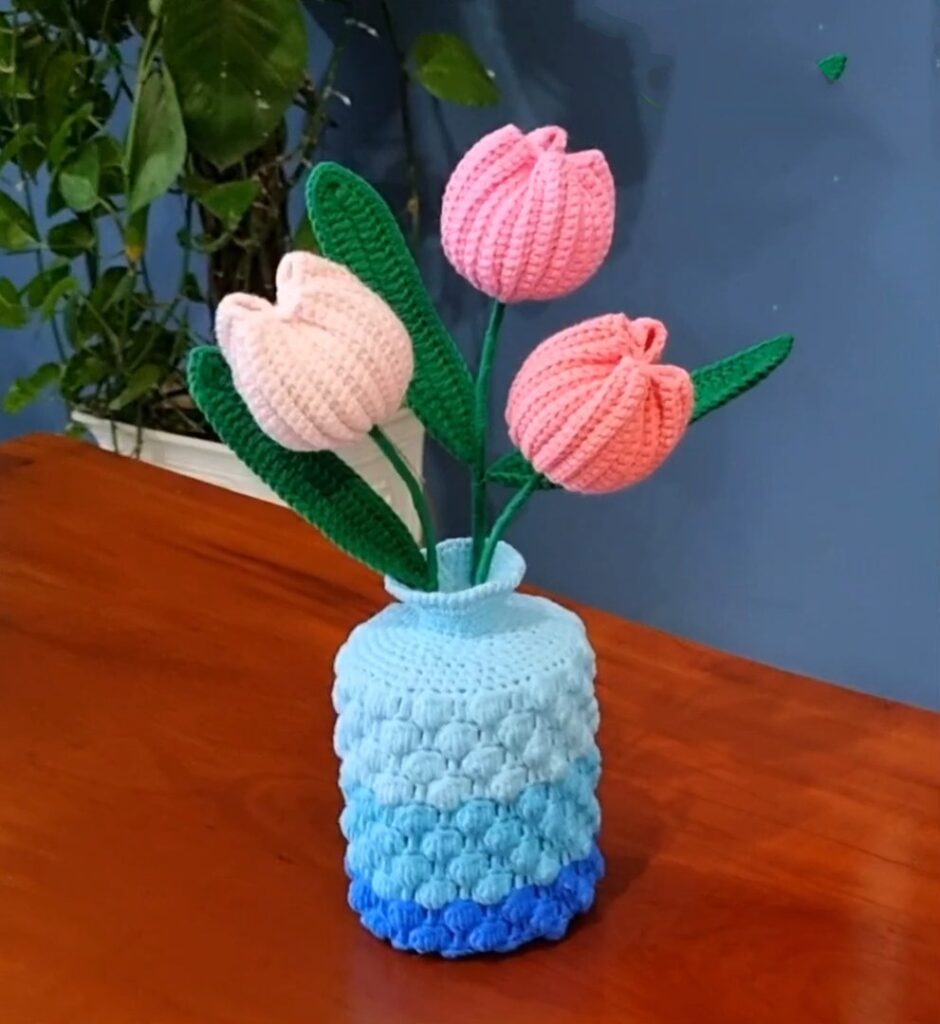
Crochet Tulips & Vase Pattern Step by Step
This crochet pattern teaches you how to make a lovely crochet tulip flower pot that looks very realistic and cute. The special part of this design is the vase itself, which features a beautiful bubbly texture created by using popcorn stitches. You can customize the size and colors to match your style, making it a perfect decoration that never wilts or needs water.

How to Make It
-
First, you crochet a small rectangle and sew the sides to make the flower head.
-
Next, you stuff it with cotton to make it puffy and round.
-
Then, you crochet the leaves and wrap yarn around a wire to make the stem.
-
To make the vase, you crochet a circle for the bottom and work your way up.
-
You slide a plastic sheet inside the vase to keep it strong and stiff.
-
Finally, put the flowers in the pot and you are all done!
About The Creator:
Bi do Handmade has been an expert in crocheting and designing crochet amigurumi, bag charms, and pouches. Also visit her YouTube channel for more exciting projects.
Let’s Crochet Vase Tulip Flowers
Abbreviations (US Terms)
-
MR: Magic Ring
-
Ch: Chain
-
St(s): Stitch(es)
-
Sc: Single Crochet
-
Hdc: Half Double Crochet
-
Dc: Double Crochet
-
Sl st: Slip Stitch
-
Inc: Increase (2 Sc in one stitch)
-
Dec: Decrease (Sc2tog)
-
BLO: Back Loop Only
-
Popcorn: Work 5 Dc in the same stitch. Remove hook from the working loop, insert hook into the first Dc made, grab the working loop and pull it through to close the popcorn.
-
BPsc: Back Post Single Crochet (or working around the post to create a rim)
Tulip Flower
-
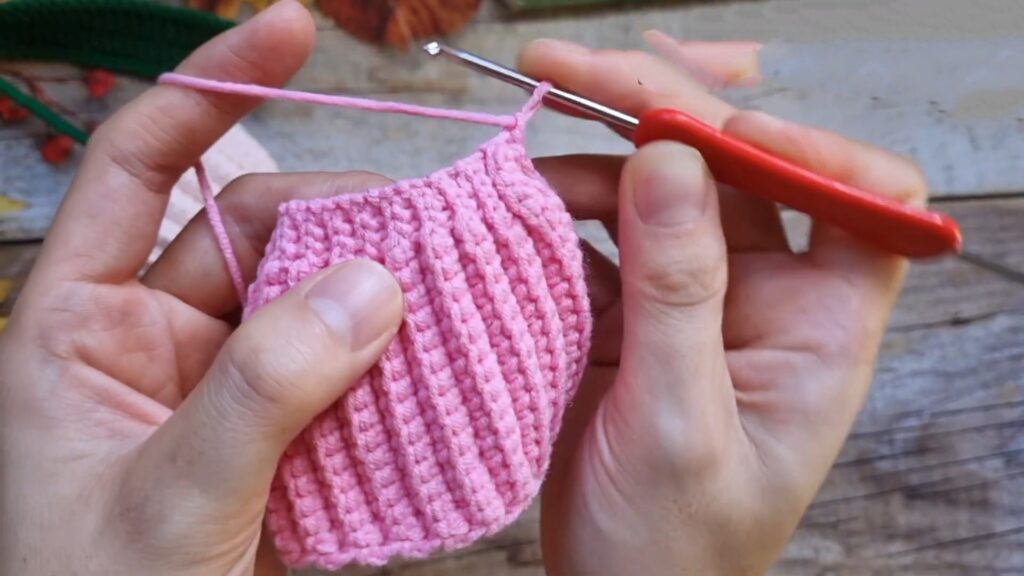
Foundation: Ch 18.
-
Row 1: Sc in 2nd ch from hook, Sc in next 12 sts, Sl st in last 4 sts. (17 sts)
-
Row 2: Ch 1, turn. BLO Sl st in first 4 sts, BLO Sc in next 12 sts, Sc in last st (work through both loops for stability).
-
Row 3: Ch 1, turn. Sc in first st (both loops), BLO Sc in next 12 sts, BLO Sl st in last 4 sts.
-
Rows 4–41: Repeat Rows 2 and 3 continuously to create a ribbed rectangular fabric.
-
Assembly:
-
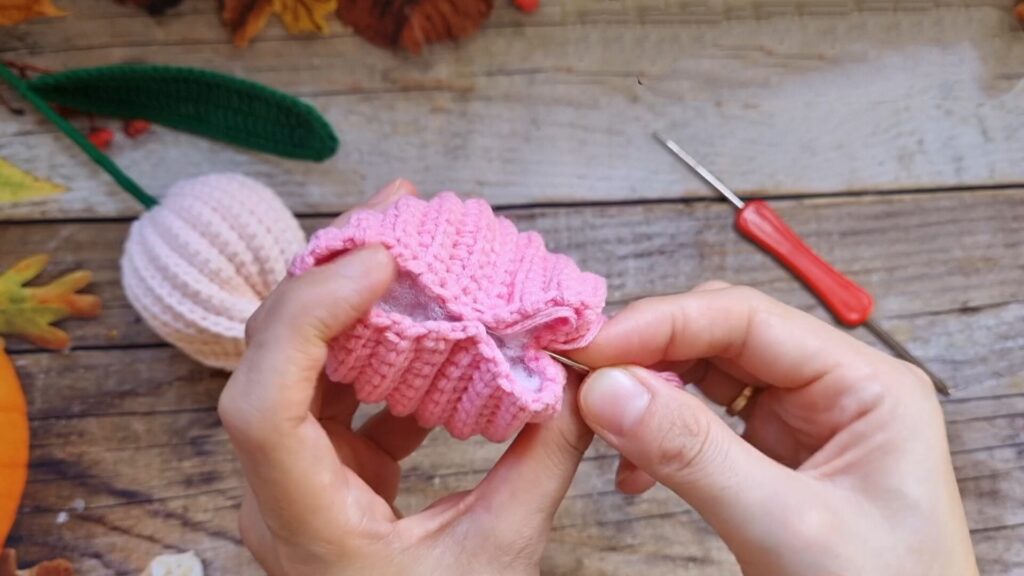
Fold the piece to join the first and last rows. Sl st along the edge to join them into a tube.
-
Bottom: Fasten off leaving a long tail. Weave the tail through the row ends of the bottom edge (the side with Slip Stitches) and pull tight to close. Secure the yarn.
-
Stuffing: Turn right side out and stuff firmly with fiberfill.
-
Top: Thread a needle. Pinch the middle of the top opening (Sc side) to find the center points. Sew opposite sides together in a cross (+) shape to form the tulip petals.
-
Leaf
-
Foundation: Ch 25.
-
Round 1:
-
2 Sc in 2nd ch from hook.
-
Hdc in next st.
-
Dc in each st across until the last ch.
-
In the last ch: Work 3 Dc, Ch 2, 3 Dc.
-
Working down the other side: Dc in each st until 2 sts remain.
-
Hdc in next st.
-
Sc in last st. Sl st to first Sc to join.
-
-
Round 2 (Add Wire):
-
Place a piece of floral wire along the edge.
-
Sc in each st around, working over the wire to encase it.
-
At the tip (Ch-2 space): Work (3 Sc, Ch 1, 3 Sc) into the space.
-
Continue Sc down the other side. Sl st to join.
-
-
Stem: Twist the remaining wire ends together. Wrap yarn around the wire to cover it completely.

Vase (Pot)
Base
-
Round 1: Start with a MR, 7 Sc into ring. Join. (7)
-
Round 2: Inc in each st around. (14)
-
Round 3: (Sc 1, Inc) repeat around. (21)
-
Round 4: (Sc 2, Inc) repeat around. (28)
-
Round 5: (Sc 3, Inc) repeat around. (35)
-
Round 6: (Sc 4, Inc) repeat around. (42)
-
Round 7: (Sc 5, Inc) repeat around. (49)
-
Round 8: (Sc 6, Inc) repeat around. (56)
-
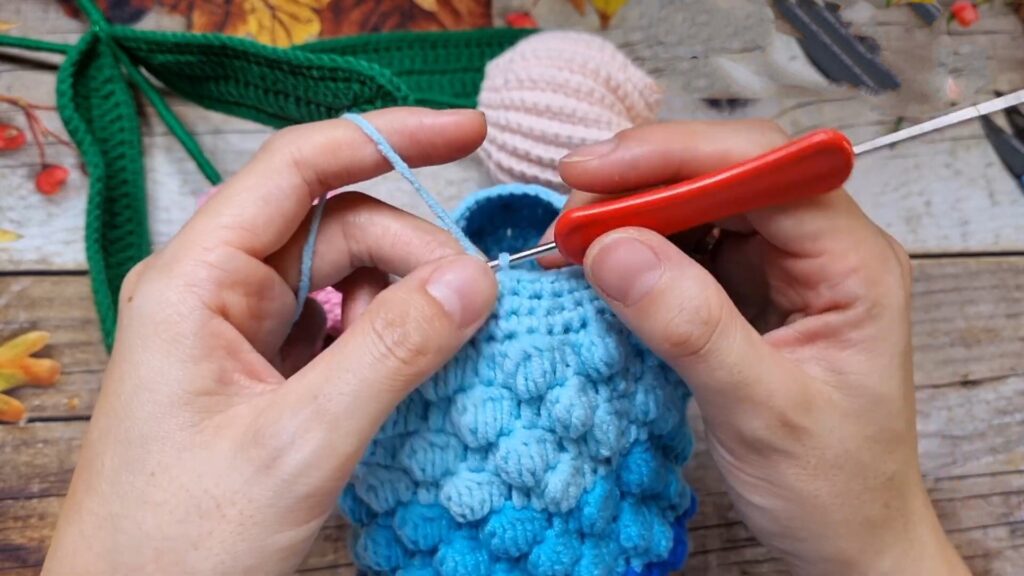
Round 9 (Rim): Work BPsc (or insert hook from bottom-up around the stem of the stitch) in each st around to create a sharp 90-degree edge for the base.
-
Round 10: Sc in each st around.
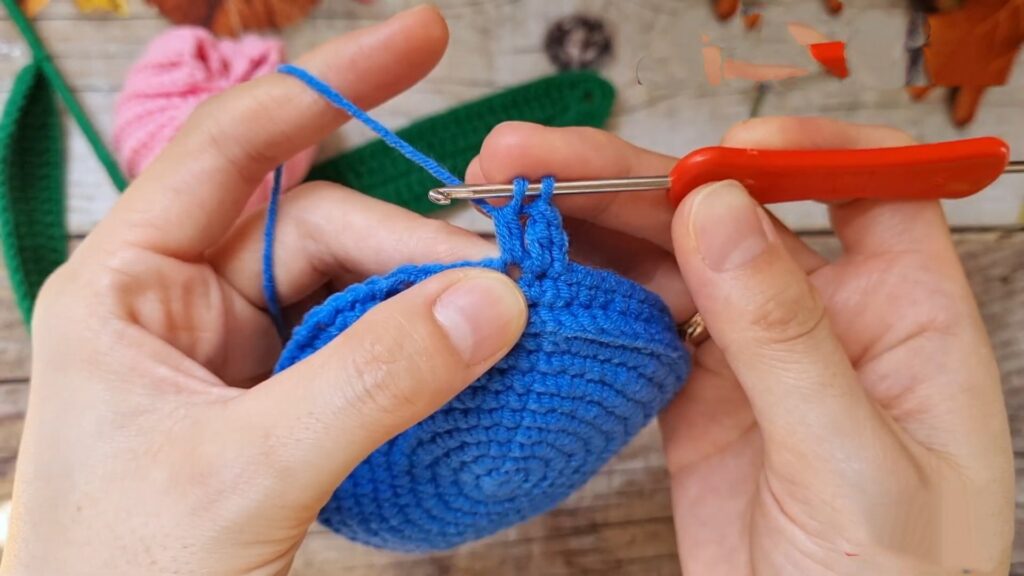
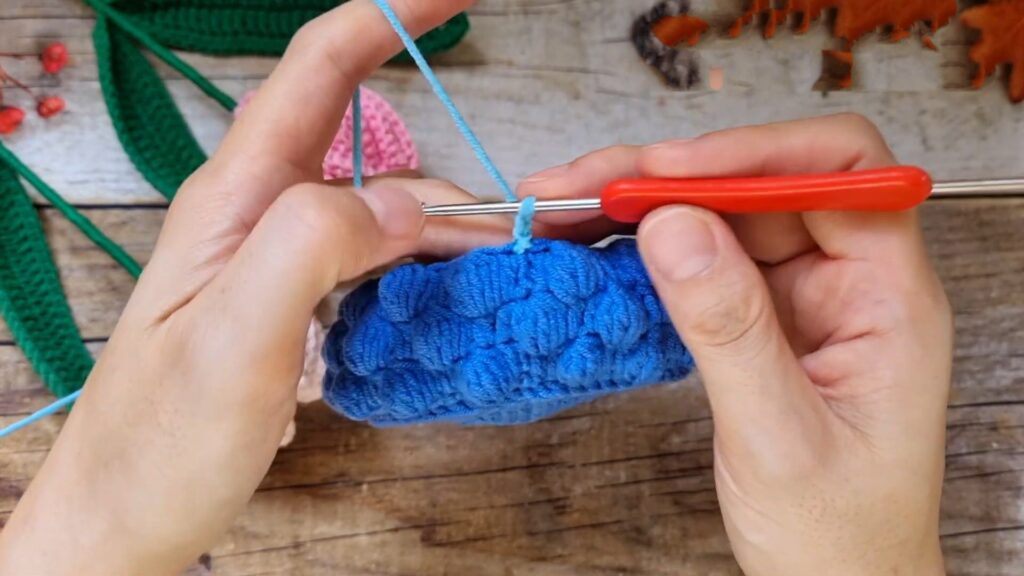
Body (Popcorn Stitch)
-
Round 11: Ch 2 (counts as first Dc), Dc in next 2 sts. Popcorn in next st, Dc in next 3 sts. Repeat around.
-
Note: Ensure Popcorns are spaced evenly. Adjust the last set of Dc if necessary.
-
-
Round 12: Ch 2, Popcorn in next st, Dc in next 3 sts. Repeat around.
-
-
Note: Shift the pattern so the Popcorn of this round aligns with the middle Dc of the 3-Dc group from the previous round (offset pattern).
-
-
Rounds 13+: Continue repeating the pattern, alternating the position of the Popcorns to create a diamond/offset texture. Change colors as desired (e.g., green base, blue top).
-
Top Edge of Body: Once desired height is reached, work 1 round of Sc.
Neck Decrease
-
Decrease Round 1: (Sc 6, Dec) repeat around.
-
Decrease Round 2: (Sc 5, Dec) repeat around.
-
Decrease Round 3: (Sc 4, Dec) repeat around.
-
Continue decreasing pattern (Sc 3, Dec, etc.) until the opening reaches the desired neck width (approx. ending with (Sc 2, Dec)).
-
Insert Support: Cut a piece of plastic canvas to size, roll it into a tube, and insert it into the vase for stability. Stitch the canvas in place if needed.
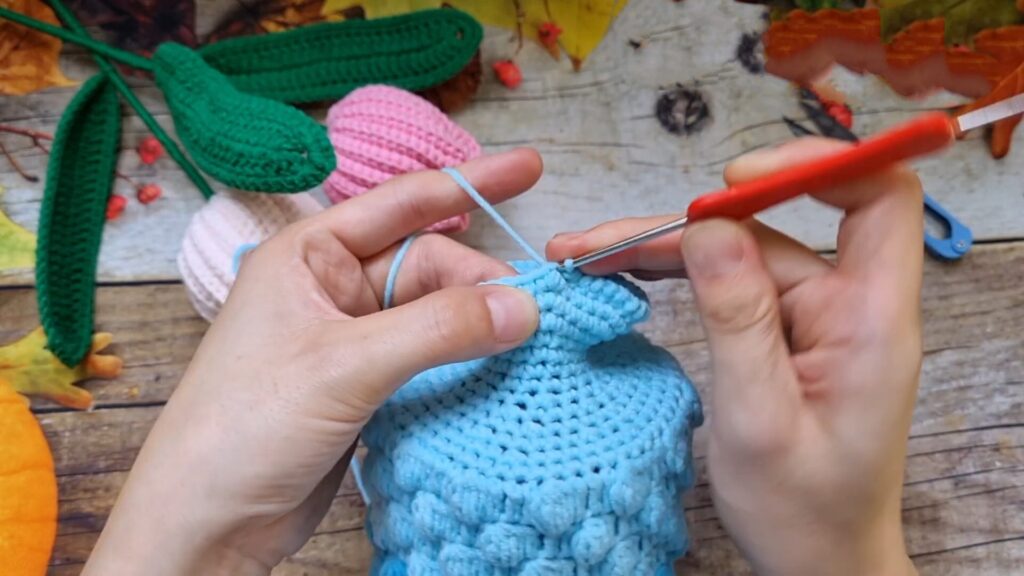
Vase Neck & Flare
-
Neck: Sc in each st around for 4–5 rounds (straight).
-
Flare Round 1: (Sc 2, Inc) repeat around.
-
Flare Round 2: (Sc 4, Inc) repeat around.
-
Edging: Sc in each st around. To create the decorative twisted edge shown in the video: Insert hook, pull up a loop, yarn over around the hook, then pull through both loops.
Assembly
-
Insert the wrapped stems of the Tulips and Leaves into the vase.
-
Use foam or extra stuffing inside the vase to hold the flowers in place.
Video Tutorial:
Pattern In UK Terms
Abbreviations (UK Terms)
-
MR: Magic Ring
-
Ch: Chain
-
St(s): Stitch(es)
-
Dc: Double Crochet (US Sc)
-
Htr: Half Treble Crochet (US Hdc)
-
Tr: Treble Crochet (US Dc)
-
Ss: Slip Stitch
-
Inc: Increase (2 Dc in one stitch)
-
Dec: Decrease (Dc2tog)
-
BLO: Back Loop Only
-
Popcorn: Work 5 Tr in the same stitch. Remove hook from the working loop, insert hook into the first Tr made, grab the working loop and pull it through to close the popcorn.
-
BPdc: Back Post Double Crochet
Tulip Flower
-
Foundation: Ch 18.
-
Row 1: Dc in 2nd ch from hook, Dc in next 12 sts, Ss in last 4 sts. (17 sts)
-
Row 2: Ch 1, turn. BLO Ss in first 4 sts, BLO Dc in next 12 sts, Dc in last st (work through both loops).
-
Row 3: Ch 1, turn. Dc in first st (both loops), BLO Dc in next 12 sts, BLO Ss in last 4 sts.
-
Rows 4–41: Repeat Rows 2 and 3 continuously.
-
Assembly:
-
Join first and last rows with Ss to form a tube.
-
Bottom: Fasten off leaving a long tail. Weave through row ends of the bottom edge (Ss side) and pull tight to close. Secure yarn.
-
Stuffing: Turn right side out and stuff firmly.
-
Top: Pinch the middle of the top opening to find center points. Sew opposite sides together in a cross (+) shape.
-
Leaf
-
Foundation: Ch 25.
-
Round 1:
-
2 Dc in 2nd ch from hook.
-
Htr in next st.
-
Tr in each st across until the last ch.
-
In the last ch: Work 3 Tr, Ch 2, 3 Tr.
-
Working down the other side: Tr in each st until 2 sts remain.
-
Htr in next st.
-
Dc in last st. Ss to first Dc to join.
-
-
Round 2 (Add Wire):
-
Place floral wire along the edge.
-
Dc in each st around, working over the wire.
-
At the tip (Ch-2 space): Work (3 Dc, Ch 1, 3 Dc) into the space.
-
Continue Dc down the other side. Ss to join.
-
-
Stem: Twist remaining wire ends. Wrap yarn around wire to cover.
Vase (Pot)
Base
-
Round 1: MR, 7 Dc into ring. Join. (7)
-
Round 2: Inc in each st around. (14)
-
Round 3: (Dc 1, Inc) repeat around. (21)
-
Round 4: (Dc 2, Inc) repeat around. (28)
-
Round 5: (Dc 3, Inc) repeat around. (35)
-
Round 6: (Dc 4, Inc) repeat around. (42)
-
Round 7: (Dc 5, Inc) repeat around. (49)
-
Round 8: (Dc 6, Inc) repeat around. (56)
-
Round 9 (Rim): BPdc in each st around (creates 90-degree edge).
-
Round 10: Dc in each st around.
Body (Popcorn Stitch)
-
Round 11: Ch 2 (counts as first Tr), Tr in next 2 sts. Popcorn in next st, Tr in next 3 sts. Repeat around.
-
Round 12: Ch 2, Popcorn in next st, Tr in next 3 sts. Repeat around. (Ensure Popcorns are offset from previous round).
-
Rounds 13+: Repeat pattern, alternating Popcorn positions to create diamond texture. Change colours as desired.
-
Top Edge of Body: Work 1 round of Dc.
Neck Decrease
-
Decrease Round 1: (Dc 6, Dec) repeat around.
-
Decrease Round 2: (Dc 5, Dec) repeat around.
-
Decrease Round 3: (Dc 4, Dec) repeat around.
-
Continue decreasing pattern until opening reaches desired neck width (approx. ending with (Dc 2, Dec)).
-
Support: Insert rolled plastic canvas for stability.
Vase Neck & Flare
-
Neck: Dc in each st around for 4–5 rounds.
-
Flare Round 1: (Dc 2, Inc) repeat around.
-
Flare Round 2: (Dc 4, Inc) repeat around.
-
Edging: Dc in each st around. For twisted edge: Insert hook, pull up loop, yarn over around the hook, pull through both loops.
Assembly
-
Insert wrapped stems of Tulips and Leaves into vase.
-
Secure with stuffing or foam inside vase.