
Free Crochet Vintage Scarf Pattern with Zig-Zag Texture
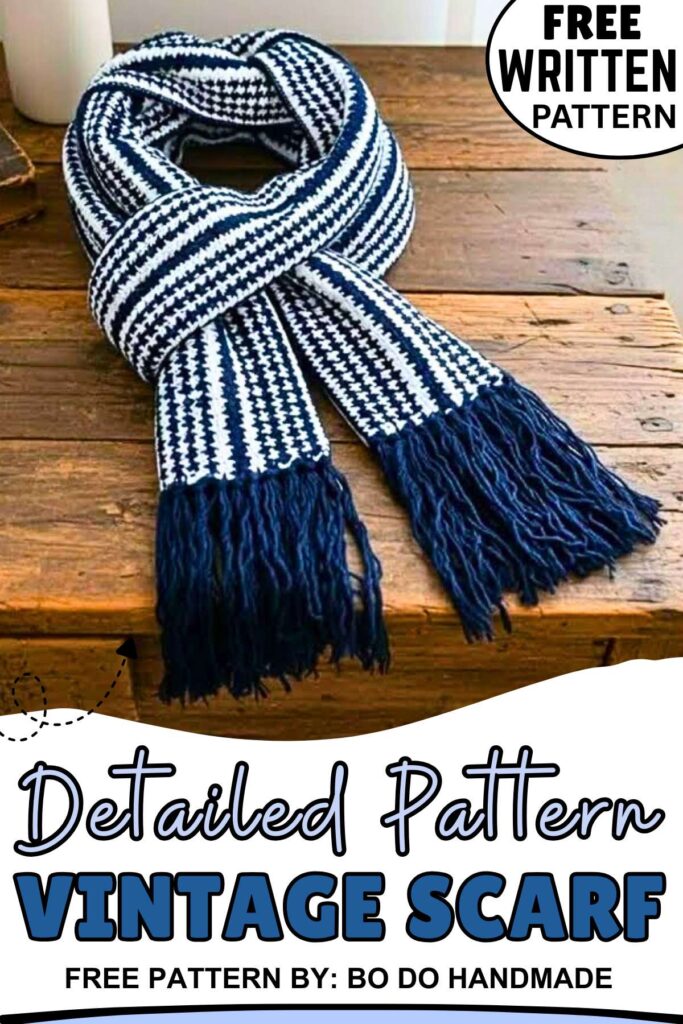
Today’s crochet scarf for winter looks so elegant with the zig-zag stripes and white and blue colorwork. In this post, there will be a free and complete written pattern for crocheting this vintage scarf.
The special thing is the use of tassels at both ends, plus the crochet use of contrasting colors. You can crochet this scarf for both men and women since the pattern is gender-neutral.
Crochet Scarf for Winter
Bi do Handmade is an expert in crocheting and designing crochet amigurumi, bag charms, and pouches. Her tutorials always have detailed written instructions in two languages on the screen. So, make sure to subscribe to her channel.
Note: For this amigurumi in particular, we shall share the written pattern that is complete and checked.

These were shared previously:
Pattern for Crochet Vintage Scarf
This crochet pattern will make you a zigzag-textured scarf with a tassel. For an adult size, it will measure 1.8m long and 18-20cm wide.
Materials
Gather the following materials and tools for crocheting this quick crochet scarf:
-
Hook: 4.0 mm
-
Yarn: Milk Cotton (or similar weight)
-
Terminology: US Standard
Abbreviations
-
ch: chain
-
sc: single crochet
-
dc: double crochet
-
st: stitch
-
sl st: slip stitch
-
rep: repeat
Scarf
-
Foundation: ch until length reaches ~1.8m (do not work too tightly).
-
Row 1: ch 1, turn. *1 sc, 1 dc; rep from * across.
-
Row 2 (Switch Color): Join new color. ch 2 (counts as dc), *1 sc into previous row’s dc, 1 dc into previous row’s sc; rep from * across.
-
Row 3: *1 sc into previous row’s dc, 1 dc into previous row’s sc; rep from * across.
-
Remaining Rows: Repeat Row 3, alternating colors as desired, until width reaches 18–20 cm.
-
Note: Always work sc into dc and dc into sc to maintain the zigzag pattern.
-

Border & Tassel Gaps
-
Long Sides: sc evenly in each st along the entire length of the scarf.
-
Short Sides (Ends): To create gaps for tassels:
-
In the corner st, work 2 sc to turn.
-
*ch 2, skip approx. 1 row/space, 1 sc into the edge; rep from * across the width.
-
sl st to close.
-

Tassels
-
Cut: Prepare yarn strands approximately 20–25 cm long.
-
Bundle: Group 3–4 strands together.
-
Attach: Fold the bundle in half, pull the loop through a ch-2 gap on the scarf end, and pull the tails through the loop to tighten.
-
Repeat: Attach bundles to every ch-2 gap on both ends.
-
Trim: Even out the ends with scissors.

UK Pattern
Abbreviations (UK Terms)
-
ch: chain
-
dc: double crochet (equivalent to US sc)
-
tr: treble crochet (equivalent to US dc)
-
st: stitch
-
sl st: slip stitch
-
rep: repeat
Scarf Body
-
Foundation: ch until length reaches ~1.8m.
-
Row 1: ch 1, turn. *1 dc, 1 tr; rep from * across.
-
Row 2 (Switch Colour): Join new colour. ch 3 (counts as tr), *1 dc into previous row’s tr, 1 tr into previous row’s dc; rep from * across.
-
Row 3: *1 dc into previous row’s tr, 1 tr into previous row’s dc; rep from * across.
-
Remaining Rows: Repeat Row 3, alternating colours, until width reaches 18–20 cm.
-
Note: Always work dc into tr and tr into dc to maintain the zigzag texture.
-
Border & Tassel Gaps
-
Long Sides: dc evenly in each st along the entire length of the scarf.
-
Short Sides (Ends): * In the corner st, work 2 dc to turn.
-
*ch 2, skip approx. 1 row/space, 1 dc into the edge; rep from * across the width.
-
sl st to close.
-
Tassels
-
Cut: Prepare yarn strands 20–25 cm long.
-
Bundle: Group 3–4 strands.
-
Attach: Fold bundle in half, pull loop through a ch-2 gap, and pull tails through the loop to tighten.
-
Repeat: Attach bundles to every ch-2 gap on both ends.
-
Trim: Even out the ends with scissors.