
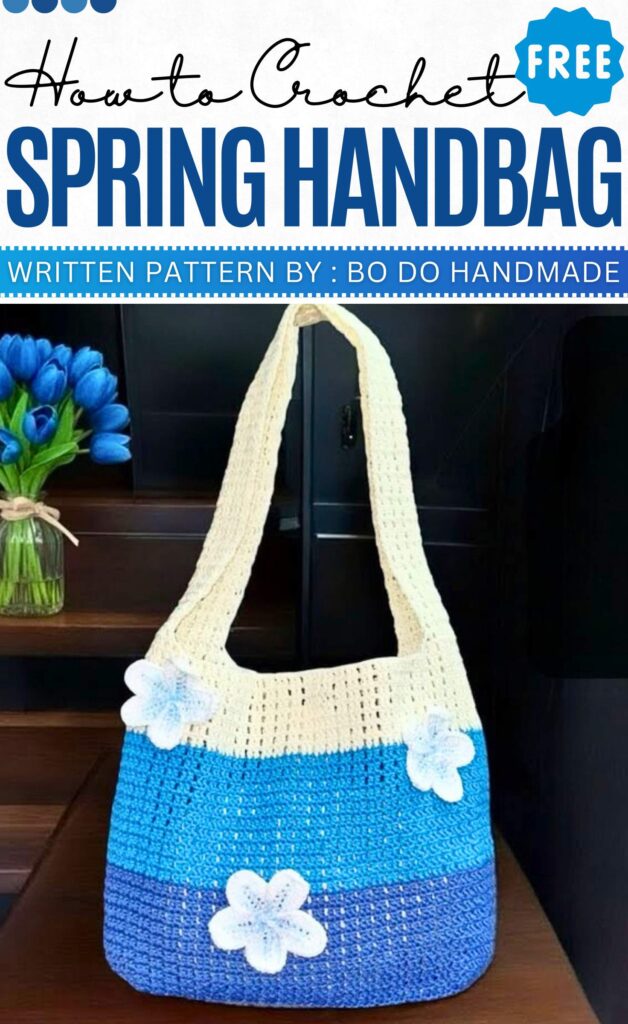
Free Crochet Handbag Pattern & Video Tutorial
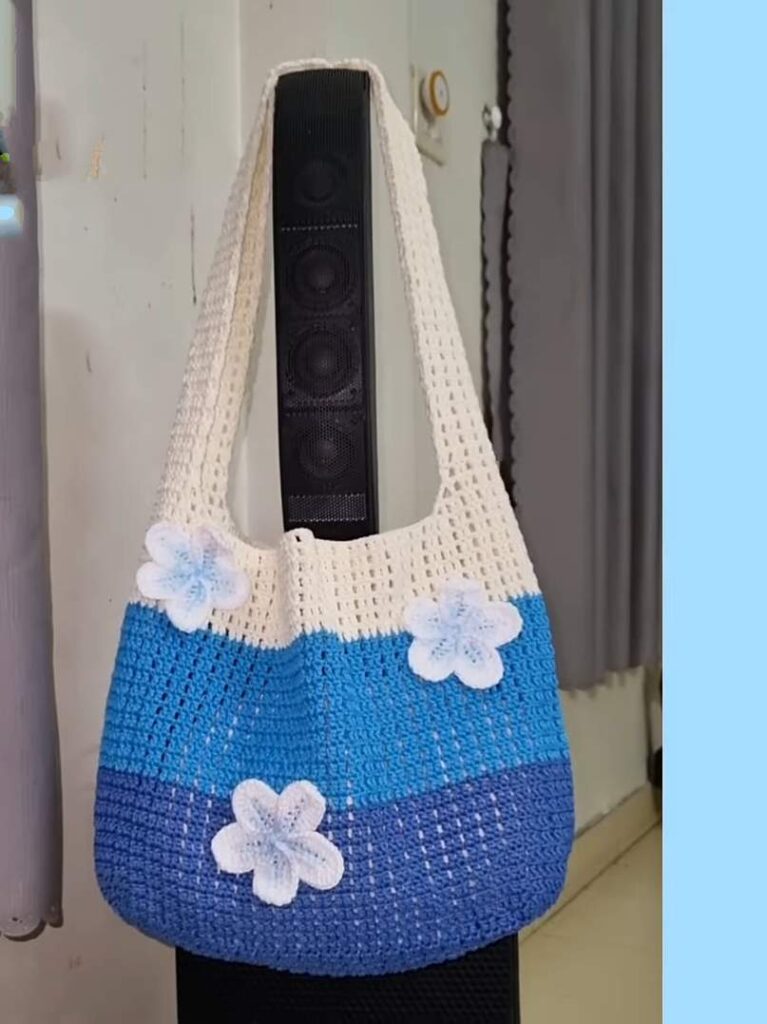
Here is perfect project for your spring time! The lovely net-style handbag that is light, stretchy, and very useful. It is a great bag for beginners because it uses a simple grid pattern that looks like a net. You can make it in one solid color or change colors halfway and add cute flowers all around!
Crochet Handbag For Springs
About The Creator:
Bi do Handmade has been an expert in crocheting and designing crochet amigurumi, bag charms, and pouches. Also visit her YouTube channel for more exciting projects.
Crochet Plumeria Net Bag Pattern
Terminology: US Terms Skill Level: Intermediate Materials:
-
2.5mm Crochet Hook
-
Cord or Ribbon Yarn (approx. 2-3mm width)
-
Scissors, Tapestry Needle, Stitch Markers
Abbreviations:
-
ch: Chain
-
dc: Double Crochet
-
sk: Skip
-
sp: Space
-
sl st: Slip Stitch
-
st(s): Stitch(es)
-
CSDC: Chainless Starting Double Crochet (or Standing DC) – Used to replace ch-3 for a cleaner edge.
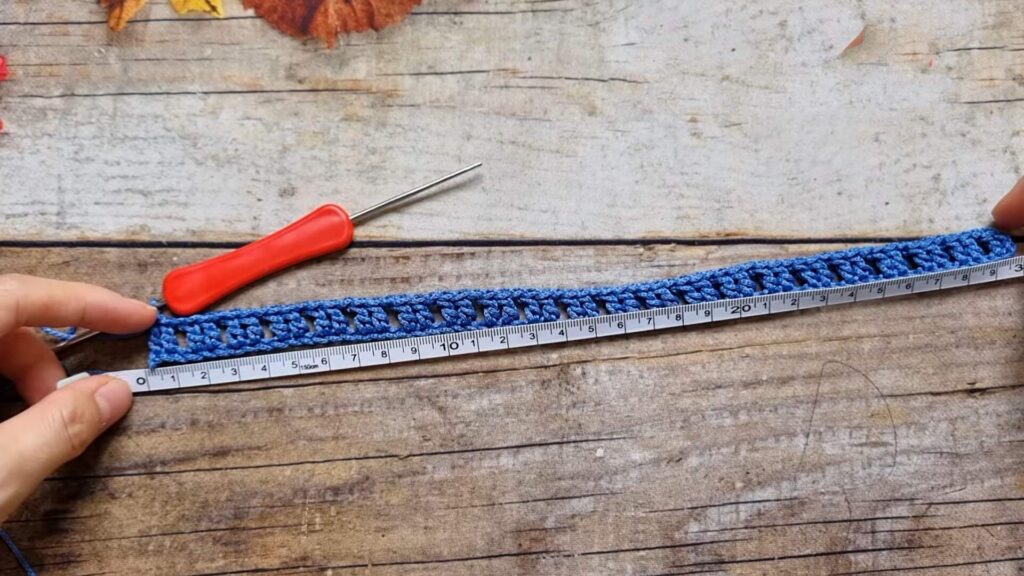
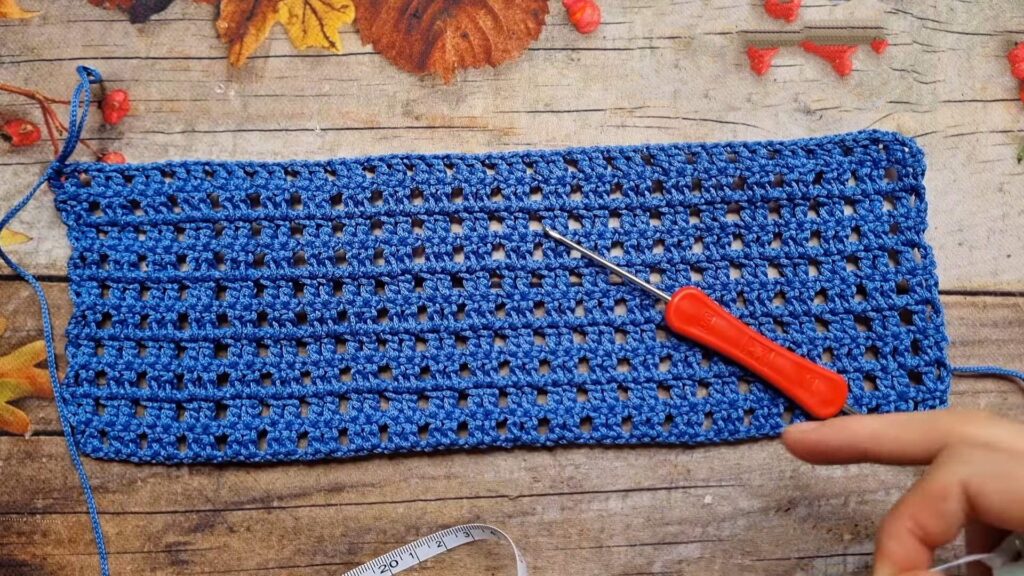
Part 1: Rectangular Mesh Base
-
Foundation: Ch 63 (or an odd number to reach approx. 30cm length).
-
Row 1: dc in 4th ch from hook (counts as 2 dc). Ch 1, sk 1 ch, dc in next 2 ch. Repeat from * to * across.
-
Row 2: Ch 3 (counts as 1 dc), turn. Sk first st, dc in next st. Ch 1, sk ch-1 sp, dc in next 2 dc. Repeat from * to * across.
-
Rows 3–End: Repeat Row 2 until the base is approx. 10cm wide.
-
Finish Base: Do not fasten off. Proceed to Body.
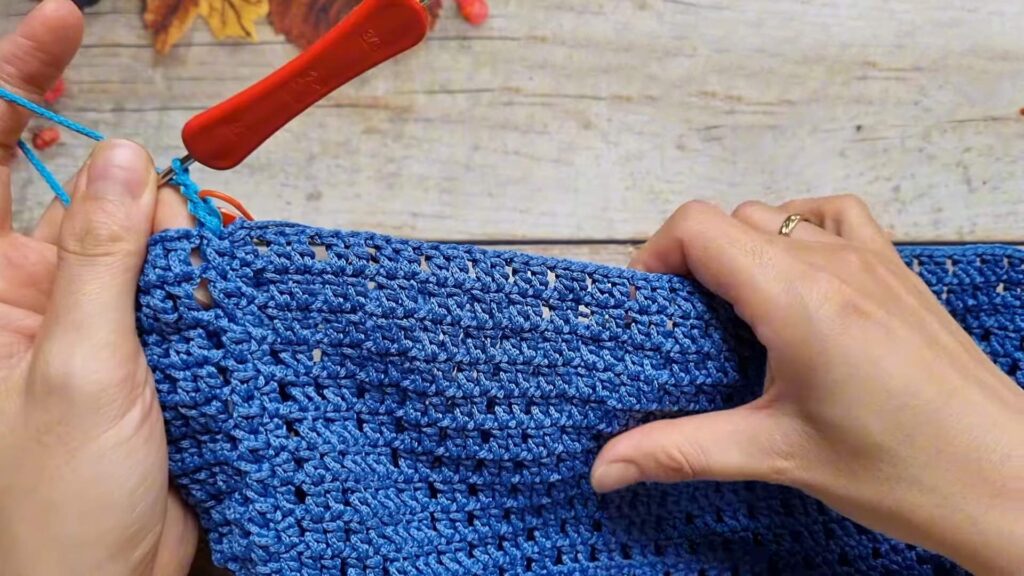
Part 2: Body (Worked in Rounds)
-
Round 1:
-
Long Sides (Row Ends): Rotate to work along the side edges. Work 2 dc into the body of each row-end stitch (ch-3 or dc post). Ch 1 between each 2-dc group.
-
Short Sides (Top/Bottom of Base): Work (2 dc, ch 1) matching the stitch pattern of the base rows.
-
Corners: Maintain the (2 dc, ch 1) pattern continuously around the corners; do not add extra increases. The mesh should form a seamless grid.
-
Join: Sl st to first st.
-
-
Round 2:
-
Start: Work a CSDC (or ch 3) in the first st. Dc in next st.
-
Pattern: Ch 1, sk ch-1 sp, dc in next 2 dc. Repeat from * to * around.
-
Join: Sl st to top of starting st.
-
-
Rounds 3–Height: Repeat Round 2.
-
Optional Color Change: At approx. 1/3 height, switch yarn color using a standing dc join.
-
Continue pattern until bag reaches desired height.
-
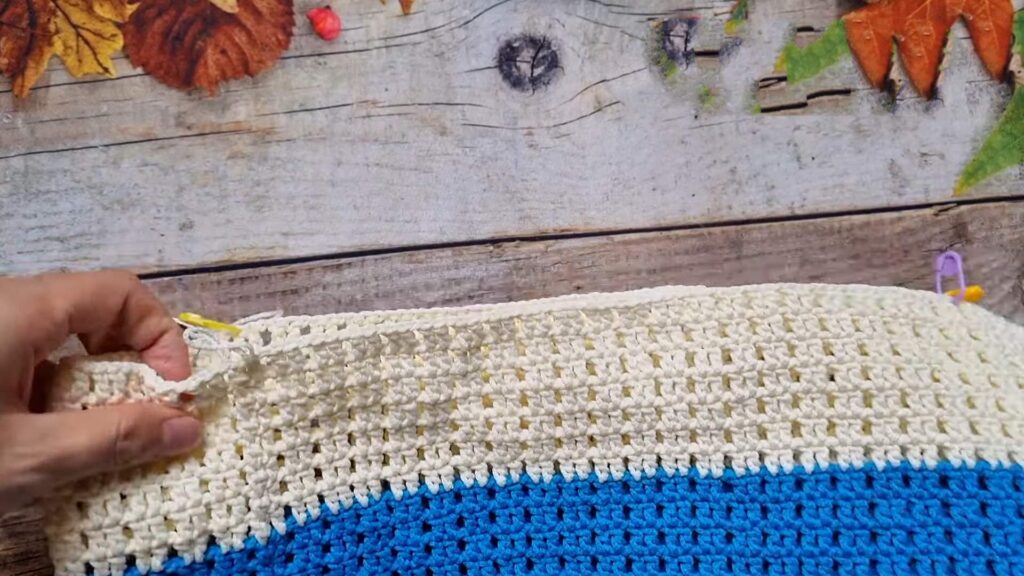
Part 3: Handles
-
Preparation:
-
Lay bag flat. Identify 4 points on the top edge corresponding to the 4 corners of the rectangular base width.
-
Mark the stitch groups to begin the straps (width can be 2-3 mesh blocks).
-
-
Strap Half (Make 4 – or 2 long continuous):
-
Row 1: Attach yarn at marker. Ch 3 (counts as dc), dc in next st. Ch 1, sk sp, dc in next 2 sts. Work across designated strap width.
-
Row 2 (Decrease): Ch 3, turn. Sk the first dc and the next st to create a slight taper. Continue mesh pattern. At the end, skip the last partial stitch to decrease.
-
Rows 3+: Work straight mesh rows (Ch 3, dc, ch 1…) until the strap piece reaches half the desired total strap length.
-
Repeat: Create 4 identical strap pieces extending from the 4 marked corners.
-
-
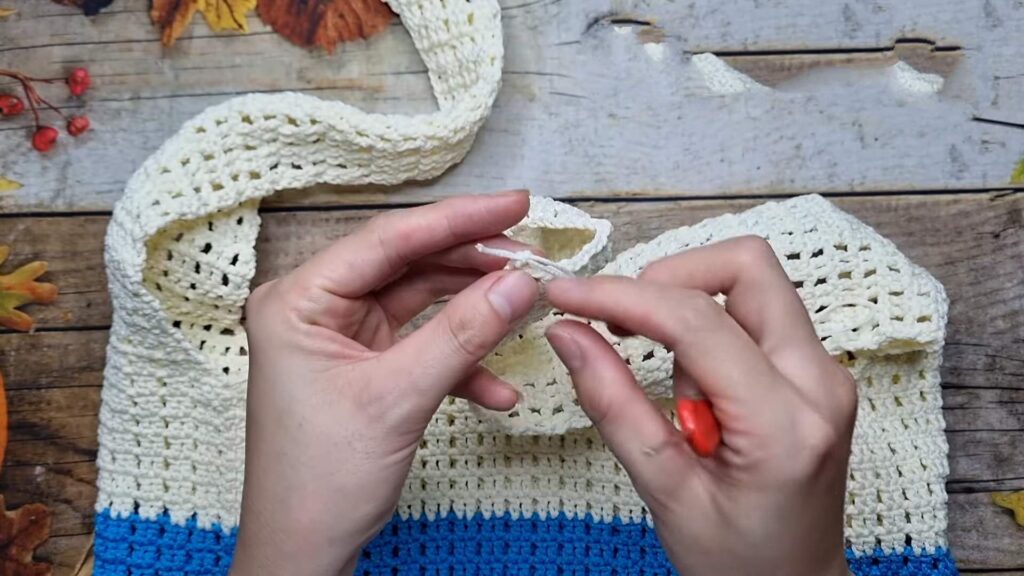
Joining:
-
Fold the strap pieces so the front-left meets the back-left, and front-right meets back-right.
-
Seam: With right sides facing, sew the ends of the corresponding strap halves together using a tapestry needle. Ensure the mesh lines up (4 stitches/points typically).
-
Fold the edges of the strap in half lengthwise and sew along the seam for a reinforced, double-thick handle if preferred (as shown in some variations), or leave flat. Video instruction specifies joining the two ends.
-

Finishing
-
-
Edging: Weave in all loose ends securely.
-
Decoration (Optional): Attach crochet Plumeria flowers or other appliqués to the mesh grid.
-
Closure: Sew a magnetic snap button to the inside center of the opening if desired.
-
Crochet Plumeria Net Bag Pattern
Terminology: UK Terms Skill Level: Intermediate Materials:
-
2.5mm Crochet Hook
-
Cord or Ribbon Yarn (approx. 2-3mm width)
-
Scissors, Tapestry Needle, Stitch Markers
Abbreviations:
-
ch: Chain
-
tr: Treble Crochet (US dc)
-
sk: Skip/Miss
-
sp: Space
-
ss: Slip Stitch
-
st(s): Stitch(es)
-
CSTR: Chainless Starting Treble Crochet (or Standing Tr) – Used to replace ch-3 for a cleaner edge.
Part 1: Rectangular Mesh Base
-
Foundation: Ch 63 (or an odd number to reach approx. 30cm length).
-
Row 1: tr in 4th ch from hook (counts as 2 tr). Ch 1, sk 1 ch, tr in next 2 ch. Repeat from * to * across.
-
Row 2: Ch 3 (counts as 1 tr), turn. Sk first st, tr in next st. Ch 1, sk ch-1 sp, tr in next 2 tr. Repeat from * to * across.
-
Rows 3–End: Repeat Row 2 until the base is approx. 10cm wide.
-
Finish Base: Do not fasten off. Proceed directly to the Body.
Part 2: Body (Worked in Rounds)
-
Round 1:
-
Long Sides (Row Ends): Rotate to work along the side edges. Work 2 tr into the body of each row-end stitch (ch-3 or tr post). Ch 1 between each 2-tr group.
-
Short Sides (Top/Bottom of Base): Work (2 tr, ch 1) matching the stitch pattern of the base rows.
-
Corners: Maintain the (2 tr, ch 1) pattern continuously around the corners; do not add extra increases. The mesh should form a seamless grid.
-
Join: ss to first st.
-
-
Round 2:
-
Start: Work a CSTR (or ch 3) in the first st. tr in next st.
-
Pattern: Ch 1, sk ch-1 sp, tr in next 2 tr. Repeat from * to * around.
-
Join: ss to top of starting st.
-
-
Rounds 3–Height: Repeat Round 2.
-
Optional Colour Change: At approx. 1/3 height, switch yarn colour using a standing tr join.
-
Continue pattern until bag reaches desired height.
-
Part 3: Handles
-
Preparation:
-
Lay bag flat. Identify 4 points on the top edge corresponding to the 4 corners of the rectangular base width.
-
Mark the stitch groups to begin the straps (width can be 2-3 mesh blocks).
-
-
Strap Half (Make 4 – or 2 long continuous):
-
Row 1: Attach yarn at marker. Ch 3 (counts as tr), tr in next st. Ch 1, sk sp, tr in next 2 sts. Work across designated strap width.
-
Row 2 (Decrease): Ch 3, turn. Sk the first tr and the next st to create a slight taper. Continue mesh pattern. At the end, skip the last partial stitch to decrease.
-
Rows 3+: Work straight mesh rows (Ch 3, tr, ch 1…) until the strap piece reaches half the desired total strap length.
-
Repeat: Create 4 identical strap pieces extending from the 4 marked corners.
-
-
Joining:
-
Fold the strap pieces so the front-left meets the back-left, and front-right meets back-right.
-
Seam: With right sides facing, sew the ends of the corresponding strap halves together using a tapestry needle. Ensure the mesh lines up (4 stitches/points typically).
-
Reinforcement: Fold the edges of the strap in half lengthwise and sew along the seam for a double-thick handle if preferred, or leave flat.
-

Finishing
-
Edging: Weave in all loose ends securely.
-
Decoration (Optional): Attach crochet Plumeria flowers or other appliqués to the mesh grid.
-
Closure: Sew a magnetic snap button to the inside centre of the opening if desired.