How to Make Spooky Macrame Spider for Halloween
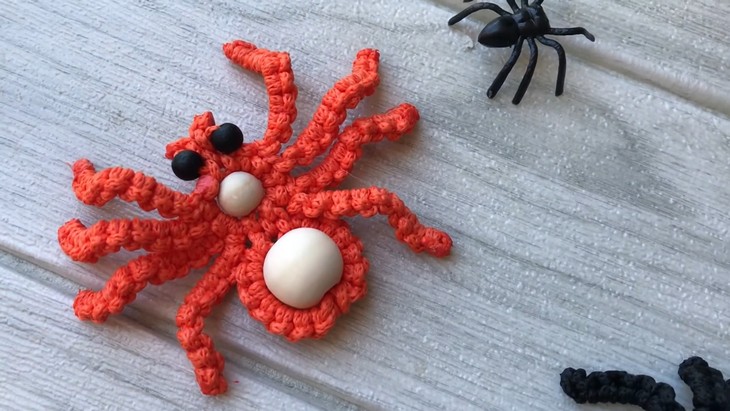
Halloween’s cutest macrame project is here! With a knot-by-knot tutorial, learn how to make this macrame beaded spider designed by Fe Barreiros that you won’t resist making more than one! This macrame spider is based on real, spooky spiders with eight legs and tiny eyes. In addition, it also features two rustic beads in different sizes around which the pattern is worked, which are the most fascinating feature of this macrame pattern. You can complete making this mini flat spider within just 20 minutes with a 10cm measurement.
So, if you have made up your mind to practice macrame with this spider project, continue reading this post till the end. There you will find the complete tutorial. They will certainly sell well at craft fairs.

About the Designer: The designer behind this small spider project for Halloween is @febarreirosmacrame – she has taken the macrame to new heights, designing almost everything using this technique, from popular bracelets, wall hangings, and plant pot to unusual projects like appliques, pouches, bags, slippers, coasters, wreaths, earrings, and anything you can think about. She has the most promising list of macrame gems, the boho and rustic project,s and Christmas crafts, too. To learn macrame, you should certainly go through her large library!
Note: In respect of the creator’s pattern rights, there will be no provision of the written pattern. You can watch the tutorial with on-screen instructions at the end of this post. Moreover, macrame patterns should be watched!
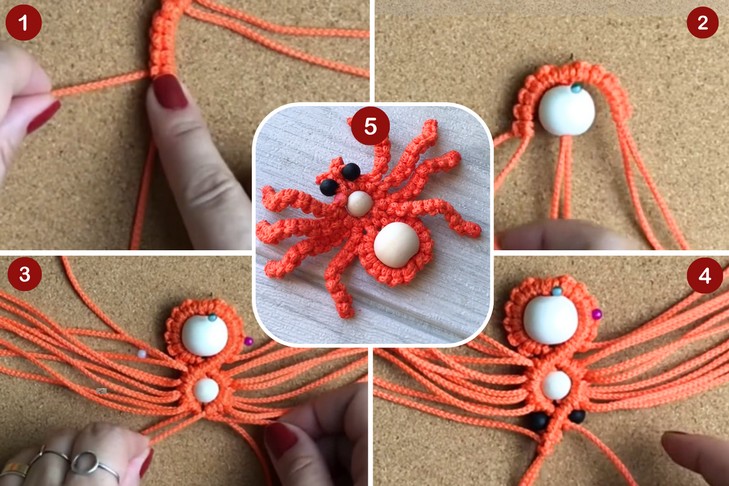
Macrame Spider Tutorial
Skill Level: Intermediate (genuinely speaking, I am currently not a macrame expert, but analyzing the tutorial, I found: you will take a 43-inch-long strand, pin it at the center on the board, make a basic knot, which is a square or half knot, and shift it to the pin. Similarly, continue making the knots, then insert them in the large bead, and bring the set of knots to one side. Continue working knots around. A similar pattern goes for the other second part back as for the belly. Other knots mentioned are the double half-hitch in the body, the Lark’s head knot for attaching new thread, and the basic knots for the legs, too.
Tutorial Timing: 18 minutes only. (perfect for learning how to work macrame around beads and handling many yarn strands, which are the base for legs at once. It will certainly improve your macrame designing as this project is a bit unconventional. From knots, you will practice half knot, double knot, and Lark’s head knot, which will be widely used in most projects like planters, bracelets, and wall hangings.)

Personalization Tips: The tutor suggests that if your bead is larger, increase the number of knots to wrap every bead. However, the tutor uses an 18 and 8 mm bead. You can choose from orange and black colors for Halloween, or try purple and red also. For a twist, use the ombre and multi-colored beads.
Pattern Type: An on-screen written pattern is available if you find written instructions easy to follow along with. Finished size is 10cm.
Materials and Tools
You can gather the following materials for making this quick spider that the tutor suggested in the tutorial:
- Cord: Polypropylene cord (natural/neutral color), 5mm thickness.
- 3 strands of 1.10 meters each.
- 8 strands of 80 centimeters each.
- 2 beads for the eyes.
- 2 beads for the body (18 mm)

Techniques Used
The following are the techniques that the tutor will use for spider for beginners:
- Square Knot: Overlap two threads, creating a loop, pass the right thread over and under the left, then reverse the process for symmetry.
- Half Knot: Pass one thread over the other, creating a loop, and pull it tight for a single locking knot.
- Double Half-Hitch Knot: Take a working thread, loop it twice around a holding cord, and pull it tight to secure.
- Lark’s Head Knot: Fold the thread in half, place the loop over the pin, pass the ends through the loop, and pull tight.
- Basic Knots for Legs: Use square or half knots, working down evenly to form leg-like extensions.
- Attaching Large Bead: Slide the set of knots through the bead, then continue knotting tightly around it for security.