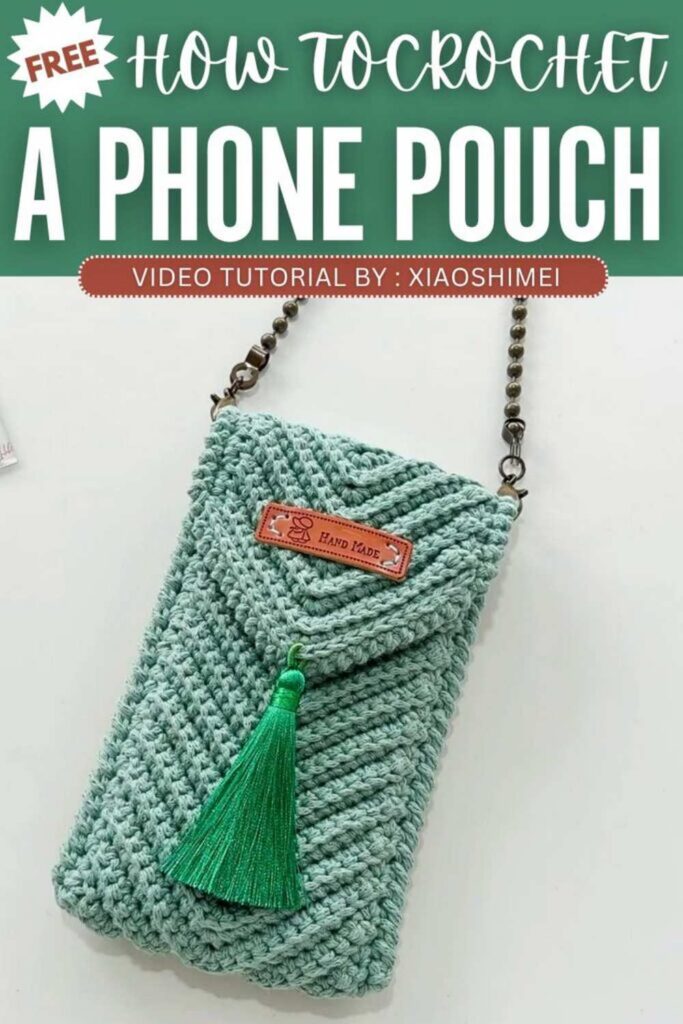
Free Crocheted Phone Pouch Pattern For Beginners
Keep your phone safe with this simple crochet smartphone pouch. Made in one piece with a textured herringbone pattern, it is both useful and stylish. The small tassels add a nice finishing touch, giving the pouch a bit of extra charm. Easy to carry and practical for everyday use, it is a great way to keep your phone and small essentials close at hand.
Crocheted Phone Pouch Pattern
Step by Step Pattern
This pattern is for a stylish, one-piece crochet phone bag featuring a textured “arrow-feather” pattern. The design is modern, creative, and finished with a trendy tassel.
Materials Needed
Yarn: 2mm hollow cotton yarn.
Crochet Hook: 3.0mm.
Extras: Magnetic snap button, decorative patch, bag strap, tassel.
Abbreviations
ch: Chain stitch
sc: Single crochet
sl st: Slip stitch
inc: Increase (work 2 sc in the same st)
dec: Decrease (work 2 sc together)
BLO: Back Loop Only (often implied in the pattern by “picking one thread on the back”)
Pattern Instructions
Main Body: Arrow-Feather Pattern
All rows are worked in BLO (Back Loop Only) unless otherwise specified.
Row 1: Start with a chain. Work 3 sc into the foundation.
Row 2: Ch 1, turn. Work 1 inc, 2 sc, 1 inc.
Row 3: Ch 1, turn. Work 1 inc, 2 sc, 2 inc in the middle st, 3 sc, 2 sc on the other side, 1 inc, 2 sc.
Row 4: Ch 1, turn. 1 inc, 2 sc, 4 sc, 2 inc in the middle st, 3 sc, 4 sc, 2 sc in the last st.
Row 5: Ch 1, turn. 2 sc in the first st, 6 sc, 3 sc in the middle st, 6 sc, 2 sc in the last st.
Row 6: Ch 1, turn. 2 sc in the first st, 8 sc, 3 sc in the middle st, 8 sc, 2 sc in the last st.

Note: From Row 7 onwards, you will begin decreasing at the sides to shape the pattern while continuing the increase in the center.
Row 7: Ch 1, turn. 1 dec (using the first 2 sts), 9 sc, 3 sc in the middle st, 9 sc, 1 dec.
Row 8: Ch 1, turn. 1 dec, 9 sc, 3 sc in the middle st, 9 sc, 1 dec.
Repeat: Continue repeating the Row 7 and 8 pattern (maintaining the stitch count) until you reach Row 64.

Border and Finishing the Main Piece
Once Row 64 is complete, work a border of single crochet around the entire piece.
Work 57 sc down each side, 3 sc in each corner, and 13 sc along the bottom edge.
On the top flap edge, work 12 sl st, attach your tassel, then work another 12 sl st.
Weave in all ends.

Assembly
Folding: Fold the main piece to the desired height to fit your phone.
Seaming: Align the sides and join them together.
Edging (Crab Stitch): Re-join yarn at the bottom edge. Work a row of “reverse single crochet” (crab stitch) along the side seams and the edge of the flap to create a decorative finish.
Hardware:
Install a magnetic snap button on the inside of the flap.
Sew on a small decorative patch to the outside of the flap.
Attach your preferred bag strap.
Video Pattern:
Pattern In UK Terms
Materials Needed
Yarn: 2mm hollow cotton yarn.
Crochet Hook: 3.0mm.
Extras: Magnetic snap button, decorative patch, bag strap, tassel.
Abbreviations (UK Terms)
ch: Chain stitch
dc: Double crochet (replaces the US “single crochet”)
sl st: Slip stitch
inc: Increase (work 2 dc in the same st)
dec: Decrease (work 2 dc together)
BLO: Back Loop Only
Pattern Instructions
Main Body: Arrow-Feather Pattern
All rows are worked in BLO (Back Loop Only) unless otherwise specified.
Row 1: Start with a chain. Work 3 dc into the foundation.
Row 2: Ch 1, turn. Work 1 inc, 2 dc, 1 inc.
Row 3: Ch 1, turn. Work 1 inc, 2 dc, 2 inc in the middle st, 3 dc, 2 dc on the other side, 1 inc, 2 dc.
Row 4: Ch 1, turn. 1 inc, 2 dc, 4 dc, 2 inc in the middle st, 3 dc, 4 dc, 2 dc in the last st.
Row 5: Ch 1, turn. 2 dc in the first st, 6 dc, 3 dc in the middle st, 6 dc, 2 dc in the last st.
Row 6: Ch 1, turn. 2 dc in the first st, 8 dc, 3 dc in the middle st, 8 dc, 2 dc in the last st.
Note: From Row 7 onwards, you will begin decreasing at the sides to shape the pattern while continuing the increase in the center.
Row 7: Ch 1, turn. 1 dec (using the first 2 sts), 9 dc, 3 dc in the middle st, 9 dc, 1 dec.
Row 8: Ch 1, turn. 1 dec, 9 dc, 3 dc in the middle st, 9 dc, 1 dec.
Repeat: Continue repeating the Row 7 and 8 pattern (maintaining the stitch count) until you reach Row 64.

Border and Finishing the Main Piece
Once Row 64 is complete, work a border of double crochet around the entire piece.
Work 57 dc down each side, 3 dc in each corner, and 13 dc along the bottom edge.
On the top flap edge, work 12 sl st, attach your tassel, then work another 12 sl st.
Weave in all ends.
Assembly
Folding: Fold the main piece to the desired height to fit your phone.
Seaming: Align the sides and join them together.
Edging (Crab Stitch): Re-join yarn at the bottom edge. Work a row of “reverse double crochet” (crab stitch) along the side seams and the edge of the flap to create a decorative finish.
Hardware:
Install a magnetic snap button on the inside of the flap.
Sew on a small decorative patch to the outside of the flap.
Attach your preferred bag strap.
Quick Making Guide
Main Body: BLO technique to create ridges.
Shape: Arrow-feather pattern using center increases (3 dc in 1) and side decreases (2 sts into 1).
Edging: Crab stitch (rev-dc) for a professional, durable finish