
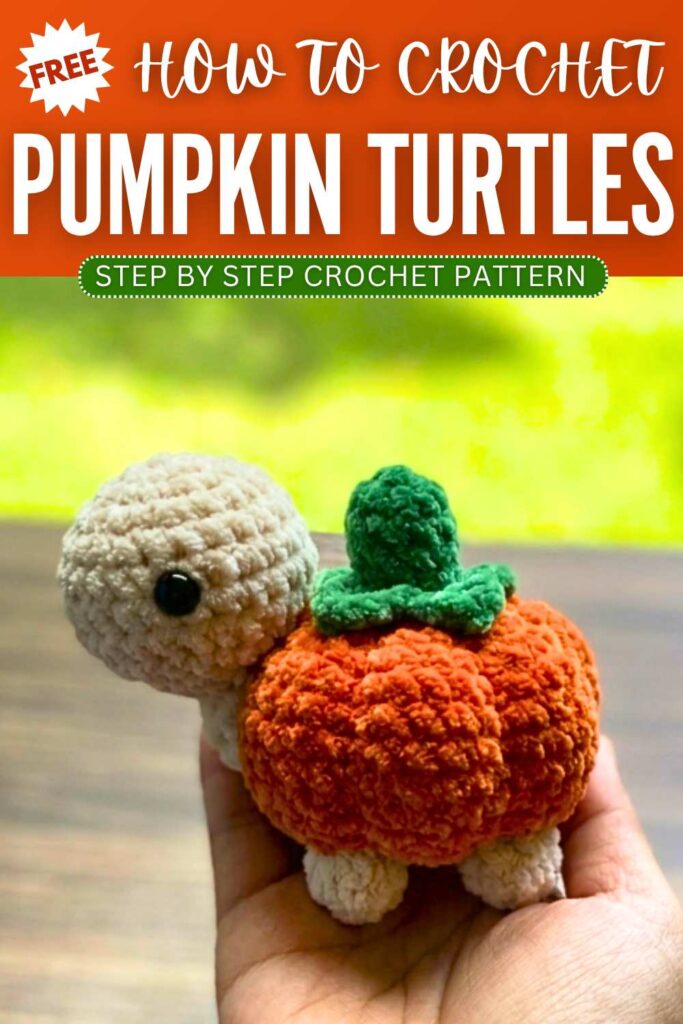
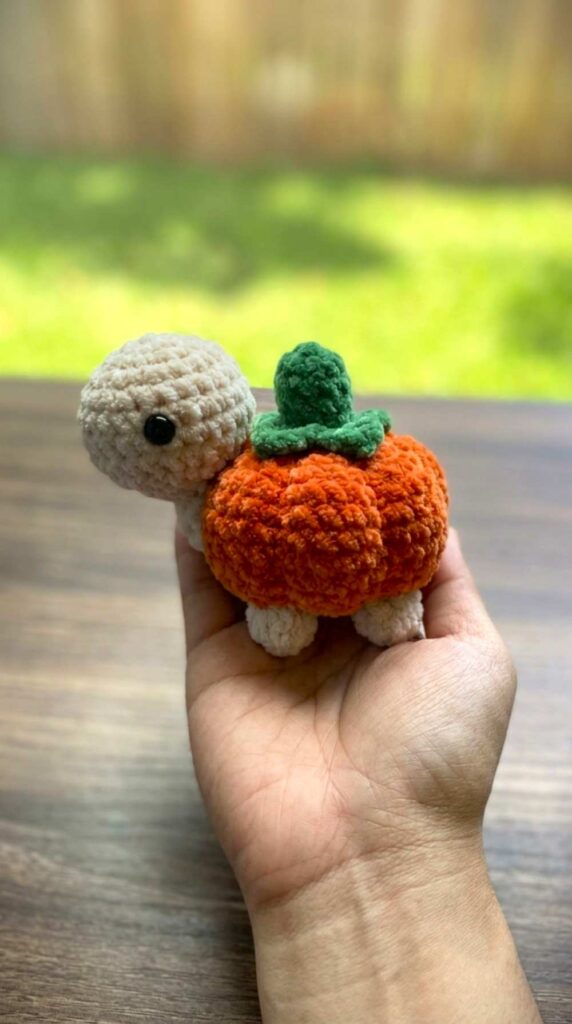
Crochet Pumpkin Baby Turtle Amigurumi for Fall & Halloween
Looking for an irresistible crochet desk buddy for fall? Learn how to crochet this palm-sized pumpkin shell baby turtle plushie with a FREE pattern. This is a Chibi version of the viral crochet pumpkin turtle plush and we shall crochet the legs and arms instead of flappers to make it stand. To make this crochet turtle plush look chubby, the pumpkin is crocheted using the traditional method.
Pumpkin Baby Turtle Plushie
So, you will love to add this crochet pumpkin turtle to your fall and Halloween decorations. You can also crochet an amigurumi version of this crochet turtle following the same pattern but by using the cotton yarn. So, continue reading for the full crochet pumpkin turtle pattern.
Crochet Pumpkin Turtle Plushie Pattern for Beginners
This project is a fun and easy crochet tutorial to make an adorable turtle carrying a pumpkin as its shell. You will start by crocheting the orange pumpkin body and using yarn to sculpt its distinct ridges.
Then, you will crochet the cream-colored head, four little stubby legs, and a green stem with leaves to sit right on top. Finally, you will stuff the parts, sew them all together, and attach tiny safety eyes to give your pumpkin turtle its sweet face!
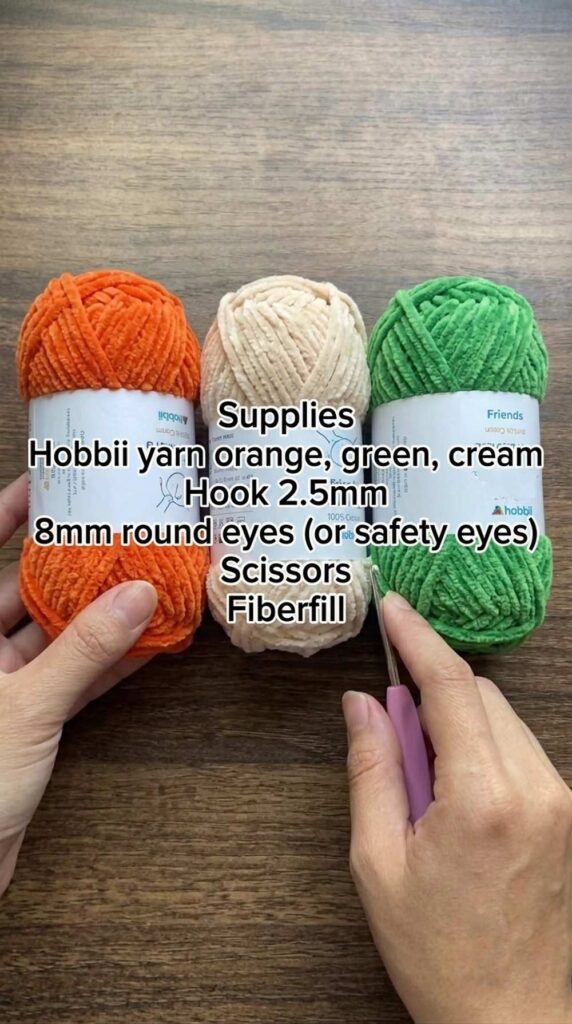
Materials Needed
Hobbii yarn in Orange, Green, and Cream
Crochet hook (2.5 mm)
8 mm round eyes (or safety eyes)
Fiberfill (stuffing)
Scissors
Yarn needle (for sewing and sculpting)
Abbreviations
MR: Magic ring
ch: Chain
sc: Single crochet
hdc: Half double crochet
inc: Increase (2 single crochets in the same stitch)
dec: Decrease (single crochet 2 stitches together)
slst: Slip stitch
BLO: Back loops only
R: Round / Row
Full Written Pattern
Pumpkin Body (Orange Yarn)
Note: End each round with a slip stitch (slst).
R1: 6 sc in a MR. (6)
R2: ch 1, 6 inc. (12)
R3: ch 1, (1 sc, 1 inc) repeat 6 times. (18)
R4: ch 1, (2 sc, 1 inc) repeat 6 times. (24)
R5: ch 1, (3 sc, 1 inc) repeat 6 times. (30)
R6: ch 1, (4 sc, 1 inc) repeat 6 times. (36)
R7: ch 1, (5 sc, 1 inc) repeat 6 times. (42)
R8 to R12: ch 1, 42 sc. (42)
R13: ch 1, (5 sc, 1 dec) repeat 6 times. (36)
R14: ch 1, (4 sc, 1 dec) repeat 6 times. (30)
R15: ch 1, (3 sc, 1 dec) repeat 6 times. (24)
R16: ch 1, (2 sc, 1 dec) repeat 6 times. (18)
Stuff the pumpkin, but do not stuff it too firmly as you need to be able to shape the ridges later.
R17: ch 1, (1 sc, 1 dec) repeat 6 times. (12)
R18: ch 1, 6 dec. (6)
Fasten off, leaving a very long tail. Thread your needle and loop the yarn tightly around the outside of the sphere (from bottom to top) multiple times to sculpt the indents/ridges of the pumpkin.
Head (Cream Yarn)
R1: 6 sc in a MR, slst. (6)
R2: ch 1, 6 inc, slst. (12)
R3: ch 1, (1 sc, 1 inc) repeat 6 times, slst. (18)
R4: ch 1, 5 inc, 13 sc, slst. (23)
R5 to R7: ch 1, 23 sc, slst. (23)
R8: ch 1, 5 dec, 13 sc, slst. (18)
R9: ch 1, 4 dec, 10 sc, slst. (14)
R10: ch 1, 3 dec, 6 sc, 1 dec, slst. (10)
Add stuffing to the head.
R11: ch 1, 3 hdc, 7 sc, slst. (10)
R12 to R15: ch 1, 10 sc, slst. (10)
Fasten off, leaving a tail for sewing. Insert the eyes between rows 6 and 7.
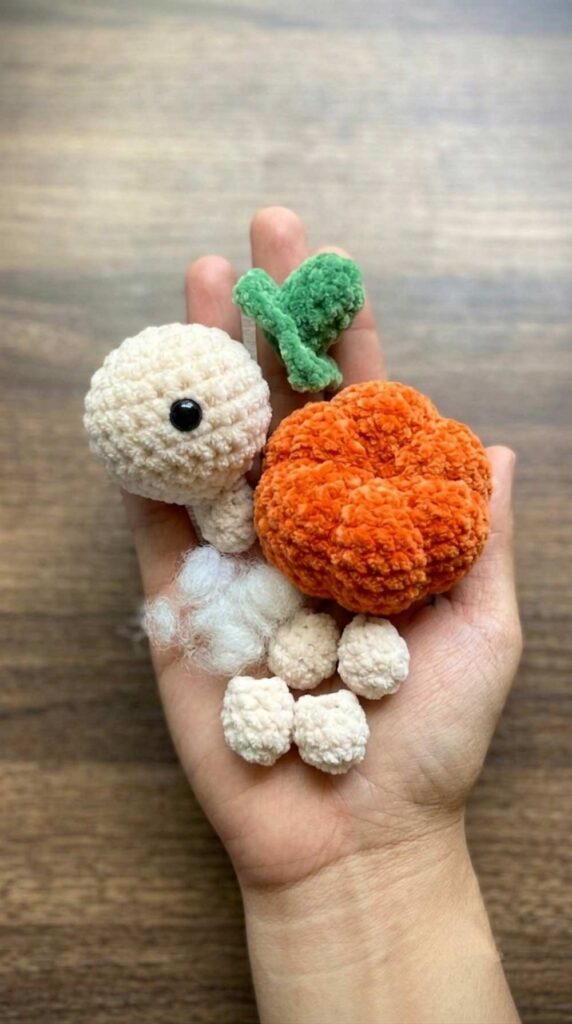
Legs (Make 4 – Cream Yarn)
R1: 8 sc in a MR, slst. (8)
R2: ch 1, 8 sc in BLO, slst. (8)
R3: ch 1, 8 sc, slst. (8)
Fasten off, leaving a tail to sew them onto the body.
Stem & Leaves (Green Yarn)
R1: 5 sc in a MR, slst. (5)
R2: ch 1, 5 inc, slst. (10)
R3: ch 1, 10 sc in BLO, slst. (10)
R4 to R5: ch 1, 10 sc, slst. (10)
Leaves/R6: (ch 4, starting from the 2nd chain from hook: 1 sc, 1 hdc, 1 hdc. Then, skip 1 stitch on the round base and slst into the next). Repeat this sequence 5 times to make 5 leaves around the stem.
Fasten off, leaving a tail for sewing.
Assembly
Sew the cream head to the front opening/side of the orange pumpkin body.
Pin the four cream legs to the bottom of the pumpkin and sew them securely in place.
Sew the green stem and leaves directly onto the top center of the pumpkin shell.