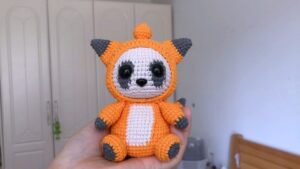
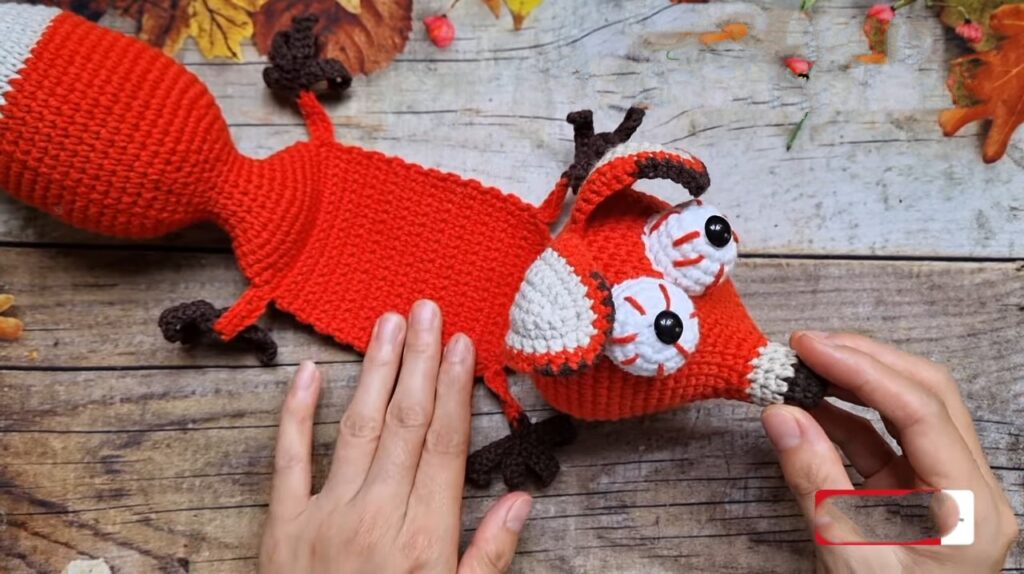
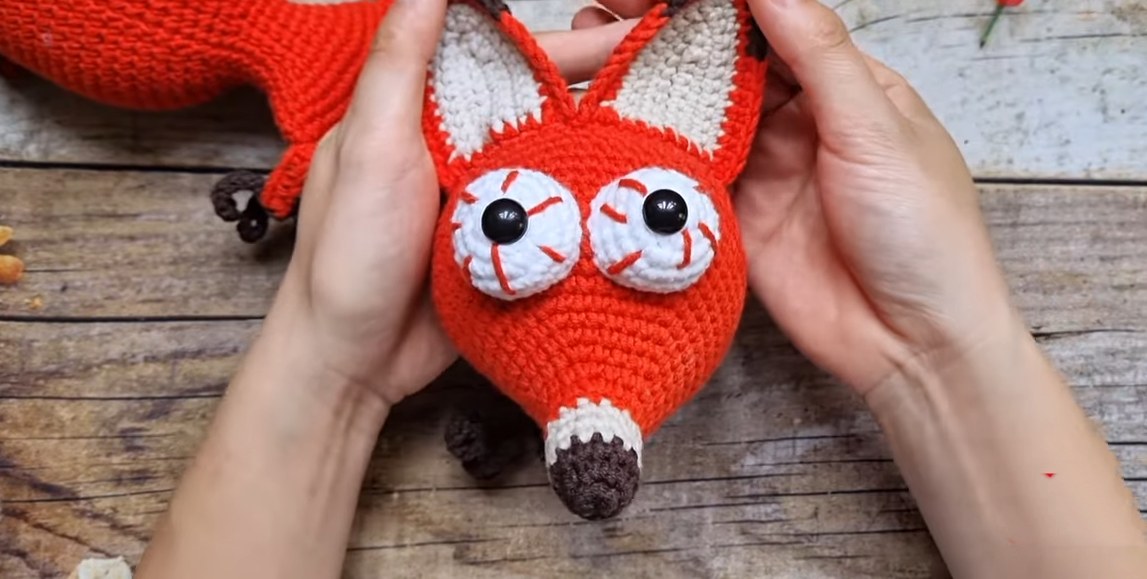
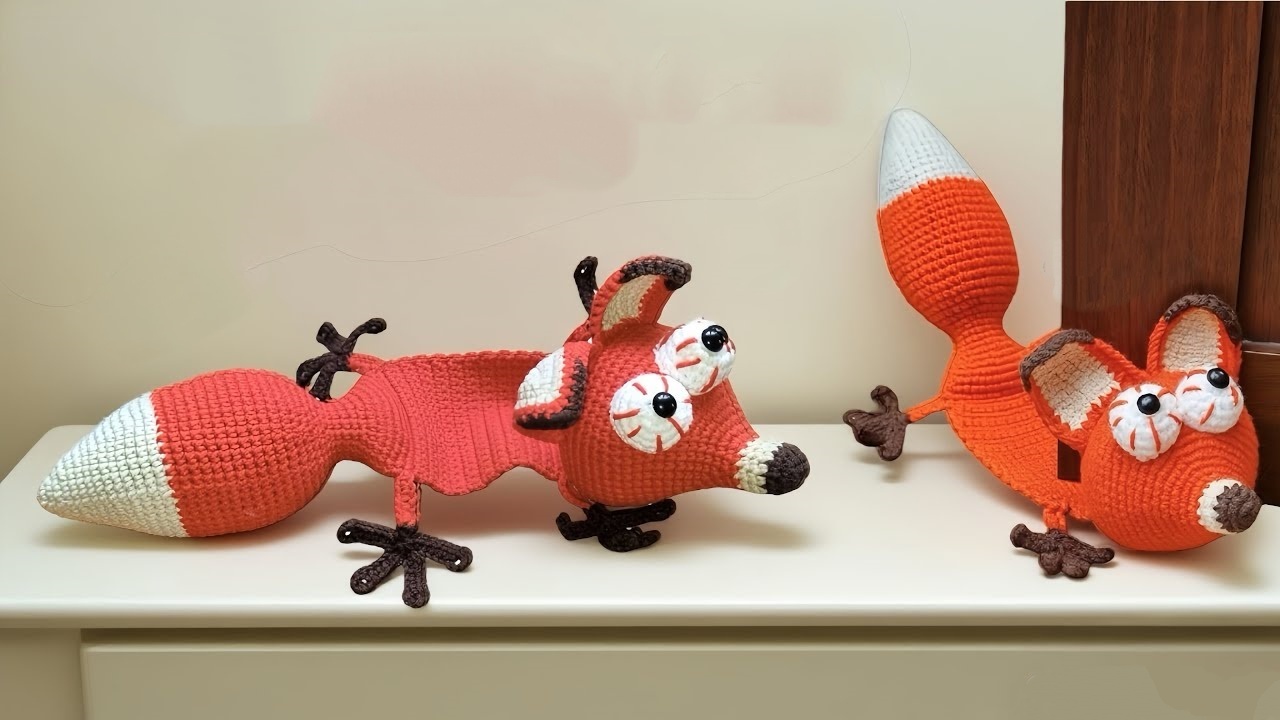
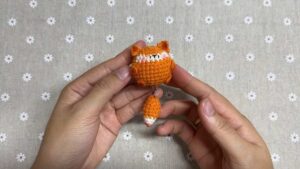
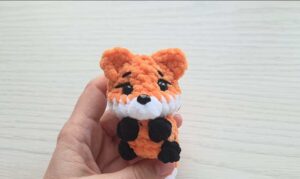
Crochet Fox Amigurumi Door Stopper Pattern
This project shows how to make a cute crochet fox door stopper that can hold a door open or just sit as a fun decoration. The fox is soft and has a friendly look with its head, ears, and body worked in yarn. It’s bigger than a small toy and looks nice in a room, making it both useful and cute. This kind of crochet item is fun to make and looks great in your home.
Crochet Fox Amigurumi Door Stopper

About The Creator:
Bi do Handmade has been an expert in crocheting and designing crochet amigurumi, bag charms, and pouches. Also visit her YouTube channel for more exciting projects.
Crochet Fox Door Stopper Pattern
Abbreviations
MR: Magic Ring
ch: Chain
sc: Single Crochet
inc: Increase (2 sc in one stitch)
dec: Decrease (sc2tog)
sl st: Slip Stitch
st(s): Stitch(es)
(…) x N: Repeat instructions in parentheses N times
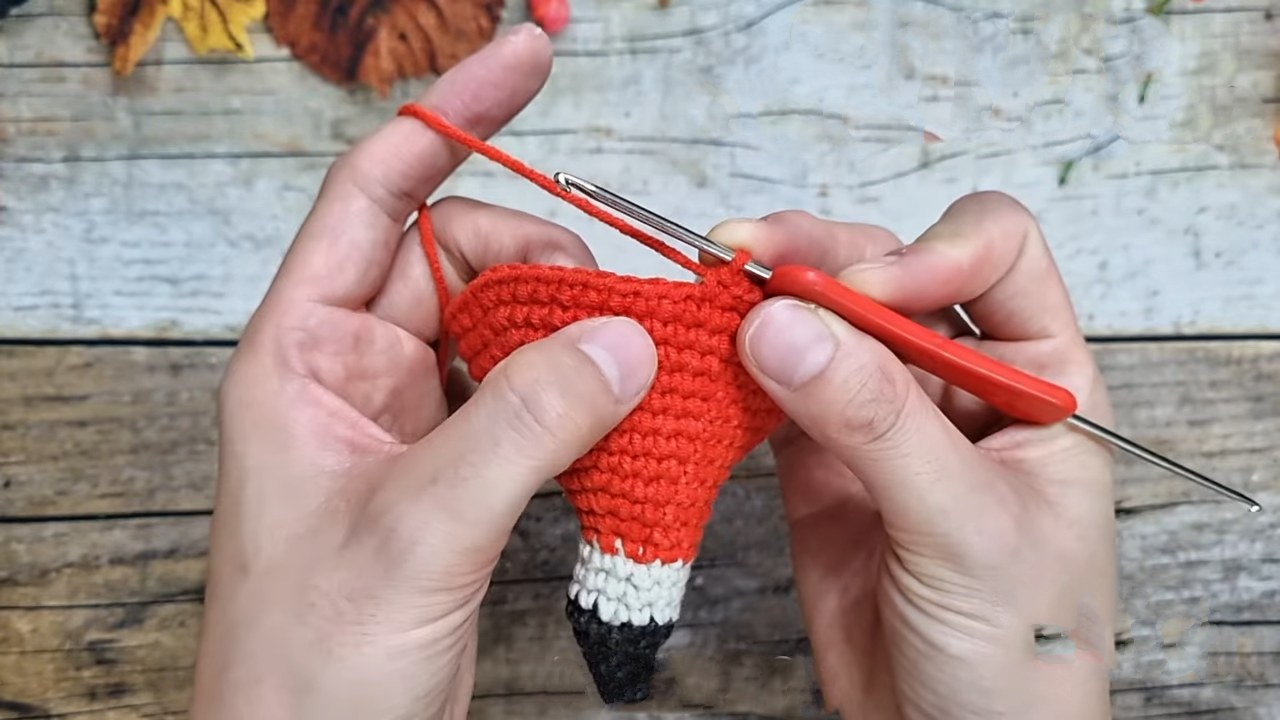
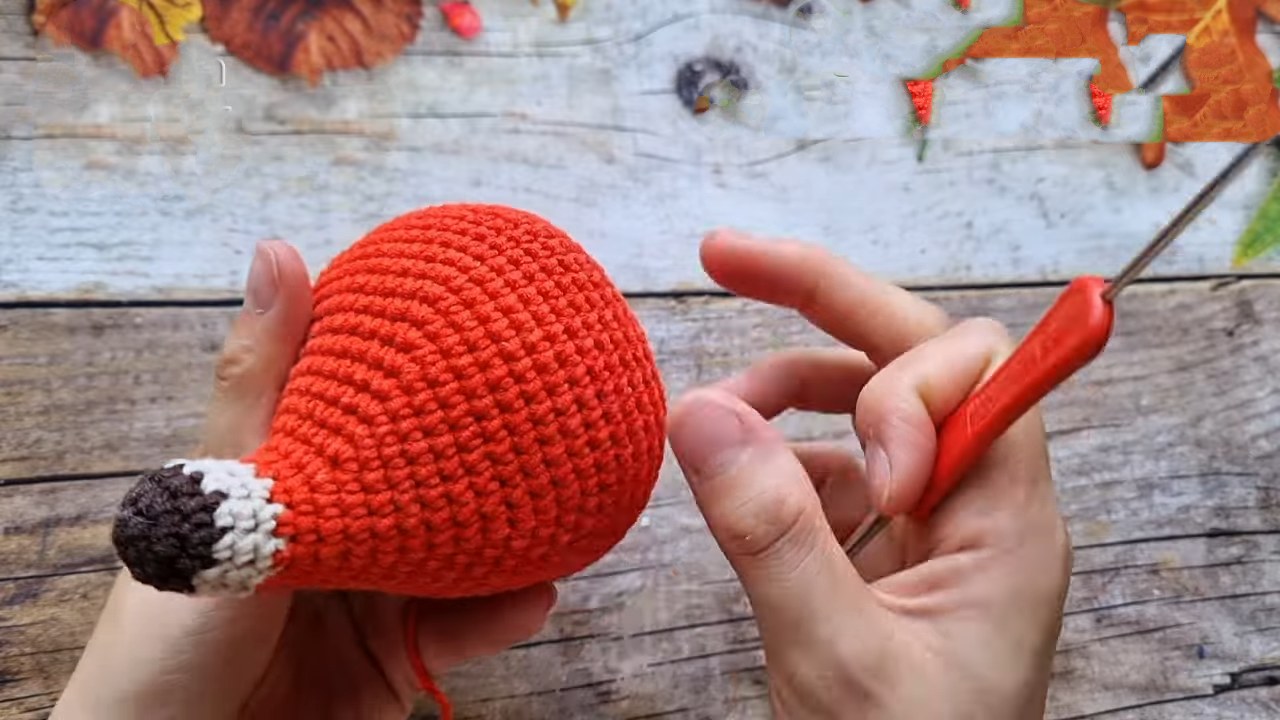
1. Head (Snout & Face)
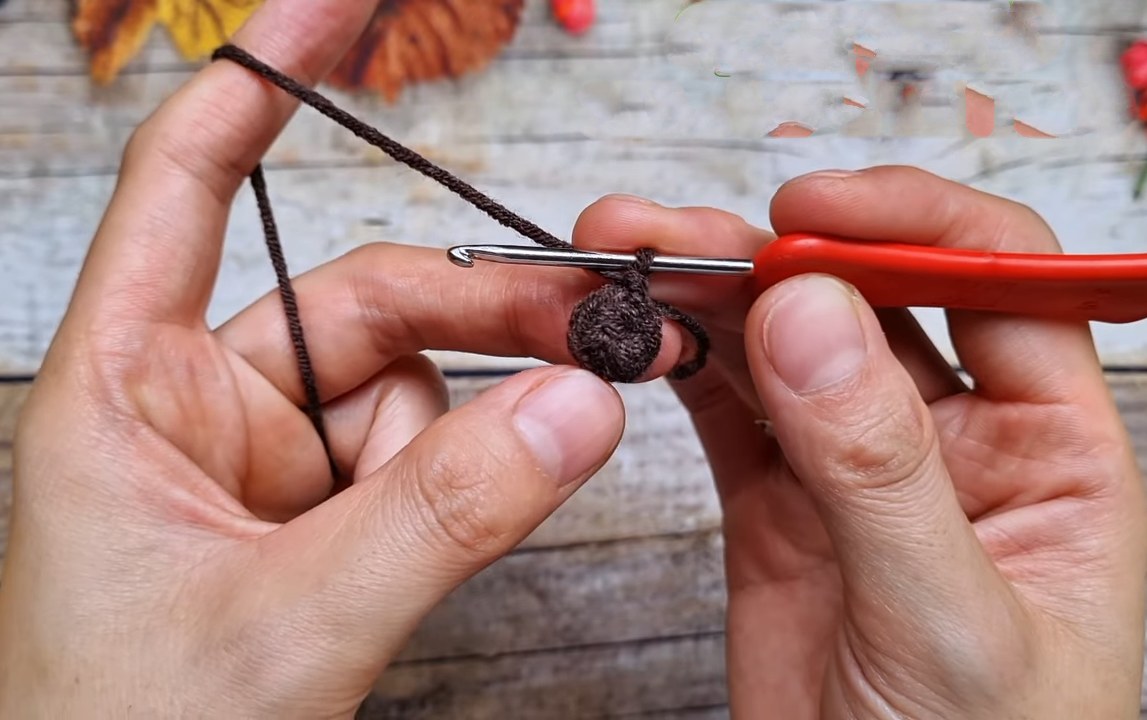
Start with Black or Dark Brown (Nose tip).
R1: 6 sc in MR (6)
R2: 6 inc (12)
R3: 12 sc (12)
Change to White
R4–R6: 12 sc (12)
Change to Orange
R7: 12 sc (12)
R8: (1 sc, inc) x 4, 4 sc (16)
R9: (2 sc, inc) x 4, 4 sc (20)
R10: (3 sc, inc) x 4, 4 sc (24)
R11: (4 sc, inc) x 4, 4 sc (28)
R12: (5 sc, inc) x 4, 4 sc (32)
R13: (6 sc, inc) x 4, 4 sc (36)
R14: (7 sc, inc) x 4, 4 sc (40)
R15: (8 sc, inc) x 4, 4 sc (44)
R16: (9 sc, inc) x 4, 4 sc (48)
R17: (10 sc, inc) x 4, 4 sc (52)
R18: (11 sc, inc) x 4, 4 sc (56)
R19–R26: 56 sc (56)
R27: (2 sc, dec) x 14 (42)
R28: 42 sc (42)
R29: (1 sc, dec) x 14 (28)
R30: 28 sc (28)
R31: (dec) x 14 (14)
R32: 14 sc (14)
Stuff firmly.
R33: 7 dec (7)
Fasten off and sew closed.
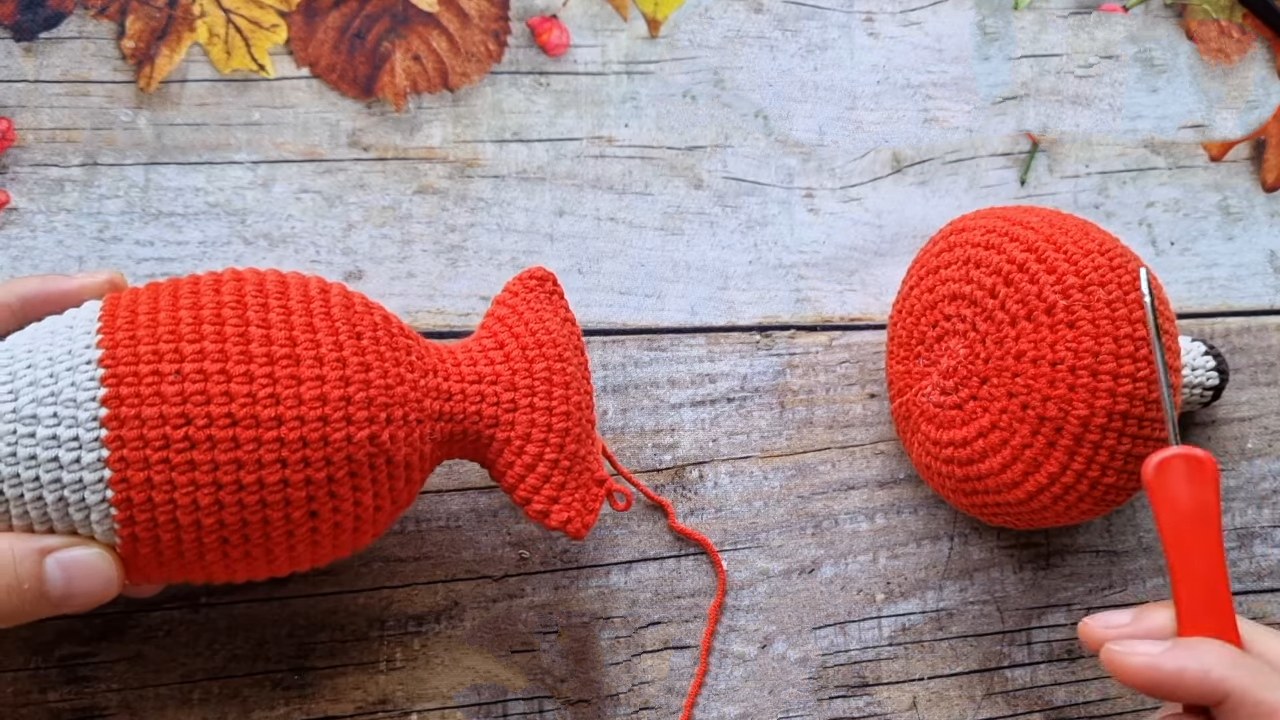
2. Body (Tail & Flat Stopper)
Start with White (Tail Tip).
R1: 6 sc in MR (6)
R2: (1 sc, inc) x 3 (9)
R3: (2 sc, inc) x 3 (12)
R4–R15: Continue increasing 3 sts per round (e.g., R4 is 3 sc, inc; R5 is 4 sc, inc) until you reach (14 sc, inc) x 3. (48 sts at end of R15).
Change to Orange
R16–R27: 48 sc (48)
R28: (6 sc, dec) x 6 (42)
R29: (5 sc, dec) x 6 (36)
R30: (4 sc, dec) x 6 (30)
R31: (3 sc, dec) x 6 (24)
R32: (2 sc, dec) x 6 (18)
R33–R37: 18 sc (18)
Start increasing for Body/Butt
R38: (2 sc, inc) x 6 (24)
R39: (3 sc, inc) x 6 (30)
R40: (4 sc, inc) x 6 (36)
R41–R43: 36 sc (36)
Stuff the tail section firmly. Do not fasten off.
R44 (Transition to Flat): Flatten the opening. Working through both layers to close the tube: 18 sc across.
Body Strap (Flat Rows):
Row 1–20 (approx): Ch 1, turn, 18 sc. (Work until strap is long enough for your door).
Neck Taper:
Row 21: Ch 1, turn, skip 1st st, sc across, skip 2nd to last st, sc in last st (decrease at start and end).
Row 22+: Repeat Row 21 (decreasing 2 sts per row) until width is approx 8 sts.
Fasten off, leaving a long tail. Sew the tapered end to the underside of the Head.

3. Eyes (Make 2)
Using White.
R1: 6 sc in MR (6)
R2: 6 inc (12)
R3: (1 sc, inc) x 6 (18)
R4–R6: 18 sc (18)
Fasten off. Attach safety eyes or embroider pupils. Sew onto Head.
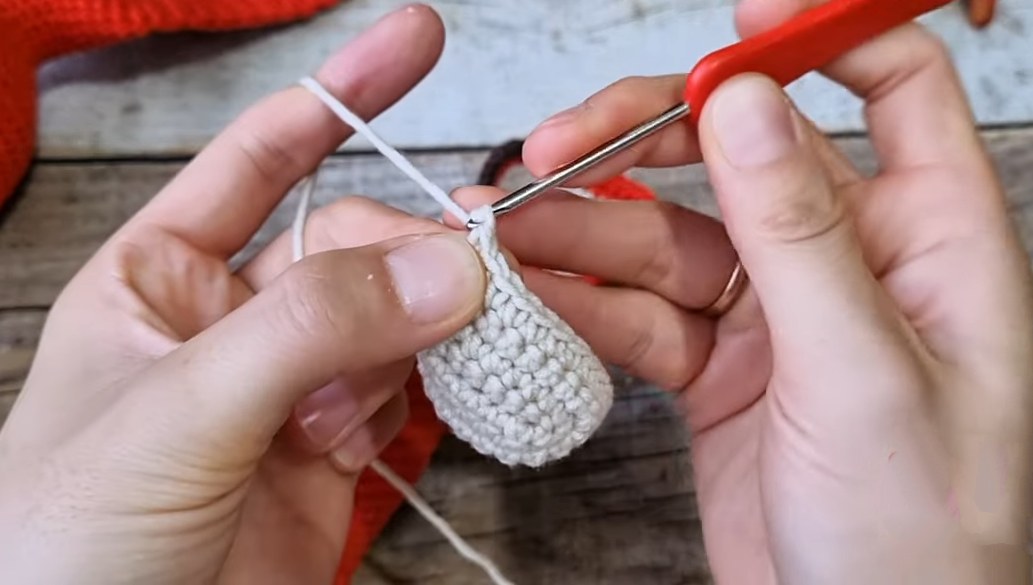
4. Ears (Make 2)
Start with White (Inner Ear).
Row 1: Ch 8. Sc in 2nd ch from hook, sc 5, 3 sc in last ch. Working down other side: sc 6.
Row 2: Ch 1, turn. Sc in each st to the center peak (middle of 3-sc group), 3 sc in peak st, sc down the other side.
Row 3–4: Repeat Row 2.
Edging:
Change to Orange. Sc around the entire edge.
At the top tip, change to Black for 3 sts to create the ear tip.
Sew ears to the head.
5. Legs & Paws (Make 4)
Paws (Black):
Ch 14. Skip 6 ch (creates a loop), sc in 7th ch. Sc in next 4 chs. (Leave last 3 ch unworked). First Toe made.
Ch 11. Skip 6 ch, sc in next 5 ch. Second Toe made.
Ch 11. Skip 6 ch, sc in next 5 ch. Third Toe made.
Ch 11. Skip 6 ch, sc in next 5 ch. Fourth Toe made.
Join Toes: Insert hook into the base of the last sc of the 1st, 2nd, and 3rd toes. Sl st through all loops to join.
Working into the 3 unworked chs from the very beginning: 1 sc in next 2 ch, sl st in last. Fasten off Black.
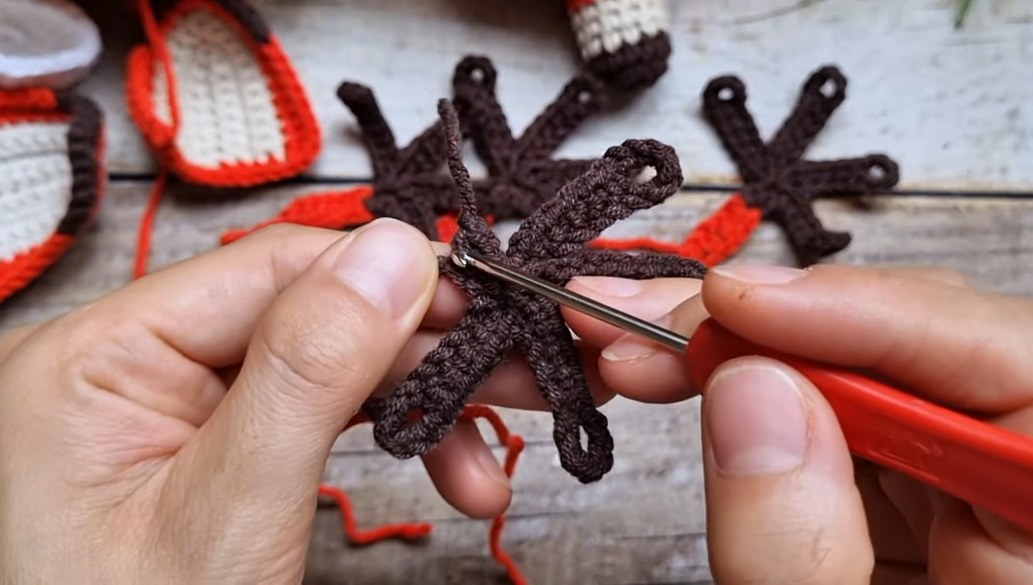
Legs (Orange):
Attach Orange yarn to the base of the black paw.
Ch 7.
Skip 1 ch, 6 sc back down the chain.
Sl st to base. Fasten off leaving a long tail.
Assembly:
Sew 2 legs near the head (Front legs).
Sew 2 legs near the tail (Back legs).
Add stuffing to the body section if desired (or keep flat to slide under door).
1. Head (Snout & Face)
Start with Black or Dark Brown.
R1: 6 dc in MR (6)
R2: 6 inc (12)
R3: 12 dc (12)
Change to White
R4–R6: 12 dc (12)
Change to Orange
R7: 12 dc (12)
R8: (1 dc, inc) x 4, 4 dc (16)
R9: (2 dc, inc) x 4, 4 dc (20)
R10: (3 dc, inc) x 4, 4 dc (24)
R11: (4 dc, inc) x 4, 4 dc (28)
R12: (5 dc, inc) x 4, 4 dc (32)
R13: (6 dc, inc) x 4, 4 dc (36)
R14: (7 dc, inc) x 4, 4 dc (40)
R15: (8 dc, inc) x 4, 4 dc (44)
R16: (9 dc, inc) x 4, 4 dc (48)
R17: (10 dc, inc) x 4, 4 dc (52)
R18: (11 dc, inc) x 4, 4 dc (56)
R19–R26: 56 dc (56)
R27: (2 dc, dec) x 14 (42)
R28: 42 dc (42)
R29: (1 dc, dec) x 14 (28)
R30: 28 dc (28)
R31: (dec) x 14 (14)
R32: 14 dc (14)
Stuff firmly.
R33: 7 dec (7)
Fasten off and sew closed.
2. Body (Tail & Flat Stopper)
Start with White.
R1: 6 dc in MR (6)
R2: (1 dc, inc) x 3 (9)
R3: (2 dc, inc) x 3 (12)
R4–R15: Increase 3 sts per round until (14 dc, inc) x 3 (48).
Change to Orange
R16–R27: 48 dc (48)
R28: (6 dc, dec) x 6 (42)
R29: (5 dc, dec) x 6 (36)
R30: (4 dc, dec) x 6 (30)
R31: (3 dc, dec) x 6 (24)
R32: (2 dc, dec) x 6 (18)
R33–R37: 18 dc (18)
Start increasing for Body section
R38: (2 dc, inc) x 6 (24)
R39: (3 dc, inc) x 6 (30)
R40: (4 dc, inc) x 6 (36)
R41–R43: 36 dc (36)
Stuff tail section. Do not fasten off.
R44 (Join): Flatten opening. Work through both layers: 18 dc across.
Body Strap (Flat Rows):
Row 1–20: Ch 1, turn, 18 dc.
Neck Taper:
Row 21: Ch 1, turn, skip 1st st, dc across, skip 2nd to last st, dc in last st.
Row 22+: Repeat Row 21 until width is approx 8 sts.
Fasten off. Sew tapered end to underside of Head.
3. Eyes (Make 2)
Using White.
R1: 6 dc in MR (6)
R2: 6 inc (12)
R3: (1 dc, inc) x 6 (18)
R4–R6: 18 dc (18)
Fasten off. Sew to Head.
4. Ears (Make 2)
Start with White.
Row 1: Ch 8. Dc in 2nd ch from hook, dc 5, 3 dc in last ch. Work down other side of ch: dc 6.
Row 2: Ch 1, turn. Dc in each st to center peak, 3 dc in peak st, dc down other side.
Row 3–4: Repeat Row 2.
Edging: Change to Orange. Dc around entire edge. Use Black for the 3 peak stitches at the top tip.
5. Legs & Paws (Make 4)
Paws (Black):
Ch 14. Skip 6 ch (loop), dc in 7th ch. Dc in next 4 chs.
(Ch 11, skip 6 ch, dc in next 5 ch) x 3. (4 toes total).
Join: Insert hook into base of last dc of each toe. Ss through all loops to join.
Dc in next 2 remaining chs from start, ss in last. Fasten off Black.
Legs (Orange):
Attach Orange to paw base.
Ch 7.
Skip 1 ch, 6 dc back down ch.
Ss to base. Leave tail for sewing.
Video Tutorial:
Pattern In UK Terms
1. Head (Snout & Face)
Start with Black or Dark Brown.
R1: 6 dc in MR (6)
R2: 6 inc (12)
R3: 12 dc (12)
Change to White
R4–R6: 12 dc (12)
Change to Orange
R7: 12 dc (12)
R8: (1 dc, inc) x 4, 4 dc (16)
R9: (2 dc, inc) x 4, 4 dc (20)
R10: (3 dc, inc) x 4, 4 dc (24)
R11: (4 dc, inc) x 4, 4 dc (28)
R12: (5 dc, inc) x 4, 4 dc (32)
R13: (6 dc, inc) x 4, 4 dc (36)
R14: (7 dc, inc) x 4, 4 dc (40)
R15: (8 dc, inc) x 4, 4 dc (44)
R16: (9 dc, inc) x 4, 4 dc (48)
R17: (10 dc, inc) x 4, 4 dc (52)
R18: (11 dc, inc) x 4, 4 dc (56)
R19–R26: 56 dc (56)
R27: (2 dc, dec) x 14 (42)
R28: 42 dc (42)
R29: (1 dc, dec) x 14 (28)
R30: 28 dc (28)
R31: (dec) x 14 (14)
R32: 14 dc (14)
Stuff firmly.
R33: 7 dec (7)
Fasten off and sew closed.
2. Body (Tail & Flat Stopper)
Start with White.
R1: 6 dc in MR (6)
R2: (1 dc, inc) x 3 (9)
R3: (2 dc, inc) x 3 (12)
R4–R15: Increase 3 sts per round until (14 dc, inc) x 3 (48).
Change to Orange
R16–R27: 48 dc (48)
R28: (6 dc, dec) x 6 (42)
R29: (5 dc, dec) x 6 (36)
R30: (4 dc, dec) x 6 (30)
R31: (3 dc, dec) x 6 (24)
R32: (2 dc, dec) x 6 (18)
R33–R37: 18 dc (18)
Start increasing for Body section
R38: (2 dc, inc) x 6 (24)
R39: (3 dc, inc) x 6 (30)
R40: (4 dc, inc) x 6 (36)
R41–R43: 36 dc (36)
Stuff tail section. Do not fasten off.
R44 (Join): Flatten opening. Work through both layers: 18 dc across.
Body Strap (Flat Rows):
Row 1–20: Ch 1, turn, 18 dc.
Neck Taper:
Row 21: Ch 1, turn, skip 1st st, dc across, skip 2nd to last st, dc in last st.
Row 22+: Repeat Row 21 until width is approx 8 sts.
Fasten off. Sew tapered end to underside of Head.
3. Eyes (Make 2)
Using White.
R1: 6 dc in MR (6)
R2: 6 inc (12)
R3: (1 dc, inc) x 6 (18)
R4–R6: 18 dc (18)
Fasten off. Sew to Head.
4. Ears (Make 2)
Start with White.
Row 1: Ch 8. Dc in 2nd ch from hook, dc 5, 3 dc in last ch. Work down other side of ch: dc 6.
Row 2: Ch 1, turn. Dc in each st to center peak, 3 dc in peak st, dc down other side.
Row 3–4: Repeat Row 2.
Edging: Change to Orange. Dc around entire edge. Use Black for the 3 peak stitches at the top tip.
5. Legs & Paws (Make 4)
Paws (Black):
Ch 14. Skip 6 ch (loop), dc in 7th ch. Dc in next 4 chs.
(Ch 11, skip 6 ch, dc in next 5 ch) x 3. (4 toes total).
Join: Insert hook into base of last dc of each toe. Ss through all loops to join.
Dc in next 2 remaining chs from start, ss in last. Fasten off Black.
Legs (Orange):
Attach Orange to paw base.
Ch 7.
Skip 1 ch, 6 dc back down ch.
Ss to base. Leave tail for sewing.
You may also like
How To Crochet Fox Wallet for Autumn – Needle Case & Hook Holder
How to Crochet Cute Fox Plushie for Autumn (Plush Fox Doll)
Free Crochet Kawaii Long-Tail Fox Amigurumi for Fall
Free Crochet Mini Kawaii Fox Amigurumi Pattern for Fall
Love-Knitting: Free Crochet No-Sew Sitting Fox Plushie for Fall Decorations