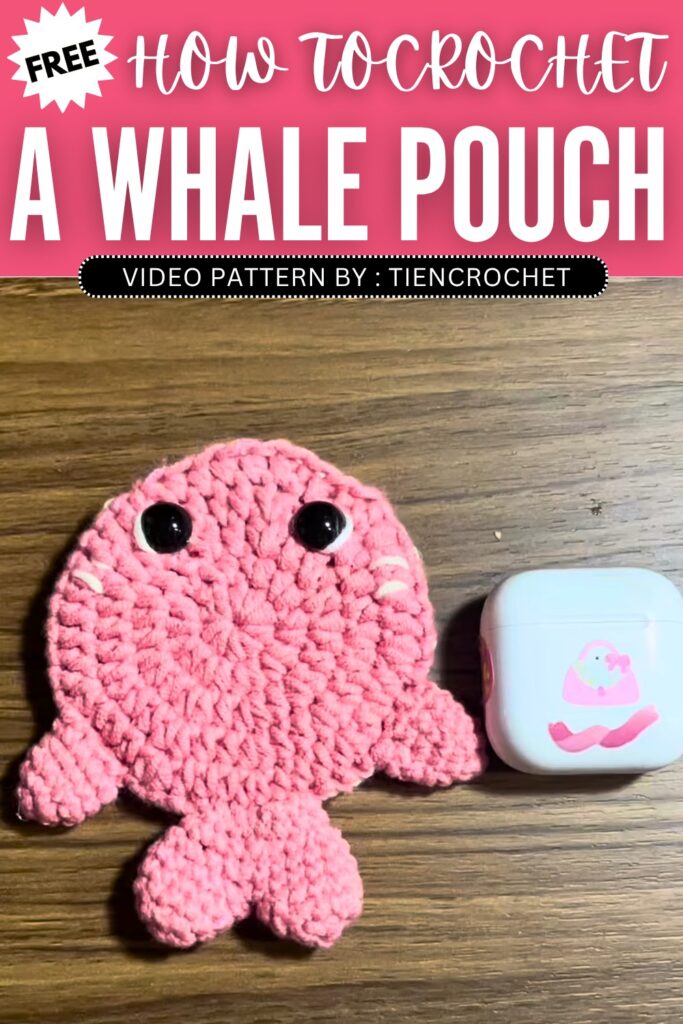
Crochet Whale Pouch & Bag Charm Pattern
This pattern shows you how to make a cute whale-shaped pouch for AirPods or other small items. It is made by crocheting simple parts like the body, tail, and fins, then joining them together. The pouch is both useful and fun, helping you keep your things safe while adding a cute handmade touch. It’s a great project to carry with you or use every day.
Step by Step Pattern
This crochet pattern is based on the tutorial for a whale-shaped pouch by Tiên Crochet, perfect for holding small items like AirPods.
Abbreviations
st(s): stitch(es)
ch: chain
sl st: slip stitch
sc: single crochet
hdc: half double crochet
inc: increase (two stitches in the same stitch)
dec: decrease (single crochet two stitches together)
Materials Needed
Yarn in desired colors (Main body color, plus a secondary color if desired for details)
Crochet hook (appropriate for your yarn weight)
Stitch marker
Tapestry needle
Scissors
Pattern Instructions
Body Panels (Make 2)
Work in rounds, closing each round with a slip stitch.
Round 1: Create a magic ring, ch 2. Work 10 hdc into the ring. Sl st to the 2nd ch to join. (10 sts)
Round 2: Ch 2. Work 2 hdc in each st around. Sl st to join. (20 sts)
Round 3: Ch 2. 1 hdc, 1 hdc inc repeat around. Sl st to join. (30 sts)
Round 4: Ch 2. 1 hdc, 1 hdc, 1 hdc inc repeat around. Sl st to join. (40 sts)
Round 5: Ch 2. 1 hdc, 1 hdc, 1 hdc, 1 hdc inc repeat around. Sl st to join. (50 sts)
Fasten off on one piece. Keep the loop active on the second piece if you prefer joining while working, or fasten off both and sew together.

Assembly (Body)
Place the two panels together with wrong sides facing.
Sew or slip stitch the edges together around the perimeter, leaving a gap at the top to serve as the pouch opening for your item.
Tail
Make two small cylinders for the tail pieces.
Round 1: Magic ring, ch 1. Work 6 sc into the ring. (6 sts)
Round 2: 2 sc in each st around. (12 sts)
Rounds 3–4: 1 sc in each st around. (12 sts)
Fasten off one piece. Keep the hook active on the second piece.

Tail Assembly & Body
Join the two cylinders to work in the round for the tail base.
Round 5: Sc around both pieces to join them (24 sts total).
Round 6: 1 sc, 1 dec repeat around. (16 sts)
Round 7: 1 sc in each st around. (16 sts)

Fasten off, leaving a long tail for sewing to the main body.
Fins (Make 2)
Round 1: Magic ring, ch 1. Work 5 sc into the ring. (5 sts)
Round 2: 2 sc in each st around. (10 sts)
Rounds 3–5: 1 sc in each st around. (10 sts)
Fasten off, leaving a long tail for sewing.
Video Pattern:
Pattern In UK Terms
Abbreviations (UK Terms)
st(s): stitch(es)
ch: chain
sl st: slip stitch
dc: double crochet (equivalent to US single crochet)
htr: half treble crochet (equivalent to US half double crochet)
inc: increase (two stitches in the same stitch)
dec: decrease (dc two stitches together)
Materials Needed
Yarn in desired colors
Crochet hook (appropriate for your yarn weight)
Stitch marker
Tapestry needle
Scissors
Pattern Instructions
Body Panels (Make 2)
Work in rounds, closing each round with a slip stitch.
Round 1: Create a magic ring, ch 2. Work 10 htr into the ring. Sl st to the 2nd ch to join. (10 sts)
Round 2: Ch 2. Work 2 htr in each st around. Sl st to join. (20 sts)
Round 3: Ch 2. 1 htr, 1 htr inc repeat around. Sl st to join. (30 sts)
Round 4: Ch 2. 1 htr, 1 htr, 1 htr inc repeat around. Sl st to join. (40 sts)
Round 5: Ch 2. 1 htr, 1 htr, 1 htr, 1 htr inc repeat around. Sl st to join. (50 sts)
Fasten off on one piece. Keep the loop active on the second piece if you prefer joining while working, or fasten off both and sew together.
Assembly (Body)
Place the two panels together with wrong sides facing.
Sew or slip stitch the edges together around the perimeter, leaving a gap at the top to serve as the pouch opening for your item.
Tail
Make two small cylinders for the tail pieces.
Round 1: Magic ring, ch 1. Work 6 dc into the ring. (6 sts)
Round 2: 2 dc in each st around. (12 sts)
Rounds 3–4: 1 dc in each st around. (12 sts)
Fasten off one piece. Keep the hook active on the second piece.

Tail Assembly & Body
Join the two cylinders to work in the round for the tail base.
Round 5: Dc around both pieces to join them (24 sts total).
Round 6: 1 dc, 1 dec repeat around. (16 sts)
Round 7: 1 dc in each st around. (16 sts)
Fasten off, leaving a long tail for sewing to the main body.
Fins (Make 2)
Round 1: Magic ring, ch 1. Work 5 dc into the ring. (5 sts)
Round 2: 2 dc in each st around. (10 sts)
Rounds 3–5: 1 dc in each st around. (10 sts)
Fasten off, leaving a long tail for sewing.
You may also like

Crochet Whale Pouch Bag Pattern For Summer

Crochet Oli: Crochet Whale Wallet & Pouch for Summer
Crochet Cat Pouch & Bag Charm Pattern Free

Crochet Tomato Pouch Bag Pattern For Summer

5 Free Crochet Pineapple Pouch & Amigurumi Patterns

Crochet Bunny Phone Pouch Bag Pattern Free

Crochet Axolotl Pouch Bag Pattern For Summer